
Internet Express for Tru64 UNIX Version 6.8 Administration Guide (14233)


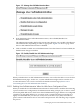
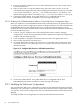

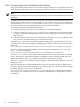
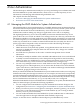

Figure 3-11 Manage User Self-Administration Menu
2. From the Manage User Self-Administration menu, choose Enable/Disable User
Self-Administration.
The Administration utility displays the current status allowing you to enable or disable user
self-administration, depending on which is appropriate. Figure 3-12 shows a page where
the User Self-Administration feature is disabled.
3. Click on Enable to enable user self-administration. Once this feature has been enabled, the
Enable button changes to Disable.
Figure 3-12 Enable/Disable User Self-Administration Page
When you disable the User Self-Administration feature, users will not be able to access the User
Self-Administration pages. In this case, a system administrator might need to reset the user
account information. You can also customize the default status message (Section 3.12.5:
Customizing the User Self-Administration Feature).
3.12.1.1 Enabling User Self-Administration When No Web Server Configuration Exists
When you enable the User Self-Administration feature for the first time or enable it after removing
a previous Web server configuration, the Administration utility prompts you to select a virtual
host for the public Web server, which serves the self-administration pages. If there is no configured
virtual host on the public Web server, you must create a virtual host before proceeding. It is
highly recommended that you select (or create) a Secure Sockets Layer (SSL) virtual host to
protect sensitive information such as user names and passwords. The following steps complete
the process:
3.12 Managing the User Self-Administration Feature 63