Multimedia User Guide
© Copyright 2008 Hewlett-Packard Development Company, L.P. Microsoft and Windows are U.S. registered trademarks of Microsoft Corporation. The information contained herein is subject to change without notice. The only warranties for HP products and services are set forth in the express warranty statements accompanying such products and services. Nothing herein should be construed as constituting an additional warranty. HP shall not be liable for technical or editorial errors or omissions contained herein.
Product notice This user guide describes features that are common to most models. Some features may not be available on your computer.
iv Product notice
Table of contents 1 Using multimedia hardware Product notice ...................................................................................................................................... 1 Using the audio features ...................................................................................................................... 1 Important audio settings ......................................................................................................
Changing DVD region settings ........................................................................................................... 23 Observing the copyright warning ........................................................................................................ 23 Index ...................................................................................................................................................................
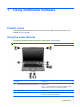
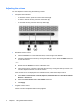
1 Using multimedia hardware Product notice This user guide describes features that are common to most models. Some features may not be available on your computer. Using the audio features The following illustration and table describe the audio features of the computer. NOTE: Your computer may look slightly different from the illustration in this section. Component Description (1) Record sound.
Component Description (4) Audio-out (headphone) jack (second jack included on select models only) Connects optional powered stereo speakers, headphones, ear buds, a headset, or television audio. (5) Volume mute button Mutes and restores computer sound. (6) Volume scroll zone Adjusts speaker volume. Slide your finger to the left to decrease volume and to the right to increase volume.
Using S/PDIF digital audio (select models only) S/PDIF (Sony/Phillips Digital Interface) or digital audio provides enhanced audio performance, including surround sound and other high-end audio output. For digital audio connections, connect the S/PDIF digital audio plug to the digital audio connector on your audio/video equipment. NOTE: In order to use S/PDIF with the headphone jack, you will need an optional mini TOS link cable and/or adapter.
Adjusting the volume You can adjust the volume using the following controls: ● ● Computer volume buttons: ◦ To decrease volume, press the volume down button (2). ◦ To mute or restore volume, press the mute button (1). ◦ To increase volume, press the volume up button (3). Windows® volume control: a. Click the Volume icon in the notification area, at the far right of the taskbar. b. Increase or decrease the volume by moving the slider up or down. Select the Mute check box to mute the volume.
Using the QuickPlay buttons Media button and DVD button (select models only) functions vary, depending on the software installed on your computer. The media button (1) and the DVD button (2) allow you to listen to music, play DVDs, and watch movies with the touch of a button. Media button—QuickPlay installed Computer power state Media button function On or off Opens a music program or the Media menu so that you can select a multimedia program. NOTE: Standby Press the power button to exit the program.
DVD button—QuickPlay installed Computer power state DVD button function On Opens the default DVD program so that you can play a DVD in the optical drive. NOTE: Press the power button to exit the program. Off Opens QuickPlay so that you can play a DVD in the optical drive. NOTE: Press the power button to exit QuickPlay. Standby Exits standby. DVD button—QuickPlay not installed Computer power state DVD button function On Opens the default DVD program so that you can play a DVD in the optical drive.
Using the video features Using the external monitor port The external monitor port connects an external display device, such as an external monitor or a projector, to the computer. ▲ To connect a display device, connect the device cable to the external monitor port. NOTE: If a properly connected external display device does not display an image, press fn+f4 to transfer the image to the device. Repeatedly pressing fn+f4 alternates the screen image between the computer display and the device.
Using the S-Video-out jack (select models only) The 7-pin S-Video-out jack connects the computer to an optional S-Video device such as a television, VCR, camcorder, overhead projector, or video capture card. To transmit video signals through the S-Video-out jack, you need an S-Video cable, available from most electronics retailers.
Using the camera Select computer models include an integrated camera, located on the top of the display. The camera can be used with a variety of software for the following functions: ● Capturing video. ● Streaming video with instant message software. ● Taking still photos. The camera light (1) turns on when video software accesses the camera (2).
Capturing and streaming video To illustrate how each camera feature works, the following examples use specific software, not available on all computers. Select Start > All Programs to locate the video software installed on your computer, and refer to the individual program's online Help for further information. Capturing video You can capture video for playback at a later time. The following example uses MovieMaker software: 1. Select Start > Programs > Windows MovieMaker. 2.
Taking still photographs with the integrated camera 1. Select Start > Control Panel > Scanners and Cameras. 2. Double-click the listing for the integrated camera, and then click Next. 3. Click Take Picture. 4. Follow the directions on the Picture wizard to select any of the following options: ● Publish the pictures to a Web site. ● Order prints of the pictures. ● Save the pictures on your computer.
● Privacy—Turns off the capture function. ● Low Light—Lowers the frame rate automatically in a poor lighting environment to maintain the brightness of the captured image. The Properties dialog box is accessible from various programs that use the integrated camera, usually from a configuration, settings, or properties menu.
Using an optical drive Depending on the type of optical drive and software installed in your computer, the optical drive plays, copies, and creates CDs or DVDs. Identifying the installed optical drive ▲ Select Start > My Computer. The type of optical drive installed in the computer is displayed under Devices with Removable Storage. Inserting an optical disc (CD or DVD) 1. Turn on the computer. 2. Press the release button (1) on the drive bezel to release the disc tray. 3. Pull out the tray (2). 4.
Removing an optical disc when running on battery or external power 1. Press the release button (1) on the drive bezel to release the media tray, and then gently pull out the tray (2) until it stops. 2. Remove the disc (3) from the tray by gently pressing down on the spindle while lifting the outer edges of the disc. Hold the disc by the edges and avoid touching the flat surfaces. NOTE: If the tray is not fully accessible, tilt the disc carefully as you remove it. 3.
Removing an optical disc when no computer power is available 1. Insert the end of a paper clip (1) into the release access in the front bezel of the drive. 2. Press in gently on the paper clip until the tray is released, and then pull out the tray (2) until it stops. 3. Remove the disc (3) from the tray by gently pressing down on the spindle while lifting the outer edges of the disc. Hold the disc by the edges and avoid touching the flat surfaces. NOTE: 4.
Using the media activity functions The media activity hotkeys and the media activity buttons (select models only) control the play of an audio CD or a DVD that is inserted into the optical drive. Using the media activity hotkeys A media activity hotkey is a combination of the fn key (1) and a function key. 16 ● When an audio CD or a DVD is not playing, press fn+f9 (2) to play the disc.
Using the media activity buttons (select models only) NOTE: The tapping sound made by the media activity buttons is enabled at the factory. You can disable the sound in the Setup Utility (f10). The following illustration and topics describe the functions of the media activity buttons.
Next/fast forward button Media status Button Function Playing Next/fast forward button Plays the next track or chapter. Playing fn + next/fast forward button Fast forwards the playback. Media status Button Function Playing Stop button Stops the playback.
2 Working with multimedia software The computer includes preinstalled multimedia software. Some computer models also include additional multimedia software on an optical disc.
Opening preinstalled multimedia software 1. Select Start > All Programs. 2. Click the program that you want to open. Installing multimedia software from a disc 20 1. Insert the disc into the optical drive. 2. When the installation wizard opens, follow the on-screen instructions. 3. Restart the computer if prompted to do so.
Using multimedia software 1. Select Start > All Programs, and then open the multimedia program you want to use. For example, if you want to use Windows Media Player to play an audio CD, click Windows Media Player. NOTE: Some programs may be located in subfolders. 2. Insert the media disc, such as an audio CD, into the optical drive. 3. Follow the instructions on the screen. – or – 1. Insert the media disc, such as an audio CD, into the optical drive. An AutoPlay dialog box opens. 2.
Preventing playback disruptions To reduce the possibility of playback disruption: ● Save your work and close all open programs before playing a CD or a DVD. ● Do not connect or disconnect hardware while playing a disc. Do not initiate standby or hibernation while playing a disc. Otherwise, you may see the warning message “Putting the computer into hibernation or standby might stop the playback. Do you want to continue?” If this message is displayed, click No. After you click No: ● Playback may resume.
Changing DVD region settings Most DVDs that contain copyrighted files also contain region codes. The region codes help protect copyrights internationally. You can play a DVD containing a region code only if the region code on the DVD matches the region setting on your DVD drive. CAUTION: The region settings on your DVD drive can be changed only 5 times. The region setting you select the fifth time becomes the permanent region setting on the DVD drive.
Index A audio features 1 audio settings 2 audio-in (microphone) jack 1 audio-out (headphone) jack 2, 3 B button Media 5 button, volume mute 4 buttons DVD 5 next/fast forward 17 play/pause 17 previous/rewind 17 stop 17 C camera capturing video 10 identifying 9 properties 11 taking still photographs 11 CD inserting 13 playing 22 protecting 19 removing, with power 14 removing, without power 15 writing to 19 copyright warning 23 D DVD changing region setting 23 inserting 13 playing 22 protecting 19 removing, w