Welcome to HP Customer Support HP PCs - Testing for Hardware Failures This document is for HP PCs. HP provides diagnostic software you can use to test hardware components on your computer and confirm hardware failures when you suspect something is wrong. Start by using the Fast Test to quickly identify hardware issues. After running the Fast Test, if no errors are found but your computer is still exhibiting symptoms of a hardware problem, run the Extensive Test.
While the test is running, the time remaining and test result for each component are shown on the screen. The test can take 2 or more hours to complete. 5. If a component fails a test, write down the failure ID (24-digit code) so you have it available when you contact HP Customer Support. The information is also available in Test Logs on the main menu. Run tests when Windows doesn't start Video of testing your HP computer hardware View this video on YouTube. Run the Fast Test (about 4 minutes) 1.
If no system component failed, run the Extensive Test. Run the Extensive Test (2 hours or more) 1. Hold the power button for at least five seconds to turn off the computer. 2. Turn on the computer and immediately press Esc repeatedly, about once every second. When the menu appears, press the F2 key. 3. On the HP PC Hardware Diagnostics (UEFI) main menu, click System Tests. 4. Click Extensive Test. 5. Click Run once, or Loop until error.
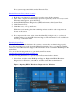
2. The app opens to the main menu. Click System Tests. Figure : Opening the System Tests menu 3. The System Tests menu opens. Figure : System Tests menu in Windows Opening the System Tests menu when Windows won't start Use the following steps to open the System Tests menu when Windows won't start. 1. Hold the power button for at least five seconds to turn off the computer.
2. Turn on the computer and immediately press Esc repeatedly, about once every second. When the menu appears, press the F2 key. 3. On the main menu, click System Tests. Figure : Selecting the System Tests from the main menu 4. The System Tests menu displays.
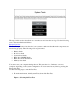
The steps in this section describe how to run the tests and view the test logs. Use the following tests to check for hardware failures. Run the Fast Test The Fast Test performs a fast check of your system to make sure that the main components are functioning properly. The following tests are performed. Battery check Processor check System board check Hard drive SMART check Hard drive short DST check Memory fast check You cannot use your computer during the test.
2. Click Run once. While the test is running, the time remaining and test result for each component are shown on the screen. The test can take up to 5 minutes. Figure : Running the Fast Test 3. If a component fails a test, write down the failure ID (24-digit code) so you have it available when you contact HP Customer Support. The information is also available in Test Logs on the main menu. If no system component failed, run the Quick Test.
Run the Quick Test The System Quick Test performs a quick check of your system to make sure that the main components are functioning properly. note: The Quick Test is not available in the Windows version of the diagnostic tests. The following tests are performed. Battery check Processor check System board check Hard drive SMART check Hard drive short DST check Memory quick check You cannot use your computer during the test.
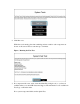
Figure : Running the Quick Test 3. If a component fails a test, write down the failure ID (24-digit code) so you have it available when you contact HP Customer Support. The information is also available in Test Logs on the main menu. If no system component failed, run the Extensive Test. Run the Extensive Test The Extensive Test checks your system to make sure that the main components are functioning properly. It provides a more comprehensive test than the Quick Test.
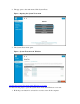
1. From the main menu, click System Tests, then click Extensive Test. Figure : Selecting the Extensive Test 2. Click Run once, or Loop until error. While the test is running, the time remaining and test result for each component are shown on the screen. The test can take 2 or more hours to complete.
3. If a component fails a test, write down the failure ID (24-digit code) so you have it available when you contact HP Customer Support. The information is also available in Test Logs on the main menu. If the System Test did not detect a hardware problem, continue with the Component Tests section. Running Component Tests The component tests are used to manually select and test the individual computer components.
3. The Component Tests menu displays. Click the plus sign next to each component to expand the selection. Your Component Tests menu might be different, depending on the components installed on your computer.
Opening the Component Tests menu when Windows won't start Use the following steps to open the Component Tests menu. 1. Hold the power button for at least five seconds to turn off the computer. 2. Turn on the computer and immediately press Esc repeatedly, about once every second. When the menu appears, press the F2 key. 3. On the main menu, click Component Tests. Figure : Selecting Component Tests from the main menu 4. The Component Tests menu displays.
Complete list of Component Tests Highlighted Component Tests - Memory, Hard Drive, AC Adapter, and Battery Tests The following sections show how to run the Memory, Hard Drive, AC Adapter, and Battery component tests. Memory Test The Memory Tests include a Fast Test, Quick Test, and an Extensive Test. If you think there is a problem with the memory, first try the Fast Test (3 to 5 minutes). If the Fast Test does not find a problem, run the Quick Test (about 10 minutes).
3. Click Run once. The Fast Test begins. 4. When the Fast Test is complete, the results are displayed on the screen. If the memory passes the Fast Test but there is still a problem with the computer memory, run the Quick Test. If the memory passes the Quick Test but there is still a problem with the computer memory, run the Extensive Test. This test can take 45 minutes or longer.
2. Click Run Once. Figure : Running the Hard Drive Quick Test 3. The Hard Drive Quick Test begins. If the computer has more than one hard drive, select the drive you want to test. To test all the hard drives, select Test All Hard Drives. When the test is complete, the results are displayed on the screen. Test results are also available in the Test Logs on the main menu. 4. If the hard drive passes the Quick Test, but there is still a problem with the hard drive, run the Extensive Test.
DST, and Long DST. To run these tests individually, select them from the Hard Drive Tests menu. If the hard drive fails one of the tests, write down the failure ID (24-digit code) so you have it available when you contact HP Customer Support. The information is also available in Test Logs on the main menu. Power Tests There are two different power tests available, the AC Adapter Test and the Battery Test.
The Battery Test begins. 3. When the battery test is complete, the results are displayed on the screen. For additional battery information, click Battery Details. If the battery fails one of the tests, write down the failure ID (24-digit code) so you have it available when you contact HP Customer Support. The information is also available in Test Logs on the main menu.
2. The InstallShield wizard opens. Click Next. Figure : Beginning the installation 3. Navigate to the folder on your computer or the flash drive where the .exe file was downloaded and double-click the .exe file. Choose where to save the files and click Next. o To run the software on your computer, download it to the computer desktop. o To run the software from a USB flash drive, download it to a USB flash drive.
Figure : Choosing the location to save the files 4. The Welcome screen displays. Click Next to install the software.
5. When the installation is complete, click Finish to close the Setup Wizard.
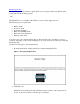
6. To open HP PC Hardware Diagnostics for Windows, select Start, select All Apps, and then select HP Help and Support. Right-click HP PC Hardware Diagnostics for Windows, select More, and then select Run as administrator. Figure : Opening HP PC Hardware Diagnostics for Windows 7. When the tool opens, select the type of diagnostic test you want to run, and then follow the on-screen instructions. note: If you need to stop a diagnostic test at any time, click Cancel.
Figure : Component Tests menu in the HP PC Diagnostics for Windows Installing the latest version of HP PC Hardware Diagnostics HP occasionally makes updates to its HP PC Hardware Diagnostics environment. To download the latest version, go to the HP Hardware Diagnostics website. You can also install the Hardware Diagnostics to a blank FAT or FAT32 formatted USB drive to use when the main storage device fails or when the UEFI files are corrupted.
The Hardware Diagnostics can be accessed from a USB drive by disabling Secure Boot. For instructions to disable Secure Boot, see Secure Boot (Windows 10) or Secure Boot (Windows 8). 1. On the HP Hardware Diagnostics website in the HP PC Hardware Diagnostics section, click Download, then select Run. The InstallShield Wizard opens. 2. Click Next. Figure : InstallShield Wizard 3. Click Next to choose where to save the files.
4. Select the language for the installation. Then click OK. Figure : Selecting the language The wizard begins to extract the files necessary to install the Hardware Diagnostics program.
5. Click Next. The Setup Wizard opens.
6. Select the installation location for the Hardware Diagnostics program, then click Next. If you are downloading onto the computer being tested, select UEFI Partition on Hard Drive. If you are installing onto a USB drive, select USB Flash Drive.
7. Click Install.
8. Click Yes to create the HP_TOOLS partition. Figure : Creating the HP_TOOLS Partition 9. Wait while the software is installed. Click Finish to close the wizard. Testing with HP PC Hardware Diagnostics from an external USB device If the HP PC Hardware Diagnostics cannot load the extended tests from the hard drive, a properly prepared USB device can be used to boot the PC into an extended testing environment.
1. Turn off the computer. 2. Insert the USB device containing the latest version of the PC Hardware Diagnostics into a USB port on the computer. 3. Turn on the computer, then press the Esc key repeatedly until the Startup menu screen is displayed. note: If you cannot start the computer from the USB storage device, temporarily disable Secure Boot from the BIOS. For instructions to disable Secure Boot, see Secure Boot (Windows 10) or Secure Boot (Windows 8). 4. Press F2 to select System Diagnostics.
The system is ready to begin testing. Testing using HP Support Assistant HP Support Assistant provides easy access to several hardware diagnostic tests. This section describes how to test for hardware problems with HP Support Assistant Diagnostics. note: HP Support Assistant can be used only if the computer boots into Windows. Opening the HP Support Assistant Diagnostics note: If your graphics do not match those in the examples below, download and install the latest version of HP Support Assistant. 1.
3. To access the HP diagnostic tools using HP Support Assistant, select the Support tab. Then select Diagnostics and tools. A test example is explained in the following section.
4. Proceed to the section for the problem you want to troubleshoot and follow the on-screen instructions. Running HP Support Assistant Diagnostic Tests To run any HP diagnostic test, select it from the Diagnostics and tools tab and follow the onscreen instructions. This section provides examples of the HP Battery Check and the HP Network Check tests.
To enter HP Basic System Diagnostics, hold the power button for at least five seconds to turn off the computer. Turn on the computer and immediately press the F2 key repeatedly, about once every second until the HP Basic System Diagnostics screen is displayed. note: If the HP PC Hardware Diagnostic UEFI screen is displayed, go to Testing using HP PC Hardware Diagnostics (UEFI).
After starting the test, there are two screens displayed: test in progress, and after the test, a pass or fail screen. HP PCs - Computer is Slow This document applies to HP desktop and HP notebook computers.
HP PCs - No Power or No Boot Troubleshooting This document applies to HP desktop and notebook computers. The computer won't turn on because it has no power, or it turns on but does not boot into Windows. Other problems might include: Nothing happens when you press the power button. Computer lights turn on, but the monitor remains blank. Computer stops at the HP or Compaq logo screen. Computer shows a black screen or a blue screen with an error message.