
Intel Unite Solution - Enterprise Deployment Guide


Intel Unite® Solution Enterprise Deployment Guide v3.1.7 13 of 83
4.3 Enterprise Server Installation
Once you have verified all the steps in the previous section (Enterprise Server Pre-Installation), continue
with the Intel Unite software installers (this process needs to be run on the server that hosts the IIS
environment).
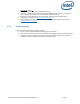
Locate the Intel Unite Server.mui.msi file and double-click to install on the target server(s).
The installation wizard provides the option to install these components: a Database, Web Service,
Client Download page, and Administration Portal.
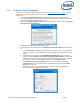
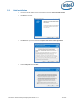
After launching Intel Unite Server.mui.msi, accept the license agreement, by checking I accept the
terms of the License Agreement box.
Click Next to continue to the Database Server window.
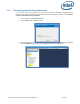
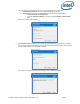
In the Database Server window, select the Database Server Connection Details. Available options
are:
In the SQL Hostname box, (local) is the default value for the SQL server. You can change it by
editing your Hostname or leave the default value (leave (local) if SQL is installed on the same
server).
The default value for the Server is Trusted (Windows Authentication), (if you are already
logged in), or select Specify Username and Password (SQL Authentication) if you have valid
credentials that have access to the database and prefer SQL authentication. If you choose the
latter, make sure you TEST the database connection by clicking Test Connection.
In the Database Connection/Setup Details section, you need to create a password for
UniteServiceUser which is used to access the new database named UniteServer. Confirm
Password in the next box.
The password must contain at least 8 characters, at least one uppercase character, one
lowercase character, one digit and one symbol.