
Intel Unite Solution - Enterprise Deployment Guide


Intel Unite® Solution Enterprise Deployment Guide v3.1.7 25 of 83
6 Client Installation
6.1 Client Pre-Installation
A Client needs to be able to locate and check in with the Enterprise Server. The Intel Unite application
needs an exemption in the client firewall to check in and communicate with the Enterprise Server.
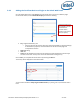
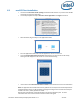
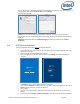
When you run the client installer, it will prompt you for server connection details and give you the option of
bypassing the manual lookup (named Specify Server in the install process) in favor of retrieving
information from the DNS Service Record. When running the installer, it will edit the ServerConfig.xml.
Depending on the method chosen for PIN lock up, you need to know if you will use the Automatically Find
Server or the Specify Server selection when executing the installation.
If you know that the DNS Service record exists, then you can select Automatically Find Server, it is
preferable to use the automatic lookup to avoid mistyping errors. If unsure, use the Specify Server option
(manual lookup), where you would need to know the hostname for the Enterprise Server.
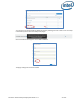
Note: If a server is defined in the ServerConfig.xml, it will take precedence over the DNS Service Record.
Mobile Client Devices: all client devices need to be connected to the corporate network or use an
appropriately configured VPN, including iOS and Android devices. When using tablets and phones –
normally used for personal use- which are not connected to the corporate network but their own carrier
provider, these may not be able to connect to an Intel Unite app session as you may have a corporate
firewall that will not allow these connections, see section Mobile Client Devices for more information.
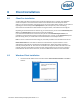
6.2 Windows Client Installation
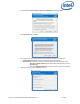
Locate the installer folder and run the Client installer: Intel Unite Client.mui.msi. Click Next to
continue.