Intel® Unite™ Solution Intel® Unite™ Plugin for Telemetry Guide Nov 2016
Legal Disclaimers & Copyrights All information provided here is subject to change without notice. Contact your Intel representative to obtain the latest Intel product specifications and roadmaps. Intel technologies’ features and benefits depend on system configuration and may require enabled hardware, software or service activation. Performance varies depending on system configuration. No computer system can be absolutely secure. Check with your system manufacturer or retailer or learn more at intel.com.
Table of Contents 1. 2. 3. Introduction ...................................................................................................................... 4 1.1 Audience ................................................................................................................ 4 1.2 Overview ................................................................................................................ 4 Plugin Installation ....................................................................
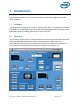
1. Introduction This document explains how to install and use the Telemetry plugin for the Intel® Unite™ Solution. 1.1 Audience This document is designed for use by IT professionals within a corporate environment responsible for installing the Intel Unite software and adding optional features to the application, such as enabling Telemetry for their business. 1.
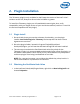
2. Plugin Installation The Telemetry plugin is only available for the Enterprise version of the Intel® Unite™ solution version 3.0, Enterprise Server build 3.0.38.44 or greater. To install the Telemetry plugin you will need Administrator rights, also, verify compatibility with your target version of your Intel Unite solution (versions 1.0 and 2.0 are not be compatible with this plugin). 2.1 Plugin Install 1.
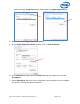
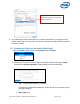
When the plugin Properties window opens, open the Digital Signatures tab. 4. Select Intel Unite Plugin and click on Details. 5. On the Digital Signatures Details window, click on View Certificate. 6. In the Certificate window, select the Details tab and scroll down until you see Thumbprint. 7. Select Thumbprint. Once the value is displayed, copy and paste it into a notepad or a text file, remove the spaces and save it. Intel® Unite™ Solution – Telemetry Plugin Guide v1.
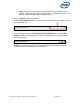
Copy and paste the value into a notepad or a text file, remove the spaces and save it. 8. This information will be used when you create the Profile for your plugin on the Admin Web Portal. The key value can also be created and entered after the profile has been created. 2.3 Creating the Profile on the Admin Web Portal 1. Go to the Admin Web Portal, under Groups, select Profiles. 2.
Value: Paste the value saved on the notepad or text file mentioned in section - Obtaining the Certificate Hash Value – (thumbprint value). This data can also be entered after creating the key. 3. Click on Create to save the profile. 4. In the Profile Details window, you will see the new Profile for the plugin and the key value entered. 5. You must also ensure the Verify Plugin Certificate Hash key in the Profile Details window is enabled (green).
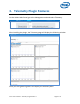
3. Telemetry Plugin Features On the Admin Web Portal, go to the Management tab and select Telemetry. After installing the plugin, the Telemetry page will display the following window. Once you start gathering data it will display the telemetry data. Intel® Unite™ Solution – Telemetry Plugin Guide v1.
On the main Telemetry window, you will be able to see data for up to 10 Hubs. When more Hubs are available, you will see an additional tab - Show Top Ten Rooms /Show Bottom Ten Rooms-, as selected by the user. See the example below. View up to 10 Hubs on the same window The available fields are: Date range to display metrics FQDNs: use this field to view one Hub at a time Reset: use when you want to reset the metrics view Intel® Unite™ Solution – Telemetry Plugin Guide v1.
Refresh: use when you want to see the latest data, the data will refresh every 5 min (no less) Show top/bottom Ten rooms: list Hubs in alphabetical order Export Raw Data: export data to a supported file *.
Appendix A. Troubleshooting If you have any issues with this plugin, see below for possible causes, but you can also consult the Hub log for additional information. Verify that Certificate hashes preventing the plugin to work are not entered in the admin portal. Ensure the Plugin Certificate Hash key value for Telemetry has been entered on the Admin Web Portal. Ensure the Plugin Certificate Hash has been enabled on the Admin Web Portal.