
Intel Unite Solution - Plugin Guide for Skype for Business


Intel Unite® Plugin Guide for Skype* for Business v2.1 9 of 25
4. Click on Test Connection to ensure the account information is configured correctly, ensure
Skype for Business is running and logged in.
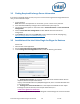
a. If you have the Skype for Business 2016 client, go to Settings >Tools>Options, in
the General tab, uncheck Show call controls when Skype for Business is in the
background.
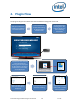
5. Launch the Intel Unite application.
6. Ensure the plugin can automatically join and leave meetings by setting up a test meeting as
follows:
Note: By default, the Skype for Business Client does not automatically join or end meetings.
a. Have a keyboard and mouse attached to the hub for this initial setup (you will not be
required to have a keyboard and mouse attached after this initial process).
b. On a client machine, schedule a Skype for Business meeting for the current
date/time and invite the email address for the hub (use the same email address you
used in the previous steps).
c. Ensure the email address for the hub that you sent the meeting invite to, accepts the
meeting.
d. On the client machine, open the Intel Unite app and connect using the PIN.
e. Click on the plugin icon and select Join. This will cause the hub to attempt to join
the meeting but there will be some popup messages. Use the mouse to select Don’t
show this again in the Join Meeting Audio screen.
7. The plugin has been installed, you can customize it if you wish.