Pointing Devices and Keyboard User Guide
© Copyright 2009 Hewlett-Packard Development Company, L.P. Microsoft and Windows are U.S. registered trademarks of Microsoft Corporation. The information contained herein is subject to change without notice. The only warranties for HP products and services are set forth in the express warranty statements accompanying such products and services. Nothing herein should be construed as constituting an additional warranty. HP shall not be liable for technical or editorial errors or omissions contained herein.
Table of contents 1 Using pointing devices Setting pointing device preferences ..................................................................................................... 1 Using the TouchPad ............................................................................................................................. 2 Connecting an external mouse ............................................................................................................. 2 2 Using the keyboard Using hotkeys .....
iv
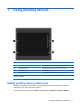
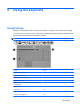
1 Using pointing devices Component Description (1) TouchPad* Moves the pointer and selects or activates items on the screen. (2) Left TouchPad button* Functions like the left button on an external mouse. (3) TouchPad scroll zone Scrolls up or down. (4) Right TouchPad button* Functions like the right button on an external mouse. *This table describes factory settings. To view or change pointing device preferences, select Start > Control Panel > Hardware and Sound > Mouse.
Using the TouchPad To move the pointer, slide your finger across the TouchPad surface in the direction you want the pointer to go. Use the TouchPad buttons like the corresponding buttons on an external mouse. To scroll up and down using the TouchPad vertical scroll zone, slide your finger up or down over the lines. NOTE: If you are using the TouchPad to move the pointer, you must lift your finger off the TouchPad before moving it to the scroll zone.
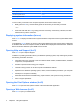
2 Using the keyboard Using hotkeys Hotkeys are combinations of the fn key (1) and either the esc key (2) or one of the function keys (3). The icons on the f1 through f9 and f11 and f12 keys represent the hotkey functions. Hotkey functions and procedures are discussed in the following sections. NOTE: Your computer may look slightly different from the illustration in this section. Function Hotkey Display system information. fn+esc Open Help and Support. fn+f1 Open the Print Options window.
Function Hotkey Mute speaker sound. fn+f9 Decrease speaker sound. fn+f11 Increase speaker sound. fn+f12 To use a hotkey command on the computer keyboard, follow either of these steps: ● Briefly press the fn key, and then briefly press the second key of the hotkey command. – or – ● Press and hold down the fn key, briefly press the second key of the hotkey command, and then release both keys at the same time.
Until you have set up your Internet or network services, the fn+f3 hotkey opens the Windows Internet Connection Wizard. After you have set up your Internet or network services and your Web browser home page, you can press fn+f3 to quickly access your home page and the Internet. Switching the screen image (fn+f4) Press fn+f4 to switch the screen image among display devices connected to the system.
NOTE: Before you can use QuickLock, you must set a Windows user password or a Windows administrator password. For instructions, refer to Help and Support. To use QuickLock, press fn+f6 to display the Log On window and lock the computer. Then follow the instructions on the screen to enter your Windows user password or your Windows administrator password and access the computer. Decreasing screen brightness (fn+f7) Press fn+f7 to decrease screen brightness.
3 Using HP QuickLook 2 HP QuickLook 2 enables you to see your Microsoft® Outlook e-mail, calendar, contact, and task information without starting the operating system. After QuickLook 2 has been configured, you can quickly access your important information when the computer is off or in Hibernation by pressing the Info Center/QuickLook button.
Configuring QuickLook 2 1. Open Microsoft® Outlook. QuickLook 2 displays two icons on the Outlook toolbar: The QuickLook 2 Preferences icon enables you to set automatic data collection preferences. The QuickLook Capture icon enables you to manually initiate QuickLook 2 information capture in addition to automatic retrieval. NOTE: For most tasks, use the QuickLook 2 Preferences icon. 2. Click the QuickLook 2 Preferences icon on the Outlook toolbar. The QuickLook 2 Preferences dialog box opens. 3. 4.
Using manual information collection Even if you have configured QuickLook 2 to collect information at preset intervals, you can also manually collect and save Outlook information any time you are using the Outlook program.
Using QuickLook 2 The behavior of the Info Center/QuickLook button depends on the power state of the computer, as shown in the following table. Power state Info Center/QuickLook button behavior Off Opens QuickLook. Hibernation Opens QuickLook. On Opens Info Center. Sleep No function. NOTE: QuickLook 2 is enabled at the factory. If you disable QuickLook 2 in the system BIOS, pressing the Info Center/QuickLook button opens Info Center when the computer is on.
For more information For more details about setting up and using QuickLook 2, refer to the QuickLook 2 software Help.
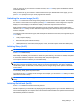
4 Using keypads NOTE: Refer to the illustration that most closely matches your computer. The computer depicted in the illustration and described in the following table has an embedded numeric keypad and also supports an optional external numeric keypad or an optional external keyboard that includes a numeric keypad. Component Description (1) fn key Executes frequently used system functions when pressed in combination with a function key or the esc key.
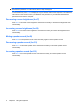
(1) Component Description num lk key Alternates between the navigation and numeric functions on the integrated numeric keypad. NOTE: The keypad function that is active when the computer is turned off will be reinstated when the computer is turned back on. (2) Integrated numeric keypad Can be used like the keys on an external numeric keypad. Using the embedded numeric keypad The 15 keys of the embedded numeric keypad can be used like the keys on an external keypad.
Switching key functions on the embedded numeric keypad You can temporarily alternate the functions of keys on the embedded numeric keypad between their standard keyboard functions and their keypad functions by using the fn key or the fn+shift key combination. ● To change the function of a keypad key to keypad functions while the keypad is off, press and hold the fn key while pressing the keypad key.
5 Cleaning the TouchPad and keyboard Dirt and grease on the TouchPad can cause the pointer to jump around on the screen. To avoid this, clean the TouchPad with a damp cloth, and wash your hands frequently when using the computer. WARNING! To reduce the risk of electric shock or damage to internal components, do not use a vacuum cleaner attachment to clean the keyboard. A vacuum cleaner can deposit household debris on the keyboard surface.
Index B buttons TouchPad 1 D display image, switching 5 screen brightness hotkeys 6 F fn key 3 fn key, identifying 12 function keys 3 H HDMI 5 Help and Support hotkey 4 hotkeys decreasing screen brightness 6 decreasing speaker sound 6 description 3 displaying system information 4 increasing screen brightness 6 increasing speaker volume 6 initiating QuickLock 5 initiating Sleep 5 muting speaker sound 6 opening Help and Support 4 opening Print Options window 4 opening Web browser 4 switching screen image 5