
HP DesignJet T1700 Printer Series - User Guide

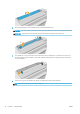
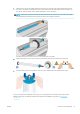
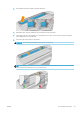
Table Of Contents
- Introduction
- Welcome to your printer
- Printer models
- Safety precautions
- Main components
- Turn the printer on and off
- Front panel
- HP Utility
- HP Print Preview
- Embedded Web Server
- Demo prints
- Configure your printer
- Connect the printer to your network
- Install your printer under Windows
- Uninstall the printer software under Windows
- Install your printer under Mac OS X
- Uninstall the printer software under Mac OS X
- Set up printer services
- Control access to the printer
- Require account ID
- Drivers
- Set Windows driver preferences
- Change the graphic language setting
- Mobile printing
- Accessibility
- Other sources of information
- Paper handling
- General advice
- Load a roll onto the spindle
- Load a roll into the printer
- Unload a roll
- Load a single sheet
- Unload a single sheet
- Sensitive-paper mode (T1700dr only)
- View information about the paper
- Paper presets
- Printing paper info
- Move the paper
- Maintain paper
- Change the drying time
- Turn the automatic cutter on and off
- Feed and cut the paper
- Working with two rolls (T1700dr only)
- Networking
- Printing
- Introduction
- Print from a USB flash drive
- Print from a computer using a printer driver
- Advanced print settings
- Select print quality
- Select paper size
- Select margin options
- Print on loaded paper
- Rescale a print
- Change the treatment of overlapping lines
- Preview a print
- Print a draft
- High-quality printing
- Print in gray shades
- Print with crop lines
- Use paper economically
- Nest jobs to save roll paper
- Use ink economically
- Protect a paper type
- Unattended printing/overnight printing
- Mobile printing
- Job queue management
- Color management
- Practical printing examples
- Retrieving printer usage information
- Handling ink cartridges and printheads
- Maintaining the printer
- Accessories
- Troubleshooting paper issues
- Paper cannot be loaded successfully
- Paper type is not in the driver
- Printer printed on the wrong paper type
- Automatic cut not available
- On hold for paper
- Which criteria are used to decide on which roll a job will be printed?
- When is a job put on hold for paper?
- If I load a new roll of paper, will jobs that were on hold for paper be automatically printed?
- I don’t like jobs being put on hold for paper. Can I prevent it?
- My job is exactly as wide as the roll of paper that is loaded on the printer, but is put on hold for ...
- Roll paper will not advance
- Paper has jammed
- A strip stays on the output tray and generates jams
- Printer displays out of paper when paper is available
- Prints do not fall neatly into the basket
- Sheet stays in the printer when the print has been completed
- Paper is cut when the print has been completed
- Cutter does not cut well
- Roll is loose on the spindle
- Recalibrate the paper advance
- Troubleshooting print-quality issues
- General advice
- Horizontal lines across the image (banding)
- Whole image is blurry or grainy
- Paper is not flat
- Print is scuffed or scratched
- Ink marks on the paper
- Black horizontal lines on yellow background
- Black ink comes off when you touch the print
- Edges of objects are stepped or not sharp
- Edges of objects are darker than expected
- Horizontal lines at the end of a cut sheet print
- Vertical lines of different colors
- White spots on the print
- Colors are inaccurate
- Colors are fading
- Image is incomplete (clipped at the bottom)
- Image is clipped
- Some objects are missing from the printed image
- Lines are too thick, too thin or missing
- Lines appear stepped or jagged
- Lines print double or in the wrong colors
- Lines are discontinuous
- Lines are blurred
- Line lengths are inaccurate
- Image Diagnostics Print
- If you still have a problem
- Troubleshooting ink cartridge and printhead issues
- Troubleshooting general printer issues
- Front-panel error messages
- HP Customer Care
- Printer specifications
- Glossary
- Index
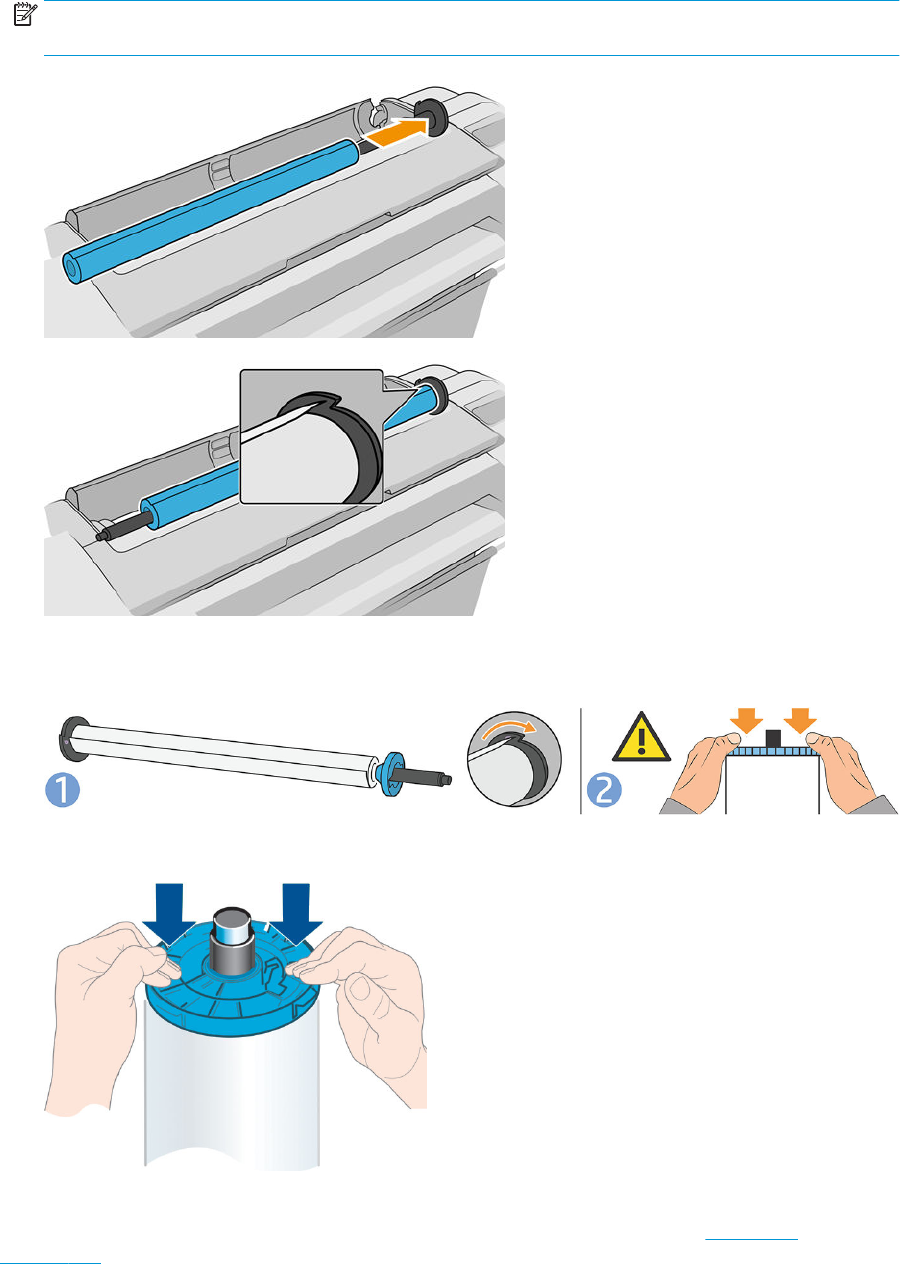
5. Slide the new roll onto the spindle. Make sure the paper type is oriented as shown (the black stop shows
the correct orientation of the paper). If it is not, remove the roll, turn it 180 degrees and slide it back on to
the spindle. There are labels on the spindle showing the correct orientation.
NOTE: The illustrations show the printer as viewed from the front. However, if you load the paper while
standing behind the printer, the blue stopper is inserted into the right-side holder.
Ensure that the end of the roll is as close to the spindle stop as possible.
6. Put the blue paper stop on to the open end of the spindle, and push it towards the end of the roll.
7. Ensure the blue paper stop is pushed in as far as it goes; until both ends are against the stoppers.
If you are a regular user of dierent paper types, you can change rolls more quickly if you preload rolls of
dierent paper types on dierent spindles. Extra spindles are available for purchase, see Accessories
on page 124.
ENWW Load a roll onto the spindle 27