
HP DesignJet T1700 Printer Series - User Guide


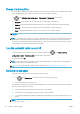


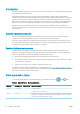
Table Of Contents
- Introduction
- Welcome to your printer
- Printer models
- Safety precautions
- Main components
- Turn the printer on and off
- Front panel
- HP Utility
- HP Print Preview
- Embedded Web Server
- Demo prints
- Configure your printer
- Connect the printer to your network
- Install your printer under Windows
- Uninstall the printer software under Windows
- Install your printer under Mac OS X
- Uninstall the printer software under Mac OS X
- Set up printer services
- Control access to the printer
- Require account ID
- Drivers
- Set Windows driver preferences
- Change the graphic language setting
- Mobile printing
- Accessibility
- Other sources of information
- Paper handling
- General advice
- Load a roll onto the spindle
- Load a roll into the printer
- Unload a roll
- Load a single sheet
- Unload a single sheet
- Sensitive-paper mode (T1700dr only)
- View information about the paper
- Paper presets
- Printing paper info
- Move the paper
- Maintain paper
- Change the drying time
- Turn the automatic cutter on and off
- Feed and cut the paper
- Working with two rolls (T1700dr only)
- Networking
- Printing
- Introduction
- Print from a USB flash drive
- Print from a computer using a printer driver
- Advanced print settings
- Select print quality
- Select paper size
- Select margin options
- Print on loaded paper
- Rescale a print
- Change the treatment of overlapping lines
- Preview a print
- Print a draft
- High-quality printing
- Print in gray shades
- Print with crop lines
- Use paper economically
- Nest jobs to save roll paper
- Use ink economically
- Protect a paper type
- Unattended printing/overnight printing
- Mobile printing
- Job queue management
- Color management
- Practical printing examples
- Retrieving printer usage information
- Handling ink cartridges and printheads
- Maintaining the printer
- Accessories
- Troubleshooting paper issues
- Paper cannot be loaded successfully
- Paper type is not in the driver
- Printer printed on the wrong paper type
- Automatic cut not available
- On hold for paper
- Which criteria are used to decide on which roll a job will be printed?
- When is a job put on hold for paper?
- If I load a new roll of paper, will jobs that were on hold for paper be automatically printed?
- I don’t like jobs being put on hold for paper. Can I prevent it?
- My job is exactly as wide as the roll of paper that is loaded on the printer, but is put on hold for ...
- Roll paper will not advance
- Paper has jammed
- A strip stays on the output tray and generates jams
- Printer displays out of paper when paper is available
- Prints do not fall neatly into the basket
- Sheet stays in the printer when the print has been completed
- Paper is cut when the print has been completed
- Cutter does not cut well
- Roll is loose on the spindle
- Recalibrate the paper advance
- Troubleshooting print-quality issues
- General advice
- Horizontal lines across the image (banding)
- Whole image is blurry or grainy
- Paper is not flat
- Print is scuffed or scratched
- Ink marks on the paper
- Black horizontal lines on yellow background
- Black ink comes off when you touch the print
- Edges of objects are stepped or not sharp
- Edges of objects are darker than expected
- Horizontal lines at the end of a cut sheet print
- Vertical lines of different colors
- White spots on the print
- Colors are inaccurate
- Colors are fading
- Image is incomplete (clipped at the bottom)
- Image is clipped
- Some objects are missing from the printed image
- Lines are too thick, too thin or missing
- Lines appear stepped or jagged
- Lines print double or in the wrong colors
- Lines are discontinuous
- Lines are blurred
- Line lengths are inaccurate
- Image Diagnostics Print
- If you still have a problem
- Troubleshooting ink cartridge and printhead issues
- Troubleshooting general printer issues
- Front-panel error messages
- HP Customer Care
- Printer specifications
- Glossary
- Index

Introduction
The printer provides a single RJ-45 connector port for a network connection. In order to meet Class B limits, the
use of shielded I/O cables is required.
The embedded Jetdirect print server supports connection to IEEE 802.3 10Base-T Ethernet, IEEE 802.3u
100Base-TX Fast Ethernet and 802.3ab 1000Base-T Gigabit Ethernet compliant networks. When connected and
powered on, the printer auto-negotiates with your network to operate with a link speed of 10, 100, or 1000
Mbps, and to communicate using full- or half-duplex mode. However, you can manually congure the link using
the printer's front panel, or through other conguration tools once network communication is established.
The printer can support multiple network protocols simultaneously, including TCP/IPv4 and TCP/IPv6. For
security, it includes features to control IP traic to and from the printer and supports conguration of IP Security
(IPsec) protocols.
Control network protocols
The printer can simultaneously support multiple network communication protocols. This allows network
computers that may be using dierent protocols to communicate with the same printer.
Each protocol may require some conguration before the printer can communicate on the network. For some
protocols, required parameters are automatically sensed and user-specied settings are not needed. However,
for other protocols, there may be many parameters to congure.
Enable or disable network protocols
If a network protocol is enabled, the printer may actively transmit on the network even when there are no
computers on the network that use the protocol. This may increase network traic. To eliminate unnecessary
traic, you can disable unused protocols. Disabling unused protocols lets you:
● Reduce network traic by eliminating broadcast messages from unused protocols
● Provide better control over who prints to the printer by eliminating users from other networks who might
route print jobs to this printer
● Display protocol-specic error conditions for enabled protocols only
To disable unused protocols through the device’s control panel menu, see Front-panel menu items on page 42.
For other tools, such as system command access to the embedded Telnet server, see the HP Jetdirect Print Server
Administrator’s Guide for your print server model.
Front-panel menu items
To access the printer network conguration settings, go to the front panel and tap , then , then
Network > Gigabit Ethernet > Modify Conguration.
Menu item
Sub-menu item Sub-menu item Values and description
Information Print Sec Report Yes: Prints a report.
No (default): Does not print a report.
TCP/IP Host Name An alphanumeric string, up to 32 characters, used to identify the device. This name is listed on
the HP Jetdirect conguration page. The default host name is NPIxxxxxx, where xxxxxx is the
last six digits of the LAN hardware (MAC) address.
42 Chapter 4 Networking ENWW