Introduction Congratulations on your purchase of an HP mouse. This mouse is the latest in a wide range of computer peripherals manufactured by HP. It is designed to provide you with the highest level of comfort available, while also allowing for maximum functionality.
Welcome Welcome to the HP Mouse Control Center Help. This guide describes the functions of the mouse and explains how to configure them using the HP Mouse Control Center software. Introduction Safety Guidelines Installing and Uninstalling the HP Mouse Control Center Navigating the HP Mouse Control Center Configuring Your HP Mouse Troubleshooting Batteries http://www.hp.com © Copyright 2011 HP Corporation. All Rights Reserved.
Installing and Uninstalling the HP Mouse Control Center This section explains how to install and uninstall the HP Mouse Control Center software.
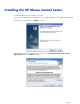
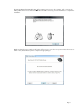
Installing the HP Mouse Control Center To install the HP Mouse Control Center on your PC: Insert the supplied HP Mouse Control Center CD in your CD or DVD drive. The Installation Wizard loads. The Welcome screen appears. Click Next to continue. Read the End User License Agreement. If you accept, choose I accept the terms in the license agreement, and then click Next to continue.
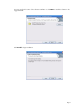
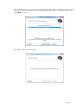
You may specify the location of the software installation or click Next to install the software in the suggested folder. Click Install to begin installation.
Installation begins. After installation is complete, a confirmation dialog appears. Click Finish.
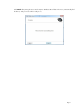
The Pairing Wizard automatically starts. Before pairing your mouse to the computer, pull or remove the battery tab from the mouse and select OK. Once the tab is removed, you have 10 minutes to complete the installation. Make sure that the power switch on the bottom of the mouse is set to the "on" position. Move the mouse to within 1 foot (30 centimeters) of the computer to begin pairing it.
If the computer finds only one mouse, it automatically begins pairing with it. If it finds more than one mouse, select the correct mouse using the "Mouse ID" (which is printed on a label on the bottom of the mouse). Select Next to continue The computer pairs itself with the mouse.
Click Finish after pairing the mouse and computer. Windows 7® will detect the mouse, automatically find the drivers, and your mouse will be ready to use.
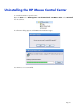
Uninstalling the HP Mouse Control Center To uninstall the HP Mouse Control Center: Open the Start menu > All Programs > Hewlett Packard > HP Mouse Suite. Select Uninstall from the submenu. A confirmation dialog appears. Click Yes and uninstallation begins. Your HP mouse is now uninstalled.
Navigating the HP Mouse Control Center The HP Mouse Control Center interface is simple and straightforward, making it easy for you to find information and customize each function of your mouse. Click the Discover icon to access the User Guide, Online Support, Product Registration and the HP Home and Home Office Store. Click the Configure icon to access the Mouse Settings. Click the Enjoy icon to find offers from HP.
Configuring Your HP Mouse Different mouse settings are indicated by the tabs on the top of the screen. Click a tab to enter the settings screen. When you change a setting, you may click Apply to save the changes, OK to save the changes and exit the program, or Cancel to exit without saving. To launch the Pairing Wizard, select Pairing Wizard.
Buttons You can configure each of the mouse buttons on the Buttons tab. The Select Button list displays the list of buttons available. When available, radio buttons will display a list of actions you can use to configure the button highlighted in the Select Button list. Click a button name from the Select Button list to view the functions that can be assigned to that button. Restore Default Settings Click the button to restore the buttons to the original default settings.
The Left and Right Buttons By default, the left mouse button is set to perform the left-click function. The right mouse button is set to perform the right-click function. If you want to swap these two button functions, check the Swap Buttons check box. Click to save all changes.
Backward Press the Backward button to display in your browser the last page you visited. Click to save all changes. Forward Press the Forward button to display in your browser the page you visited before you pressed the Backward button. Click to save all changes. Other Select Other to set a button to execute one of a set of other predefined functions when you press that button. A drop-down menu appears. Select an application from the list. Click to save all changes.
Wheel Button By default, the mouse wheel is set to operate as the middle mouse button when pressed. Select the function you want to assign to the middle mouse button. Click to save all changes.
Left Side Button The HP mouse has a button on the left side of the mouse. By default, the button is set to operate as Backward when pressed. Press the Backward button to display in your browser the last page you visited. This button can be programmed to another function. Select the function you want to assign to the button from the list. Click to save all changes.
Right Side Button The HP mouse has a button on the right side of the mouse. By default, the button is set to operate as Forward when pressed. Press the Forward button to display in your browser the page you visited before you pressed the Backward button. This button can be programmed to another function. Select the function you want to assign to the button from the list. Click to save all changes.
Wheel You can configure the mouse wheel settings on the Wheel tab. The Scrolling Speed section allows you to adjust how fast the window scrolls when you scroll the wheel vertically. The Horizontal Scrolling section allows you to adjust how fast the window scrolls when you tilt the wheel to the left or right.
Scrolling Speed Select the scrolling speed you want by using the Scrolling Speed options: Scroll: Select this option and use the drop-down list to select the speed. Scroll one screen per notch: Select this option to scroll up or down a whole screen each time you move the mouse wheel up or down one notch. Click to save all changes.
Horizontal Scrolling Move the slider to the left or right to decrease or increase the horizontal scrolling speed. Click to save all changes.
Mouse You can configure the mouse settings in the Mouse tab. The Pointer Speed section allows you to control how fast the pointer moves across the screen. The Mouse Resolution section shows you how to adjust the resolution of the mouse. The Batteries Status indicator shows the current battery level of the mouse.
Mouse Resolution What does resolution or sensitivity mean when applied to mouse settings? Resolution is a term that refers to a computer’s screen or display, indicating the number of pixels on the horizontal axis and the vertical axis. The higher the resolution, the more detail is displayed. For a mouse, resolution indicates the number of dots on the screen that the cursor moves for every inch that you move the mouse. For this reason, mouse resolution is typically listed as dots per inch (dpi).
Wi-Fi Pairing The HP Wi-Fi Mobile Mouse and your computer communicate using 802.11 wireless technology, no separate USB receiver is necessary. You must pair (connect) the mouse with your PC to enable the communication. Before pairing your mouse to your PC, make sure that your PC’s Wi-Fi is turned on. Many notebook computers have a switch or button that turns the Wi-Fi function off/on. To pair (connect) the mouse with your PC for the first time: 1. Install the software included with your mouse.
About Click Turn Off Tray Icon to remove the HP Mouse Control Center software icon from the system tray. Click the Select Language drop-down list to display a list of available languages.
Batteries Battery status is shown in a system tray icon or on the Mouse tab of the HP Mouse Control Center. Full power is indicated by a green battery icon in the system tray a black battery icon . Low battery power is indicated by . When the battery status indicates a low battery level, replace the batteries in order to continue to use the mouse. NOTE: Only high-capacity alkaline batteries are recommended for use with this product.
Replacing the Batteries To replace the batteries in your mouse: 1. Locate the open latch on the bottom of the mouse and move the latch to the open position. 2. Turn the mouse over and lift the cover off. 3. Place new batteries in the compartment as shown in the illustration. 4. Close the cover by placing the tab into its slot. 5. Press the cover down until it clicks into place. 6. Turn the mouse over and move the latch to the closed position (you may need to use a pen to do this).
Mouse Sensor Technology The HP mouse uses either optical or laser sensor technology. An optical mouse uses an LED light to track movement. A laser mouse is typically much more sensitive than an optical mouse. Also, a laser mouse works on surfaces on which an optical mouse performs poorly, such as black or shiny surfaces.
Troubleshooting Question: During the software installation process, I am receiving an error message that my operating system is not supported. Answer: Your PC must be running the Windows 7 operating system in order to communicate with the HP Wi-Fi Mobile Mouse. Additionally, your PC's Wi-Fi adapter must be Windows 7 certified. Question: My mouse is not detected by the pairing wizard. Answer: Before pairing your mouse to your PC, make sure that your PC's Wi-Fi is turned on.
Question: The mouse pointer is not moving. What should I do? Answer: Ensure that all setup procedures have been followed correctly. If the software has already been installed, uninstall it, reboot your computer, and then re-install. Clean the mouse lens with a cotton swab. Do not use any other materials or solvents to clean the mouse lens as this may result in damage to the lens. Because this is an optical device, it is important to use it on an appropriate surface.
Safety Guidelines Physical discomfort and injury can result from incorrect use of your mouse. Follow these guidelines to ensure that such problems are avoided: Sit up straight in your chair, with your elbows by your sides. Adjust the height of your chair so your arms bend at a 90-degree angle respective to your desk. Position your mouse in front of you, to the side of your keyboard. Do not slouch or hunch over your workspace. It is important to keep your wrists, arms and shoulders relaxed.