
HP Notebook Reference Guide - Windows 7 and Windows Vista
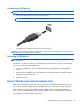
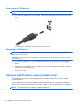
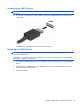
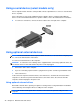
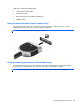
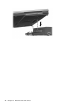
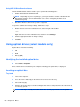
Table Of Contents
- Introduction
- Networking (select models only)
- Multimedia
- Power management
- Shutting down the computer
- Setting power options
- Using Power Assistant (select models only)
- Using battery power
- Finding additional battery information
- Using Battery Check
- Displaying the remaining battery charge
- Maximizing battery discharge time
- Managing low battery levels
- Conserving battery power
- Storing a battery
- Disposing of a used battery
- Replacing the battery
- Using external AC power
- Switching between graphics modes (select models only)
- External cards and devices
- Using Media Card Reader cards (select models only)
- Using PC Cards (select models only)
- Using ExpressCards (select models only)
- Using smart cards (select models only)
- Using a USB device
- Using 1394 devices (select models only)
- Using an eSATA device (select models only)
- Using a serial device (select models only)
- Using optional external devices
- Drives
- Security
- Protecting the computer
- Using passwords
- Using antivirus software
- Using firewall software
- Installing critical security updates
- Using HP ProtectTools Security Manager (select models only)
- Installing an optional security cable
- Using the fingerprint reader (select models only)
- Maintenance
- Computer Setup (BIOS) and System Diagnostics
- MultiBoot
- Management
- Traveling with the computer
- Troubleshooting resources
- Electrostatic Discharge
- Index
Connecting an eSATA device
CAUTION: To reduce the risk of damage to an eSATA port connector, use minimal force to connect
the device.
▲ To connect an eSATA device to the computer, connect the eSATA cable for the device to the
eSATA port.
You will hear a sound when the device has been detected.
Removing an eSATA device
CAUTION: To reduce the risk of damage to an eSATA connector, do not pull on the cable to
remove the eSATA device.
CAUTION: To reduce the risk of loss of information or an unresponsive system, use the following
procedure to safely remove the device.
1. To remove an eSATA device, save your information and close all programs associated with the
device.
2. Click the remove hardware icon in the notification area, at the far right of the taskbar, and then
follow the on-screen instructions.
3. Remove the device.
Using an eSATA device (select models only) 43