
HP ProBook Notebook PC User Guide - Windows XP
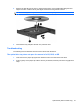
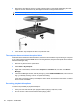
Table Of Contents
- Features
- Wireless, modem, and local area network
- Pointing devices and keyboard
- Using pointing devices
- Using the keyboard
- Using hotkeys
- Displaying system information
- Initiating Sleep
- Decreasing screen brightness
- Increasing screen brightness
- Switching the screen image
- Opening the default e-mail application
- Opening the default Web browser
- Muting speaker sound
- Decreasing speaker sound
- Increasing speaker sound
- Playing the previous track or section of an audio CD or a DVD
- Playing, pausing, or resuming an audio CD or a DVD
- Playing the next track or section of an audio CD or a DVD
- Using hotkeys
- Using QuickLook
- Using QuickWeb
- Using the embedded numeric keypad
- Using an optional external numeric keypad
- Cleaning the TouchPad and keyboard
- Multimedia
- Multimedia features
- Multimedia software
- Audio
- Video
- Optical drive (select models only)
- Identifying the installed optical drive
- Using optical discs (CDs, DVDs, and BDs)
- Selecting the right disc (CDs, DVDs, and BDs)
- Playing a CD, DVD, or BD
- Configuring AutoPlay
- Changing DVD region settings
- Observing the copyright warning
- Copying a CD or DVD
- Creating (burning) a CD, DVD, or BD
- Removing an optical disc (CD, DVD, or BD)
- Troubleshooting
- The optical disc tray does not open for removal of a CD, DVD, or BD
- The computer does not detect the optical drive
- Preventing playback disruptions
- A disc does not play
- A disc does not play automatically
- A movie stops, skips, or plays erratically
- A movie is not visible on an external display
- The process of burning a disc does not begin, or it stops before completion
- A device driver must be reinstalled
- Webcam
- Power management
- Setting power options
- Using external AC power
- Using battery power
- Finding battery information in Help and Support
- Using Battery Check
- Displaying the remaining battery charge
- Inserting or removing the battery
- Charging a battery
- Maximizing battery discharge time
- Managing low battery levels
- Calibrating a battery
- Conserving battery power
- Storing a battery
- Disposing of a used battery
- Replacing the battery
- Testing an AC adapter
- Shutting down the computer
- Drives
- External devices
- External media cards
- Memory modules
- Security
- Protecting the computer
- Using passwords
- Using Computer Setup security features
- Using antivirus software
- Using firewall software
- Installing critical updates
- Using HP ProtectTools Security Manager (select models only)
- Installing a security cable
- Software updates
- Backup and recovery
- Computer Setup
- MultiBoot
- Management and printing
- Index

Webcam
NOTE: This section describes features that are common to most models. Some features may not be
available on your computer.
Your computer includes an integrated webcam, located at the top of the display. With the preinstalled
software, you can use the webcam to take a photo, record a video, or make an audio recording. You
can preview the photo, video recording, or audio recording, and save it on your computer hard drive.
To access the webcam and software, select Start > All Programs > ArcSoft TotalMedia Suite >
WebCam Companion.
The webcam software enables you to experiment with the following features:
●
Video—Record and play back webcam video.
●
Audio—Record and play back audio.
●
Streaming video—Use with instant message software solutions that support UVC (Universal Video
Class) cameras.
●
Snapshots—Take still photos.
●
HP Business Card Reader (select models only)—Use to transform business cards into a usable
database of contact information.
Webcam tips
For optimum performance, observe the following guidelines while using the webcam:
●
Be sure that you have the latest version of an instant message program before starting a video
conversation.
●
The webcam may not work properly across some network firewalls.
NOTE: If you are having trouble viewing or sending multimedia files to someone on another LAN
or outside your network firewall, temporarily disable the firewall, perform the task you want to
perform, and then reenable the firewall. To permanently resolve the problem, reconfigure the
firewall as necessary, and adjust the policies and settings of other intrusion detection systems. For
additional information, contact your network administrator or IT department.
●
Whenever possible, place bright light sources behind the webcam and out of the picture area.
NOTE: For details about using your webcam, click the Help menu in the webcam software Help.
Adjusting webcam properties
You can adjust webcam properties using the Properties dialog box, which is accessible from various
programs that use the integrated webcam, usually from a configuration, settings, or properties menu:
●
Brightness—Controls the amount of light that is incorporated into the image. A higher brightness
setting creates a brighter image; a lower brightness setting creates a darker image.
●
Contrast—Controls the difference between lighter and darker areas on the image. A higher
contrast setting intensifies the image; a lower contrast setting maintains more of the original
information’s dynamic range, but leads to a flatter image.
66 Chapter 4 Multimedia