
Preparing Advanced Format hard drives for Microsoft Windows installations on HP Business Notebook PCs and desktop PCs - White Paper


8
This issue has been addressed in Microsoft Knowledge Base article 982018. The typical user should
apply the associated hotfix as needed; IT professionals can follow the procedure described below.
Important
The following procedure is intended for the IT professional.
Perform the following steps apply the hotfix:
1. Download the Windows PE hotfix to your c: drive from the Microsoft Support site at
http://support.microsoft.com/hotfix/KBHotfix.aspx?kbnum=982018&kbln=en-us.
2. Unzip the download file by double-clicking on it.
3. The Windows6.1-KB982018-x86.MSU file should appear in your c: drive. Expand this file:
a. Launch the command prompt with Administrator rights.
b. At the prompt, enter the following:
expand.exe c:\Windows6.1-KB982018-x86.MSU –f:*.* c:\
4. Select StartAll ProgramsWindows OPK or Windows AIK.
5. Right-click Deployment Tools Command Prompt and then select Run as administrator.
6. At the prompt, expand the Windows PE image by mounting boot.wim to be updated into a
location by entering the following:
imagex.exe /mountrw c:\winpe_x86\ISO\sources\boot.wim 1
c:\winpe_x86\mount
7. Create a scratch directory:
mkdir c:\winpe_x86\sandbox
8. Apply the hotfix to your boot.wim image:
Dism.exe /image=c:\winpe_x86\mount /ScratchDir=c:\winpe_x86\sandbox
/Apply-Unattend=c:\Windows6.1-KB982018-x86.xml
9. Commit the Windows PE image by un-mounting boot.wim to be updated into a location by
entering the following:
imagex.exe /unmount /commit c:\winpe_x86\mount
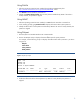
Validating partition alignment
This section outlines the following options for validating partition alignment:
Using Microsoft DiskExt (for Windows XP or later platforms)
Using the Windows Management Information Command-line (WMIC) utility (for Windows XP or
later platforms)
Using Diskpart (for Windows 7 platforms)
Sample calculations are also provided.