HP LaserJet Enterprise, HP LaserJet Managed, HP PageWide Enterprise, HP PageWide Managed - Configuration Guide using the Embedded Web Server (EWS) SUMMARY Learn how to configure and manage printers using the HP Embedded Web Server (EWS). This guide is intended for network administrators. The information is specific to the EWS for Enterprise and Managed printers/MFPs running HP FutureSmart firmware.
Copyright and License Trademark Credits © Copyright 2019 HP Development Company, L.P. Adobe®, Acrobat®, and PostScript® are trademarks of Adobe Systems Incorporated. Reproduction, adaptation, or translation without prior written permission is prohibited, except as allowed under the copyright laws. AirPrint is a trademark of Apple Inc., registered in the U.S. and other countries. The information contained herein is subject to change without notice.
Table of contents 1 Overview of the HP Embedded Web Server (EWS) .............................................................................................................................. 1 Introduction ............................................................................................................................................................................... 1 Before you begin .............................................................................................................
Configure the EWS display language .................................................................................................................................. 23 Customize the information shown on the Device Information page ............................................................................. 24 Customize the ordering information shown on the Supplies page ............................................................................... 24 Add links to the bottom of an EWS screen .............
Install certificates for whitelisting remote apps on the printer .................................................................. 69 Restrict email domains ......................................................................................................................................................... 69 Specify websites able to access a printer ..........................................................................................................................
7 Manage printers ................................................................................................................................................................................... 259 Manage security ................................................................................................................................................................... 260 Use the Self Test page .......................................................................................................
1 Overview of the HP Embedded Web Server (EWS) The HP Embedded Web Server (EWS) resides on a printer in the firmware instead of as software that is installed on a network server. The EWS provides an interface to the printer that anyone who has a network-connected computer and a standard Web browser can open and use. No additional software or drivers are required. Use the EWS to view the printer status and manage the printing functions from a computer instead of from the printer control panel.
● View and change tray configurations ● View and change the printer control-panel menu configuration ● View and print internal pages ● Receive notification of printer and supplies events ● View and change network configuration The HP Embedded Web Server works when the printer is connected to an IP-based network. The HP Embedded Web Server does not support IPX-based printer connections. Internet access is not needed to open and use the HP Embedded Web Server.
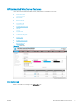
HP Embedded Web Server features Learn about the HP Embedded Web Server (EWS) features available on each tab. ● Information tab ● General tab ● Other Links list ● Copy/Print tab ● Scan/Digital Send tab ● Fax tab ● Supplies tab ● Troubleshooting tab ● Security tab ● HP Web Services tab ● Networking tab Figure 1-1 EWS Tabs Information tab Refer to the table for settings in the Information tab.
Table 1-1 HP Embedded Web Server Information tab Menu Description Device Status Shows the printer status and shows the estimated life remaining of HP supplies. The page also shows the type and size of paper set for each tray. To change the default settings, click the Change Settings link. Job Log Provides a list of the jobs that have been processed. Configuration Page Shows the information found on the configuration page. Supplies Status Page Shows the status of the supplies for the printer.
Table 1-2 HP Embedded Web Server General tab (continued) Menu Description Ordering Information Enter information about ordering replacement toner cartridges. This information displays on the supplies status page. Device Information Name the printer and assign an asset number to it. Enter the name of the primary contact who will receive information about the printer. Language Set the language in which to display the HP Embedded Web Server information.
Table 1-4 HP Embedded Web Server Copy/Print tab (continued) Menu Description Manage Stored Jobs Enable or disable the ability to store jobs in the printer memory. Configure job-storage options. Default Print Options Configure the default options for print jobs. Restrict Color Permit or restrict color printing and copying. (Color printers only) Specify permissions for individual users or for jobs that are sent from specific software programs.
Table 1-5 HP Embedded Web Server Scan/Digital Send tab (continued) Menu Description Scan to Network Folder Configure the network folder settings for digital sending, including the following: Scan to SharePoint® Scan to USB Drive Contacts ● Settings for Quick Sets jobs saved in a network folder ● Settings for notifications ● Default scan settings for jobs saved in a network folder ● Default file settings for jobs saved in a network folder Configure the SharePoint settings for digital sending,
Table 1-6 HP Embedded Web Server Fax tab Menu Description Fax Send Setup Configure settings for sending faxes, including the following: Fax Speed Dials ● Default settings for outgoing faxes ● Settings for fax Quick Sets jobs ● Settings for notifications ● Default setting for sending faxes using the internal fax modem ● Settings for using a LAN fax service ● Settings for using an Internet fax service Manage speed dials, including the following: ● Import .
Table 1-8 HP Embedded Web Server Troubleshooting tab Menu Description General Troubleshooting Use the following options as appropriate: ● Reports and Tests area: Select and print several types of reports and tests. Some reports can be viewed in the EWS by clicking the View button. ● Fax Tools area: Configure settings for fax troubleshooting.
Table 1-9 HP Embedded Web Server Security tab (continued) Menu Description Protect Stored Data Configure and manage the internal storage for the printer. Configure settings for jobs that are stored on the printer internal storage. Manage Remote Apps Manage or whitelist remote apps by importing or deleting certificates that allow devices to use this product. Certificate Management Install and manage security certificates for access to the printer and the network.
Table 1-11 HP Embedded Web Server Networking tab > Configuration settings (continued) Menu Description Network Settings Configure IPX/SPX, AppleTalk, DLC/LLC, and SNMP settings, depending on the print server model. Other Settings Configure general printing protocols and services supported by the print server. The available options depend on the print server model, but can include firmware update, LPD queues, USB settings, support information, and refresh rate.
Table 1-13 HP Embedded Web Server Networking tab > Security settings (continued) Menu Description IPsec/Firewall View or configure a Firewall policy or an IPsec/Firewall policy. Announcement Agent Enable or disable the HP Device Announcement Agent, set the configuration server, and configure mutual authentication using certificates.
2 Open the HP Embedded Web Server (EWS) Learn how to look up the printer's IP address and access the EWS. ● Overview ● Open the HP Embedded Web Server (EWS) Overview The HP Embedded Web Server (EWS) is included in the printer firmware for HP printers. This document is specific to HP Enterprise or HP Managed printers. Use the EWS to view the printer status, and to configure and manage the printer remotely without having to access the control panel.
The EWS opens. ● On standard desktops, the tabs for the EWS are available across the top of the page. ● On small, narrow devices such as phones, the tabs are collapsed and not immediately visible. To open the . tabs, use the menu icon For more information about a specific page in the EWS, click the Help link located in the upper-right corner of the page. Some pages in the EWS do not have a Help link. For more information about the EWS, watch the following video.
3 Customize the control panel and EWS appearance Learn how to customize the printer's control panel and the information shown in the EWS.
Customize the Control-Panel Home screen Learn about the options for customizing the control-panel Home screen.
2. In the left navigation pane, click Control Panel Customization, and then complete one or more of the procedures that follow in this document. Figure 3-1 Control Panel Customization menu Change the items that display on the Home screen Use the following information to change the menu items shown on the control panel Home screen. View a video on how to change the menu items that display on the Home screen 1. ENWW Under the Control Panel Customization menu, click Home Screen Customization.
Figure 3-2 Home Screen Customization page NOTE: To use a different application for the Home screen, use the Home Screen App list to select the app, and then click Apply. 2. Use the Home Screen Arrangement section to hide or show items on Home screen as follows: ● To hide a menu item: Click and hold the cursor over the menu item to be hidden, drag the item to the Hidden Items section, and then release the mouse button.
3. (Optional) In the Home Screen section, use the Folder and Configuration icons at the bottom of this section to add a folder, move an item into a folder, or access the setup page for an item. Figure 3-4 Folder and Configuration icons 4. FutureSmart 3: Click the Apply button at the bottom of the EWS window to save the changes. FutureSmart 4: The updates are automatically saved. NOTE: The Quick Sets menu item must be displayed on the Home screen to use Quick Sets.
Figure 3-6 Wallpaper Customization section 2. To set wallpaper, click Set Wallpaper, browse to the image file, and then click Open. NOTE: The wallpaper image is placed with the top-left corner of the picture in the top-left corner of the control panel. To clear wallpaper, click Clear Wallpaper. Set the Home screen font color and effect Use the following steps to set the Home screen font color and text effects. 1. On the Home Screen Customization page, locate the Wallpaper Customization section. 2.
2. On the Display Settings page, select or deselect the individual options. Figure 3-7 Display Settings page 3. Click the Apply button at the bottom of the EWS window to save the changes. Change the control-panel language and keyboard layout Use the following steps to change the language and keyboard layout. 1. ENWW Under the Control Panel Customization menu, click Control Panel Language and Keyboard Layouts.
Figure 3-8 Control Panel Language and Keyboard Layouts page 2. Select the radio button next to the preferred default language from the Language column. 3. Select the preferred keyboard layout from the Keyboard Layout drop-down menu. 4. Enable or disable the Allow users to choose another language for their session option. 5. Enable or disable the Show alternate keyboard button on keyboard screens option, and then select the languages to display.
3. Enter a title in the Title: field, enter the message into the Text: field, and then select a color from the Header Background Color choices. Figure 3-9 Welcome Message settings Configure the EWS display language Use the Language page, located in the General tab to control which language the EWS uses. You can set up the EWS to use the web browser language, the language that the printer is using, or another language.
Customize the information shown on the Device Information page Use the Device Information page in the General tab to edit the device information. This information will then be displayed on the Device Information page in the Information tab. Figure 3-11 Device Information page Customize the ordering information shown on the Supplies page Use the Ordering Information page, located in the General tab, to add specific supplies-ordering information that is displayed on the Supplies Status Page page.
Add links to the bottom of an EWS screen By default, the HP EWS webpage contains links to the HP Instant Support, Shop for Supplies, and Product Support websites. Use the Edit Other Links page, located in the General tab, to add up to five additional links to the footer of the EWS page. Figure 3-13 Edit Other Links page Configure the EWS Help options Use the Online Help page, located in the Troubleshooting tab, to configure settings for the EWS online help.
Figure 3-14 Online Help page 26 Chapter 3 Customize the control panel and EWS appearance ENWW
4 Configure the network to which a printer is attached Configure the network using the Networking tab in the EWS. ● Introduction ● Home Tab ● Networking Tab ● Other Links Introduction This Help provides an overview of the Embedded Web Server (EWS) interface provided by the HP Jetdirect print server. For detailed help, see the following resources: ● The HP.com support Web page: www.hp.com/support ● The Administrator's Guide or other documentation for this print server model.
Networking Tab This tab provides access to network configuration, security, and diagnostic parameters on the HP Jetdirect print server.
Configuration Use these menu items to set general network configuration parameters. ● Wireless Station ● Wi-Fi Direct ● Wireless Direct ● TCP/IP Settings ● Network Settings ● Other Settings ● AirPrint ● Select Language Wireless Station (Wireless print servers only.) Use this page to configure wireless station connection settings required by your network. You can manually configure the settings, or run a wizard that guides you through the wireless configuration process.
– Advanced: This connection method includes security features such as hiding the Wi-Fi Direct name in addition to authentication by the user. – Manual: This connection method requires simple authentication by the user using a password. – Auto: There will be no authentication. The mobile device can connect automatically to the printer and print the document. ● Password: The password given by the user for Advanced and Manual connections.
● ● – DNS Failure Threshold - Failure threshold value to enable throttle mode for detecting false alarms. – Monitoring Window - Time duration to monitor failed DNS queries for enabling throttle mode. – Protected Mode Duration - (Throttle mode duration) The duration where the printer operates in a safe mode after and initial detection. Remediation settings – Number of Times in a Protected Mode - Maximum number of times the printer can enter into Throttle mode before remediation action.
Proxy Server Exception List. Web addresses, host names, or domain names not requiring access through the proxy server. Use a semicolon (;) to separate addresses. Network Settings Use the tabs on this page to configure other network protocols. Depending on the print server model, you can view or configure SNMP settings. If you enter a value, click Apply to set it, or click Cancel to ignore the entry. SNMP: Configure SNMP (Simple Network Management Protocol) operation.
Select Language This page appears if the Web pages support multiple languages. (Optionally, supported languages can be selected through language preference settings in your browser. See your browser's Help).
Google Cloud Print Learn how to set up Google Cloud Print. ● Before you begin ● Setup ● Web Proxy Before you begin Before you can set up Google Cloud Print, the HP printer must be connected to a network with an active internet connection. The Google Cloud Print feature will not work if the HP printer is not connected to a network.
Setup The printer has a feature that allows you to configure Google Cloud Print with your HP printer using the HP Embedded Web Server (EWS). Google Cloud Print allows you to print to your printer from anywhere with any web-connected device, such as your computer, phone, or tablet.
Step two: Complete Google Cloud Print registration Use the following procedures to complete Google Cloud Print registration. ● Cancel registration ● Complete the registration ● Registration when an admin password is set ● Privet or local registration ● Remove Google Cloud Print Cancel registration You can choose to cancel the Google Cloud Print registration after you have printed the claim sheet. Click the Cancel Setup button, and then click Yes to confirm.
Proxy Server. Proxy server to use by embedded applications in your printer/MFP. Enter up to 64 alphanumeric characters. A proxy server is typically used by network clients for Internet access. It caches Web pages and provides a degree of Internet security for those clients. Enter its IP address or FQDN. On some networks, you might need to contact your ISP for the proxy server address. Proxy Server Port. Port number used by the proxy server for client support. Enter a value from 0 to 65535.
Security The security features that may be configured depend on your particular HP Jetdirect print server model. ● Settings ● Authorization ● Secure Communication ● Mgmt. Protocols ● 802.1X Authentication ● IPsec / Firewall ● Announcement Agent Settings This page provides a tab to run the Security Configuration Wizard, an interactive utility that will help you configure security settings.
FIPS Configuration. Enable Federal Information Processing Standards (FIPS) mode. This mode enforces the use of cryptographic suites and protocols to comply with the FIPS-140 standards for computer security. NOTE: The browser might lose connectivity during the reconfiguration process. Troubleshooting Secure Communication. Enable the logging features to record events that occur when the product makes connections (as a client) to a secure server (such as email or network folder).
Please note: Many infrastructure components, such as LAN switches, use 802.1X protocols to control a port's access to the network. Before network installation on these ports, you must initially configure the Jetdirect print server with 802.1X settings using an isolated LAN, or directly using a cross-over cable. IPsec / Firewall A Firewall or IP Security (IPsec) policy allows you to control traffic to or from the device using network-layer protocols.
Diagnostics Use these pages to troubleshoot or enhance network operation. ● Network Statistics ● Protocol Info ● Configuration Page Network Statistics Displays network statistics that have been collected and stored on the HP Jetdirect print server. Network statistics are often useful to diagnose network performance and operational problems. Protocol Info Provides a list of network configuration settings on the HP Jetdirect print server for each protocol.
Other Links Learn about other resources available in the Networking tab. ● Support Support This page displays a list of resource links for additional help. The local and remote resource links on this list may be configured using the Support Info page. To open this page, select the Networking tab and choose the Other Settings menu, then select the Support Info tab.
5 Configure printer security Configure printer security using the Security tab in the EWS. ● Printer security features ● Configure the Account Policy settings ● Configure Access Control settings for walk-up features in the EWS ● Protect printer data ● Install certificates ● Restrict email domains ● Specify websites able to access a printer HP recommends reviewing the following security best practices documents.
Printer security features Learn how to configure the printer security features using the EWS. ● Introduction ● Video overview ● Security statements ● Assign an administrator password ● Encryption support: HP High Performance Secure Hard Disks Introduction The printer includes several security features to restrict who has access to configuration settings, to secure data, and to prevent access to valuable hardware components. NOTE: The steps vary according to the type of control panel.
Assign an administrator password HP recommends securing the printer by setting the admin password for the EWS. If the password is not set, anyone with access to the printer can configure any setting and discover information about your network. ● Assign the password ● Sign in at the printer Some tabs, pages, and settings are available only when an administrator password is set. For more information about assigning an administrator password, see the General Security page on the Security tab.
NOTE: For more information about password requirements for length and complexity, see Enable password complexity on page 49. NOTE: To change an existing password, first enter the existing password in the Old Password field. NOTE: Make note of the password and store it in a safe place. The administrator password cannot be recovered. If the administrator password is lost or forgotten, contact HP Support at support.hp.com for the assistance required to completely reset the printer. 7.
3. In the left navigation pane, click Protect Stored Data. Figure 5-2 Protect Stored Data page 4. ENWW Configure the desired options and then click Apply.
Configure the Account Policy settings Learn how to configure the Account Policy settings in the EWS. ● Introduction ● Configure the Account Policy settings Introduction The account policy should be configured to match the printers network account policy as closely as possible. The default policy was created by matching the Microsoft Active Directory security defaults. HP suggests working with your customer’s IT department to make sure the MFP account is secure.
Configure the Account Policy settings Learn how to configure the Account Policy settings. ● Enable account lockout ● Enable password complexity Enable account lockout The Account lockout feature allows administrators to specify the number of failed log in attempts before the printer enters Protected Mode, which makes the account unavailable for the duration of the lockout period.
NOTE: When password complexity is enabled, administrator account passwords must contain three of the following characteristics: 4. ● Uppercase letters ● Lowercase letters ● Numbers ● Special Characters In Minimum password length, type the minimum numbers of characters that the password must contain. NOTE: The default number of characters is 8. The number of characters required in a password can range from 0 to 16.
Configure Access Control settings for walk-up features in the EWS Learn how to configure Access Control settings for walk-up printing features.
Step one: Set up the sign-in methods The Access Control sign-in methods can be enabled for the printer, but only one can be the default sign-in method. If more than one method is enabled, access the non-default method from the printer control panel by touching Sign In, and then touch Advanced. ● Windows sign-in setup ● LDAP sign-in setup NOTE: If an HP Smart Card Reader solution is installed, disable all other sign-in methods on this page because signing in is required with this solution.
NOTE: The Enable reverse DNS lookups option is selected by default. Use a secure connection (SSL) is disabled by default. Match and retrieve attribute fields ● Match the name entered with this attribute: The sAMAccountName attribute is entered by default. This attribute retrieves the Windows Active Directory account name to verify the user names. ● Retrieve the user's e-mail address using this attribute: The mail attribute is entered by default and is the recommended attribute.
● Retrieve the device user's name using this attribute: Enter the name of an attribute ● Retrieve the device user's group using this attribute: The objectClass attribute is entered by default NOTE: The Exact match on Group attribute option is selected by default. 10. To verify that the sign-in method is working correctly, enter a valid Username and Password in the Test LDAP Sign In area, and then click Test. 11. At the bottom of the page, click OK to save the settings.
Figure 5-3 Options for permissions on the Access Control page 2. 3. Determine the level of access for a Device User. ● Full Access: Allows a Device User to use the specified print feature without signing in ● Access Denied: Requires a Device User to sign in to use the specified print feature a. Disable all print features by clicking the check box under Device User. The check boxes are now set to Access Denied.
● Copy ● Digital Send ● Fax Step four: Set up the default permissions for each sign-in method Use the following steps to configure the default permission set type for Windows or LDAP sign-in methods. 1. Set the default permissions for all users and groups by clicking the drop-down lists for LDAP and Windows, and select the appropriate option. 2. If specific users or groups need different permissions from the default permissions, click New....
Protect printer data Learn how to protect printer data on the printer hard drive(s). ● Introduction ● Step one: Set up Protect Stored Data ● Step two: Complete the setup Introduction There are several methods to protect data stored on the printer hard drive(s). One of the best solutions is to purchase a printer with an encrypted drive or upgrade to an encrypted drive if the option is available. The data on an encrypted drive is not accessible if removed from the printer.
Step one: Set up Protect Stored Data Learn how to set up Protect Stored Data using the EWS. ● Drive Status ● Job Data ● Change Password for Encrypted Drives ● Managing Temporary Job Files ● Manage Stored Jobs Drive Status Click the Security tab, and then select Protect Stored Data to access the Drive Status in the EWS.
Types of data erase modes available for performing a data erase operation for devices with a hard disk drive: ● Non-Secure Fast Erase (No overwrite) ● Secure Fast Erase (Overwrite 1 time) — overwrites the data once and has little effect on printer performance ● Secure Sanitize Erase (Overwrite 3 times) — overwrites the data three times and might have an affect on printer performance Data erased when performing a data erase operation: ● Stored jobs ● Temporary job files (created as the result of pro
Change Password for Encrypted Drives Learn how to change the password for encrypted hard drives. ● Generate a new random password for all encrypted drives ● Manually set a new password for all encrypted drives NOTE: This is an optional configuration setting. The printer encryption keys are randomly generated when the product is started and securely stored in a protected memory area. NOTE: This configuration setting is not available for eMMC/SSD printers.
Manage Stored Jobs Use the Manage Stored Jobs area to manage settings for jobs stored on the printer and for Quick Copy jobs; stored jobs sent from the print driver. The following settings are available for configuration: ● Allow new jobs to be saved in Job Storage - select this check box to enable job storage on the printer. The jobs are sent from a print driver, or they can be created with the Scan to Job Storage app on the printer control panel (if available).
● ● Standard Stored Job Retention - specify how long standard jobs are held on the printer. The following settings are available: – (default) – 30 minutes – 1 hour – 4 hours – 1 day – 1 week – 4 weeks – 3 days Behavior when users are authenticated - define what users first see when they enter the Retrieve from Device Memory app (FutureSmart 3) or the Print from Job Storage app (FutureSmart 4) from the printer control panel.
Install certificates Learn how to install certificates.
Install certificates to ensure data security in the EWS Learn how to install and configure security certificates. ● Introduction ● Create or install certificates ● Configure the certificate validation settings Introduction Use the Certificate Management page to manage certificates for identification of the printer on a network and to encrypt data used by the printer. The printer comes with a self-signed identity certificate and a self-signed Certificate Authority (CA) certificate.
Create or install certificates Learn how to create or install security certificates. ● Create a new self-signed certificate ● Create a certificate signing request ● Install an identity certificate ● Import an identity certificate ● Install a certificate Create a new self-signed certificate Use this feature to create a new, self-signed identity certificate for the printer. A self-signed identity certificate is installed on the printer by default for data-encryption purposes only.
5. Select an encryption key length for the requested certificate in the RSA Key Length: drop-down menu in the Key Options area. NOTE: If the Trusted Platform Module (TPM) is installed, the private key may be marked as exportable. However, if Mark private key as exportable is selected, the private key will not be generated on the TPM. 6. Select a signature algorithm for the requested certificate from the Signature Algorithm drop-down menu in the Signature Algorithm area. 7.
NOTE: Identity type certificates, as well as Certificate Authority type certificates, are valid types for importation and use with this printer. ENWW 4. If the certificate has a private key (for example, a .pfx file), enter the password for the certificate in the Certificate Password field. Use the same password used to encrypt the private key. 5. Click Import.
Configure the certificate validation settings Use the following information to configure the certificate validation settings in the EWS. ● Configure OCSP certificate validation ● Configure CDP certificate validation Configure OCSP certificate validation Use the following steps to set up OCSP certificate validation. NOTE: Certificates might need to be installed in the Certificates tab for the OCSP servers. 1. Using the top navigation tabs, click Security. 2.
Install certificates for whitelisting remote apps on the printer Learn how to install certificates for remote apps. ● Introduction ● Install remote app certificates Introduction The Manage Remote Apps page is available only for printers that have FutureSmart 4 with firmware version 4.5 or later. Use the Manage Remote Apps page to install and manage the certificates for the remote apps that are available on mobile devices.
Figure 5-6 Email Domain Restriction page Specify websites able to access a printer Use the Web Service Security page, located in the Security tab, to enable Cross-Origin Resource Sharing (CORS), which allows resources on this printer to be accessed by web pages from different domains, and manually add trusted sites for this printer.
6 Configure printer features using the EWS Learn how to configure printer features using the EWS.
Configure the printer Use the following information to configure printer features using the EWS.
Configure the color calibration and cleaning cycles Learn how to configure the color calibration and cleaning cycles using the EWS. These features are available in the Troubleshooting tab. ● Introduction ● Print a cleaning page or perform a color calibration ● Additional calibration and cleaning information Introduction Multifunction printers automatically calibrate and clean at various times to maintain the highest level of print quality.
Additional calibration and cleaning information Reference more details about printer calibration and cleaning. ● Calibration Timing and Duration ● Worst Case Delays ● Steps to minimize interruptions ● Background – Explanation of Calibration and Cleaning ● Calibration Controls ● Cleaning Cycles Calibration Timing and Duration Please note that all of the below times are “best case” times.
Table 6-1 Normal Timings and Durations (continued) When Cycle Performed After a mis-print. ● Cleaning primary transfer 13 seconds After a paper jam. ● Clearing paper path 28 seconds 1 2 3 4 Duration Density Halftone (Dhalf): A means of calibrating the print tone characteristics. Density Maximum (Dmax): The maximum density that can be printed. Color Plane Registration (CPR): A method of aligning the 4 primary color planes.
Background – Explanation of Calibration and Cleaning The purpose of a print alignment calibration is to adjust one or more elements of the print system such that print and image quality is returned to an optimal state. These calibrations carefully measure each CMYK print result to ensure that the colors are properly aligned in the resulting image.
The specific controls are: ● Quick Calibration ● Full Calibration Cleaning Cycles The purpose of the cleaning cycle is to ensure the highest level of print quality by eliminating excess toner and paper dust that accumulates in the primary transfer stage of the electro photographic process.
Configure the Manage trays settings Learn how to configure the Manage Tray settings in the EWS. ● Introduction ● Step one: Configure the tray settings ● Step two: Load the trays Introduction You can use the HP Embedded Web Server (EWS) to manage tray settings for the printer. In addition to managing the paper size and type settings for specific trays, you can also manage general tray settings for features such as Alternative Letterhead Mode, duplexing, and prompts.
Step two: Load the trays Load paper into the trays as follows. ● Load Tray 1 ● Load Tray 2 and the optional 500–sheet input trays NOTE: To avoid jams, never add or remove paper from Tray 1 during printing. NOTE: Labels on each tray indicate the correct way to load paper. If you change the size or type of paper that is loaded in the tray, you need to configure the tray for the new size or type. Load Tray 1 Use the following steps to load Tray 1. 1. Open Tray 1. 2.
Figure 6-1 Manage Supplies page Configure jam recovery The General Settings page, located in the General tab, provides access to the Jam Recovery settings. Use this page to specify when jammed pages are printed.
Configure energy-conservation settings Learn how to configure the printer energy-conservation settings to balance the needs for speed and energy use. ● Introduction ● Print with EconoMode (mono models only) ● Set the idle settings (FutureSmart 4 only) ● Set the sleep timer and configure the printer to use 1 watt or less of power ● Configure the date and time settings ● Set the sleep schedule Introduction The printer includes several features to help reduce energy consumption.
Print with EconoMode (mono models only) Some printers have an EconoMode option for printing drafts of documents. Using EconoMode can use less toner. However, using EconoMode can also reduce print quality. ● Configure EconoMode from the print driver ● Configure EconoMode from the printer control panel (FutureSmart 3) ● Configure EconoMode from the printer control panel (FutureSmart 4) HP does not recommend the full-time use of EconoMode.
3. a. Copy/Print or Print b. Default Print Options c. Economode Select On or Off to enable or disable the feature. Set the idle settings (FutureSmart 4 only) Use the following steps to set the idle settings. By default the printer stays warm between jobs to optimize speed and print the first page of jobs faster. To conserve energy, set the printer to cool between jobs. 1. From the Home screen on the printer control panel, open the Settings menu. 2. Open the following menus: 3. ENWW a.
Set the sleep timer and configure the printer to use 1 watt or less of power The printer has several options for the energy-saving sleep timer feature. The time delay to enter the Sleep/Auto Off state is adjustable, and the power usage during the Sleep/Auto Off state varies according to selection for the Wake/Auto On option. ● FutureSmart 3 ● FutureSmart 4 NOTE: HP does not recommend using deep sleep settings if you have Security Solutions installed.
5. Use the keypad to enter the appropriate time period, and then touch the Save button, or press the OK button. 6. Select one of the Wake/Auto On to These Events options: ● All events: The printer wakes when it receives any print job (through the USB port, network port, or wireless connection), or when someone presses a button on the control panel, or opens any door or tray.
Table 6-3 Control panels Firmware version Control panel FutureSmart 3 ? OK 1 2 3 4 5 6 7 8 9 0 C FutureSmart 4 86 1. In the address line of your web browser, type the IP address or host name of the printer to open the EWS. For more information, see Open the HP Embedded Web Server (EWS) on page 13. 2. Click the General tab. 3. Open the Date/Time Settings menu. 4. In the area labeled Device Time, configure the date and time. 5.
Set the sleep schedule Use the Sleep Schedule feature to configure the printer to automatically wake or go into Sleep/Auto Off mode at specific times on specific days of the week. ● Set the sleep schedule from the printer control panel ● Set the sleep schedule from the HP Embedded Web Server (EWS) NOTE: Configure the date and time settings before setting the Sleep Schedule feature. Set the sleep schedule from the printer control panel Use the following steps to set the printer's sleep schedule. 1.
Set the sleep schedule from the HP Embedded Web Server (EWS) Use the following steps to set the sleep schedule. NOTE: The steps vary according to the type of control panel. Table 6-4 Control panels Firmware version Control panel FutureSmart 3 ? OK 1 2 3 4 5 6 7 8 9 0 C FutureSmart 4 1. In the address line of your web browser, type the IP address or host name of the printer to open the EWS. For more information, see Open the HP Embedded Web Server (EWS) on page 13. 2.
Table 6-5 Printer status (continued) Control-panel status Power-button status Printer status Black or Blank Blinking in 0.
Enable the USB port for printing The USB port is disabled by default. Before using this feature, enable the USB port.
Method one: Enable the USB port from the printer control panel Learn how to enable the USB port from the control panel for either FutureSmart 3 or 4. ● FutureSmart 3 ● FutureSmart 4 FutureSmart 3 Use the following steps to enabled the USB port from the control panel (FutureSmart 3). 1. From the Home screen on the printer control panel, select the Administration button. 2. Open the following menus: 3. a. General Settings b.
Method two: Enable the USB port from the HP Embedded Web server (network-connected printers only) Learn how to enable the USB port from the EWS for either FutureSmart 3 or 4. ● FutureSmart 3 ● FutureSmart 4 FutureSmart 3 Use the following procedure to enable the USB port from the EWS for FutureSmart 3. 1. In the address line of your web browser, type the IP address or host name of the printer to open the EWS. For more information, see Open the HP Embedded Web Server (EWS) on page 13. 2.
Configure job accounting Use the Quota and Statistics Services feature in the Embedded Web Server (EWS) to control the volume of printed or scanned pages on a per-user basis, and to use other job accounting features. ● Introduction ● Configure job accounting using a quota server ● Configure and use server-less job accounting (SJA) Introduction The EWS provides two options for configuring job accounting.
Configure job accounting using a quota server Connect to a quota server to ensure that each user stays within an acceptable range of printed or scanned pages. Refer to documentation from the company providing the quota server software for more information. ● Before you begin ● Step one: Configure statistics and quota services ● Step two: Complete the setup Before you begin Connecting to a quota server ensures that each user stays within an acceptable range of printed or scanned pages.
2. In the left navigation pane, click Job Statistics Settings. Configure the job statistics settings as follows: a. If the printer is connected to a job statistics service, and the service is available, this connection is listed under Job Statistics Service. b. To capture user data in a statistics log, select Enable Device User Statistics Log, and then click Apply. Figure 6-3 Job Statistics Settings page 3. ENWW In the left navigation pane, click Quota Settings.
Figure 6-4 Legacy Quota Server settings When a print or scan job is started from the printer control panel, the printer connects to the specified quota server and retrieves quota transaction data, or utilizes the local quota service. Step two: Complete the setup On the General tab in the EWS, do the following: 96 ● Select Job Statistics Settings, review the selected settings, and then click Apply to complete the setup.
Configure and use server-less job accounting (SJA) Configure the server-less job accounting (SJA) feature to apply local quotas. This feature is for small businesses with fewer than 10 printers and provides simple statistics and quota functionality. ● Before you begin ● Set up server-less job accounting (SJA) ● Use server-less job accounting (SJA) Before you begin Complete the prerequisites before setting up Server-less Job Accounting with local quotas. Prerequisites ● HP FutureSmart version 4.6.
Set up server-less job accounting (SJA) Use the following procedures to set up server-less job accounting.
1. Open the Embedded Web Server. 2. Select the General tab and then select the Quota Settings from the left pane. 3. Select the Enable local quota service check box, and then click Apply. Figure 6-6 Enable local quota service Step three: Add device users Device User Accounts are used to create User Access Codes that are required for Server-less Job Accounting, Quotas, and locking down the control panel. To add device users and track new users, follow these steps.
NOTE: You might find it easier to create additional users in Excel and then import your list. The easiest way is to create one or two users, select Export to create a .csv file, modify and add the users in the .csv file, save the file, and then select Import to import the list to the EWS. 5. Click Apply. Step four: Configure device access (optional) The administrator can force users to login using an access code or lock down the printer for every activity, however, this is not recommended.
NOTE: There are three default users after Quotas are enabled. As new device users are created, they will automatically display here with the default credits set at the top of the page. As features are enabled (Incoming Fax, ePrint, etc.) are enabled, those names will also display here.
NOTE: In UPD versions earlier than 6.5, the driver will allow for prints to be captured via Custom Name in Job Storage (entry point for User Access Code) and in Job Storage when enabled in the driver as Personal or Stored Job. In UPD version 6.5, the driver will allow for a Custom Name in Job Storage without having to enable Job Storage in the driver. The Custom Name is the User Access Code.
Use server-less job accounting (SJA) Use SJA to perform the following tracking and reporting tasks. ● Export and print reports (EWS) ● Reset counters (EWS) ● Print reports (control panel) ● Reset counters (control panel) ● Sign in using the access code (control panel) ● View quota credits (control panel) Export and print reports (EWS) To export or print a report for tracked Users from the EWS, follow these steps. 1. Open the Embedded Web Server. 2.
Reset counters (control panel) To reset counters from the Control Panel, follow these steps. NOTE: If counts are not reset after exporting a report, the next time a report is pulled, the counts will include all counts from the previous report and any new usage since that last report. 1. From the Home screen, swipe to and open Support Tools. 2. Open the Maintenance menu, and then open the Device User Statistics Log menu. 3. From the Access Type drop-down, select the Administrator Access Code. 4.
NOTE: The Expert Copy feature is available only on some HP MFPs with larger control panels. Expert Copy mode allows users to perform some copy jobs quickly and with fewer steps than standard copy. An Administrator can configure which version of copy shows first when the Copy app is opened on the printer's control panel. ● To enable the feature, select Enable Expert Copy. ● In the Initial Copy View list, select which version of the Copy app to show first, Copy (standard copy) or Expert Copy.
Install third-party solutions Use the EWS to install third-party software packages that extend or modify the functionality of the printer. ● Introduction ● Before you begin ● Step one: Install a solution ● Step two: Remove a solution Introduction The EWS solution installer page can be used to install example applications that come as part of the software development kit (SDK).
3. Click the Browse... button in the Install New Solution area to locate and open the installation file from the network. 4. Click the Install button. Installed solutions display in the Installed Solutions area. Step two: Remove a solution Use the following procedure to remove an installed solution. ENWW 1. Select a solution in the Installed Solutions area. 2. Click the Remove... button. 3. Restart the printer to complete the removal of the solution.
Configure printing Use the following information to configure printing features using the EWS.
Restrict the number of colored pages printed Use this feature to restrict the number of color pages produced from the printer. ● Introduction ● Step one: Configure the color settings using the Restrict Color feature ● Step two: Complete the setup Introduction For unrestricted color usage, select Enable color. To only allow black pages, select Disable color. To restrict color based upon the computer application used to print the job or upon user permissions, select Set custom color access.
Step one: Configure the color settings using the Restrict Color feature Configure the color settings as follows. ● Main Color Setting ● Color Usage Job Log To access the Restrict Color feature: 1. Click Copy/Print from the top navigation tabs. 2. Click Restrict Color in the left navigation pane.
Main Color Setting The Main Color Setting area of the Restrict Color page provides three methods for managing color use on the printer: ● Use the Set custom color access method to define the color printing capabilities for specific computer programs: ● Use the Set custom color access method to restrict color printing by a user or group: ● Method one: Enable Color Select Enable color to print all color print jobs in color.
● Remove All Color ● Allow Color The Default color control for computer applications setting applies to print jobs originating from computer programs that do not have a specific color control associated with them. 4. Click Add to apply a color control setting to a specific computer program: a. Enter the name of the program to apply a color control setting to in the Application Name field. b. Select a color control type from the Color Control drop-down list. c. Click Apply. 5.
● Device Guest ● Device Administrator ● Device User The following levels of access are available for setting: ● Access Granted ● Requires Sign In ● Full Access ● Access Denied 4. Click the Manage Permission Sets... button to add, edit, copy, or delete a permission set. 5. Click the Go to Access Control Page button to open the Access Control page on the Security tab of the EWS and view detailed access control settings.
Customize printer job short-cuts using Quick Sets Quick Sets are short-cut jobs that are available from the Home screen or within the Quick Sets feature on the printer control panel and do not impact the defaults set for the base application. ● Introduction ● Add and manage Quick Sets ● Example Quick Sets Introduction To use a Quick Set on the printer control panel, enable the base application.
Add and manage Quick Sets Learn how to add and manage Quick Sets. ● Add a Quick Set ● Edit a Quick Set ● Copy a Quick Set ● Remove a Quick Set ● Quick Set settings and options Add a Quick Set Use the following steps to add a new Quick Set. 1. Using the top navigation tabs, click General. 2. In the left navigation pane, click Quick Sets Setup. 3. Click Add to begin the Quick Set Wizard.
NOTE: The settings available in the Quick Set Wizard vary by the type of Quick Set being added. Refer to the tables in Quick Set settings and options on page 117 to see the available settings and options for each type of Quick Set. 10. Review the summary of settings, and then click Finish to save the Quick Set, or click Previous to edit the settings. Edit a Quick Set Use the following steps to edit the settings of an existing Quick Set. 1. Using the top navigation tabs, click General. 2.
Copy a Quick Set Use the following steps to copy a Quick Set. 1. Using the top navigation tabs, click General. 2. In the left navigation pane, click Quick Sets Setup. 3. In the Quick Sets area, click the check box next to the appropriate Quick Set, and then click Copy. The Quick Set Wizard opens. NOTE: Click Cancel on any page of the Quick Set Wizard to cancel the current changes, exit the Quick Set Wizard, and return to the Quick Sets Setup page. 4. 5.
Table 6-6 Address and Message Field Control — Email Quick Sets (continued) Option Description From: Use the From: drop-down list to set the email address that displays in the From: field of the email. If Default From: is selected, the email address listed in the Default From: field is used. If User's address (sign-in required) is selected, the user is required to sign in to the printer with their email address when using the Quick Set. This field can be set to be user-editable.
Table 6-7 Signing and Encryption — Email Quick Sets (continued) Option Description Encryption Algorithm Use the Encryption Algorithm drop-down list to set the encryption algorithm used for encrypted emails sent using the Quick Set. Attribute for Recipient Public Key The Attribute for Recipient Public Key field is used to set the attribute used for retrieving the email recipient's public key from LDAP for signed or encrypted emails.
Table 6-8 Scan settings — Email, Fax, Save to Network Folder, and Save to USB Quick Sets (continued) Option Description Default Output Quality Select the default output quality for the scanned document: Default Resolution ● Low (small file) ● Medium ● High (large file) Select the default scan resolution for the scanned document: ● 75 dpi ● 150 dpi ● 200 dpi ● 300 dpi ● 400 dpi ● 600 dpi Table 6-9 File settings — Email, Save to Network Folder, and Save to USB Quick Sets Feature Descri
Table 6-9 File settings — Email, Save to Network Folder, and Save to USB Quick Sets (continued) Feature Description PDF encryption If the file type is PDF, then this option encrypts the output PDF file. A password must be specified as part of the encryption. The same password must be used to open the file. The user will be prompted to enter a password prior to scanning their job if one has not been set prior to pressing start.
Table 6-10 Copy settings — Copy Quick Sets (continued) Option Description Paper Selection Select which tray to use when printing or making copies: Image Adjustment Content Orientation ● Manually feed: The Paper Selection option is automatically set to Tray 1: Any Type, Any Size ● Automatically Detect: Automatically matches the paper size of the original to a paper size in one of the trays ● Tray 1: Any Type, Any Size ● Tray 2: Plain, Letter (8.
Table 6-10 Copy settings — Copy Quick Sets (continued) Option Description Pages per Sheet Select how many pages to print on one sheet and the page order: to copy to one, two, or four Pages per Sheet and select whether to Add page borders. Pages per Sheet ● One (1) ● Two (2) ● Four (4) Page Order ● Right, then down: Prints the pages in rows ● Down, then right: Prints the pages in columns Click the Add page borders check box to add borders on the pages.
Table 6-10 Copy settings — Copy Quick Sets (continued) Option Description 2-sided ID Scan Select to have 2-sided ID Scan on or off to scan both sides of a card, such as an identification card or business card. Book Mode Select to have Book Mode off or on. Example Quick Sets Below is an example of what the Quick Sets area looks like after quick sets have been created.
Figure 6-12 PCL and PostScript Settings page Configure print quality and allowable paper types per tray Use the Print Quality pages to configure the Image Registration settings for each individual tray and control the list of allowable paper types for this printer. Go to the Copy/Print tab of the EWS and expand Print Quality to access the following pages: ENWW ● On the Image Registration page, click the Modify link next to each tray to modify the image registration shift settings.
Configure the printer to send notifications for cartridge or paper events Learn how to configure the printer to send automatic notifications for cartridge or paper events.
Step one: Set up the outgoing email servers (SMTP) Learn how to set up the outgoing email servers for notifications. ● Start the Outgoing E-mail Servers (SMTP) wizard ● Option one: Use a server already in use by another function ● Option two: I know my SMTP server address or host name ● Option three: Search network for outgoing email server Start the Outgoing E-mail Servers (SMTP) wizard Use the following procedure to start the wizard. 1. Using the top navigation tabs, click General. 2.
4. On the Outgoing E-mail Servers (SMTP) page, select one of the following options and complete the configuration using the procedures that follow. Figure 6-14 Options on the Outgoing E-mail Servers (SMTP) page Option one: Use a server already in use by another function Use this option when SMTP is already configured by another app and does not include the Automated e-mail option. 1. Select Use a server already in use by another function, and then click Next. 2.
4. 5. On the Server Usage page, select which of the following functions will send email through the server: ● E-mail: Send scanned documents and job status notifications ● Fax: Send faxes when the fax send method is set to Internet Fax ● Automated E-mails: Device alerts sent to an administrator or archived faxes are examples of automated emails sent by this device ● AutoSend: Send device information to HP or other recipients On the Summary and Test page, review the settings.
1. In the Alert Subscriptions area, click New Subscription to open the Alerts configuration page. Follow the steps in sequence on this page. 2. In the Step 1: Type the subscription name area, enter a name for the subscription in the Alert Subscription Name field. 3. In the Step 2: Recipients for this alert subscription area, enter the recipients in the Alert Recipients field. NOTE: Use email addresses, mobile text message addresses, web URLs, or a combination of these.
Configure copying Use the following information to configure copy features for a printer. ● Introduction ● Step one: Set up default copy settings ● Step two: Complete the setup NOTE: All features might not be available on every device. Introduction Use this feature to configure the default options for copy jobs. Step one: Set up default copy settings Use the following steps to set up the default copy settings for a printer. 1. FutureSmart 3: Navigate to the Copy Settings area.
Table 6-12 Copy Settings (continued) Option Description Quality Level Select a Quality Level: Watermark ● Professional ● General Office Use the Watermark options to specify if you want to include a text watermark and what to include in the watermark. Select a Watermark Type: ● None ● Text Under Copy Settings (left pane), click Watermark. Use the Watermark page to enter custom text or select pre-defined text.
Table 6-12 Copy Settings (continued) Option Description Original Size ● Automatically detect ● Letter (8.5x11) ● Mixed Letter/Legal ● Legal (8.5x14) ● Executive (7.25x10.5) ● Statement (5.5x8.5) ● Oficio (8.
Table 6-12 Copy Settings (continued) Option Description Content Orientation For some features to work correctly, specify the way the content of the original document is placed on the page. If you are making two-sided copies, select a 2-sided format option. Orientation: ● Portrait: The short edge of the page is along the top. ● Landscape: The long edge of the page is along the top.
Table 6-12 Copy Settings (continued) Option Description Optimize Text/ Picture Select an option for how to handle output of a particular type content being printed: ● Manually adjust: Manually optimize the setting for each document ● Text: Use for documents that contain mostly text ● Printed picture: Use for line drawings and preprinted images, such as magazine clippings or pages from books NOTE: ● If bands of irregular intensity print on the copies, try selecting Printed picture to improve the qu
Configure scanning and digital sending Use the following information to set up scan/digital send features using the EWS. ● Set up Scan to Email ● Set up Scan to Network Folder ● Set up Scan to SharePoint ● Set up Scan to USB Drive ● Set up and configure the Address Book ● Configure scanner job shortcuts using Quick Sets ● Manage multiple devices with Digital Sending Software NOTE: All features might not be available on every device.
Set up Scan to Email Learn how to set up the Scan to Email feature. ● FutureSmart 3 ● FutureSmart 4 NOTE: The steps vary according to the type of control panel.
FutureSmart 3 Use the following steps for FutureSmart 3. ● Introduction ● Before you begin ● Step one: Configure the Network Identification settings ● Step two: Configure the Send to E-mail feature ● Step three: Configure the Quick Sets (optional) ● Step four: Set up Send to E-mail to use Office 365 Outlook (optional) Introduction The printer has a feature that enables it to scan a document and send it to one or more email addresses.
NOTE: Configuring email setup on the Networking tab is an advanced process and might require the assistance of a system administrator. 1. Using the EWS top navigation tabs, click Networking. NOTE: For configuring the network settings for use with Office 365, Step four: Set up Send to E-mail to use Office 365 Outlook (optional) on page 149. 2. In the left navigation pane, click TCP/IP Settings. A username/password might be required to access the Network Identification tab of the EWS. 3.
Step two: Configure the Send to E-mail feature The two options for configuring Send to Email are the E-mail Setup Wizard for basic configuration and E-mail Setup for advanced configuration.
-ORAlways use these credentials: Select Always use these credentials, enter the User name and Password, and then click Next. ○ Option three: Add SMTP server a. Select Add SMTP server b. Enter the Server Name and Port Number, and then click Next. NOTE: In most cases, the default port number does not need to be changed. NOTE: If you are using a hosted SMTP service such as Gmail, verify the SMTP address, port number, and SSL settings from the service provider’s website or other sources.
Table 6-14 Email settings (continued) Option Description Subject Provide a default subject line for the e-mail messages. (Optional) 6. Message Create a custom message. (Optional) To use this message for all e-mails sent from the printer, clear the User editable check box for Message. In the Configure File Scan Settings area, set the default scanning preferences, and then click Next.
Table 6-15 Scan settings (continued) Option Description Default Output Quality Select the default output quality for the scanned document: Default Resolution 7. ● Low (small file) ● Medium ● High (large file) Select the default scan resolution for the scanned document: ● 75 dpi ● 150 dpi ● 200 dpi ● 300 dpi ● 400 dpi ● 600 dpi Review the Summary area, and then click Finish to complete the setup.
NOTE: If an SMTP server was already created for another printer function, the Use a server already in use by another function option displays. Select this option, and then configure it to be used for the email function. 2. On the Set the basic information necessary to connect to the server dialog, set the options to use, and then click Next. NOTE: Some servers have problems sending or receiving emails that are larger than 5 megabytes (MB).
-OR● 5. Click Add to start the Quick Set Wizard. Complete the following information: – Quick Set Title: Enter a title for the new Quick Set. – Button Location: From the Button Location drop-down list, select either Home Screen or Quick Sets Application. – Quick Set Description: Enter a description of the Quick Set. – Quick Set Start Option: To set how the Quick Set starts, click either Enter application, and then user presses Start or Start instantly upon selection.
Table 6-17 Signing and Encryption settings Feature Description Signing Select whether to sign the email with a security certificate. Select the User editable check box to make this setting editable at the printer control panel. Hashing Algorithm Select the algorithm to use for signing the certificate. Encryption Select whether to encrypt the email. Select the User editable check box to make this setting editable at the printer control panel.
Table 6-18 Scan settings (continued) 9. Feature Description Multi-feed Detection Select this setting to enable detection of multi-feed jobs. Erase Edges Select this setting to specify the width of edge margins to be erased, in either inches or millimeters, for the front side and back side of a job. In the File Settings area, set the default file settings preferences.
Step three: Configure the Quick Sets (optional) Quick Sets are optional short-cut jobs that can be accessed on the main Home screen or within the Quick Sets application at the printer. Use the following procedure to configure the Quick Sets. 1. In the Quick Sets area, select one of the following options: ● Select an existing Quick Set under Quick Sets Application in the table. -OR- ● 2. Click Add to start the Quick Set Wizard. If you selected Add, the Quick Sets Wizard opens.
Step four: Set up Send to E-mail to use Office 365 Outlook (optional) Complete the following to enable the printer to send an email with an Office 365 Outlook account from the control panel. ● Introduction ● Configure the outgoing e-mail server (SMTP) to send an e-mail from an Office 365 Outlook account Introduction Microsoft Office 365 Outlook is a cloud-based email system provided by Microsoft which uses Microsoft's Simple Mail Transfer Protocol (SMTP) server to send or receive emails.
8. On the E-mail Setup page, select the Enable Send to E-mail check box. If this check box is not available, the feature is unavailable at the printer control panel. 9. In the Outgoing E-mail Servers (SMTP) area, click Add to start the SMTP wizard. 10. In the I know my SMTP server address or host name field, type smtp.onoffice.com, and then click Next. 11. On the Set the basic information necessary to connect to the server dialog, in the Port Number field, type 587.
FutureSmart 4 Use the following steps for FutureSmart 4. ● Introduction ● Before you begin ● Step one: Configure the Network Identification settings ● Step two: Configure the Scan to Email feature ● Step three: Configure the Quick Sets (optional) ● Step four: Set up Scan to Email to use Office 365 Outlook (optional) Introduction The printer has a feature that enables it to scan a document and send it to one or more email addresses.
NOTE: Configuring email setup on the Networking tab is an advanced process and might require the assistance of a system administrator. 1. Using the EWS top navigation tabs, click Networking. NOTE: For configuring the network settings for use with Office 365, see "Step five: Set up Scan to Email to use Office 365 Outlook (optional)." 2. In the left navigation pane, click TCP/IP Settings. A username/password might be required to access the Network Identification tab of the EWS. 3.
Step two: Configure the Scan to Email feature The two options for configuring Scan to Email are the Email Setup Wizard for basic configuration and Email Setup for advanced configuration. Use the following options to configure the Scan to Email feature: ● Method one: Basic configuration using the Email Setup Wizard ● Method two: Advanced configuration using the Email Setup Method one: Basic configuration using the Email Setup Wizard Peform basic configuration using the Email Setup Wizard.
1. Select Search network for outgoing email server, and then click Next. 2. Select the appropriate server from the Configure Email Server (SMTP) list, and then click Next. 3. Select the option that describes the server’s authentication requirements: ○ Server does not require authentication: Select Server does not require authentication, and then click Next.
Table 6-20 Send email settings Option Description From Select one of the following options from the From drop-down list: (Required) ● User’s address (sign-in required) ● Default From: Enter a default email address and display name in the Default From Email Address and Default Display Name fields NOTE: Create an email account for the printer, and use this address for the default email address. NOTE: Configure the email feature so that users must sign in before using it.
Table 6-21 Scan settings (continued) Option Description Color/Black Select the default color setting for the scanned document: Quality and File Size Resolution 7.
Figure 6-16 Location of Advanced Settings button 2. On the Default Job Options page, select the Enable Scan to Email check box. If this check box is not selected, the feature is unavailable at the printer control panel. Figure 6-17 Enable Scan to Email 3. In the Outgoing Email Servers (SMTP) area, complete the steps for one of the following options: ● Select one of the displayed servers. ● Click Add to start the SMTP wizard. 1.
○ Option one:I know my SMTP server address or host name: Enter the address of an SMTP server, and then click Next ○ Option two: If you do not know the address of the SMTP server, select Search network for outgoing email server, and then click Next. Select the server, and then click Next. NOTE: If an SMTP server was already created for another printer function, the Use a server already in use by another function option displays. Select this option, and then configure it to be used for the email function.
Table 6-22 Address and Message Field Control (Basic Settings) Feature Description User editable To use the Default From address and Default Display Name for all emails sent from this printer (unless a user is signed in), clear the User editable check box. When setting up the address fields, if the User editable check box is cleared, users will not be able to edit those fields at the printer control panel when sending an email.
Table 6-24 File Settings (Basic Settings) (continued) Feature Description Resolution Set the resolution for the file. Higher resolution images have more dots per inch (dpi), so they show more detail. Lower resolution images have fewer dots per inch and show less detail, but the file size is smaller. Quality and File Size Select the quality for the file. Higher-quality images require a larger file size than lower-quality images, and they take more time to send.
Table 6-26 Signing and Encryption settings (continued) Feature Description Encryption Select whether to encrypt the email. Select the User editable check box to make this setting editable at the printer control panel. Encryption Algorithm Select the algorithm to use for encrypting the email. Attribute for Recipient Public Key Enter which attribute to use to retrieve the recipient’s public key certificate from LDAP.
3. If you selected Add, the Quick Sets Setup page opens. Complete the following information: ● Quick Set Name: Enter a title for the new Quick Set. ● Quick Set Description: Enter a description of the Quick Set. ● Quick Set Start Option: To set how the Quick Set starts, click either Enter application, then user presses Start or Start instantly when selected from the Home Screen. 4.
Step four: Set up Scan to Email to use Office 365 Outlook (optional) Enable the printer to send an email with an Office 365 Outlook account from the control panel. ● Introduction ● Configure the outgoing email server (SMTP) to send an email from an Office 365 Outlook account Introduction Microsoft Office 365 Outlook is a cloud-based email system provided by Microsoft which uses Microsoft's Simple Mail Transfer Protocol (SMTP) server to send or receive emails.
8. On the Email Setup page, select the Enable Scan to Email check box. If this check box is not available, the feature is unavailable at the printer control panel. 9. In the Outgoing Email Servers (SMTP) area, click Add to start the SMTP wizard. 10. In the I know my SMTP server address or host name field, type smtp.onoffice.com, and then click Next. 11. On the Set the basic information necessary to connect to the server dialog, in the Port Number field, type 587.
Set up Scan to Network Folder Learn how to set up the Scan to Network Folder feature. ● FutureSmart 3 ● FutureSmart 4 NOTE: The steps vary according to the type of control panel.
FutureSmart 3 Use the following steps for FutureSmart 3. ● Introduction ● Before you begin ● Set up Save to Network Folder Introduction This document explains how to enable and configure the Scan to Network Folder function. The printer has a feature that enables it to scan a document and save it to a network folder. To use this scan feature, the printer must be connected to a network; however, the feature is not available until it has been configured.
Set up Save to Network Folder Use one of the following methods to set up Save to Network Folder. ● Method one: Use the Save to Network Folder Wizard ● Method two: Use Scan to Network Folder Setup Method one: Use the Save to Network Folder Wizard This option opens the setup wizard that is in the HP Embedded Web Server (EWS) for the printer. The setup wizard includes the options for basic configuration.
NOTE: The FQDN can be more reliable than the IP address. If the server gets its IP address via DHCP, the IP address can change. However, the connection with an IP address might be faster because the printer does not need to use DNS to find the destination server. b.
Method two: Use Scan to Network Folder Setup This option enables advanced configuration of the Save to Network Folder feature using the HP Embedded Web Server (EWS) for the printer. ● Step one: Begin the configuration ● Step two: Configure the Save to Network Folder settings ● Step three: Complete the configuration NOTE: Before you begin: To display the printer's IP address or host name, touch the Network printer's control panel.
Step two: Configure the Save to Network Folder settings Configure the Save to Network Folder settings as follows. ● Start the Quick Set Wizard ● Dialog one: Set the button location for the Quick Set and options for user interaction at the control panel ● Dialog two: Folder Settings ● Dialog three: Notification settings ● Dialog four: Scan Settings ● Dialog five: File Settings ● Dialog six: Summary Start the Quick Set Wizard Use the following steps to navigate to and start the Quick Set Wizard.
Select one of the following options under Original Sides Prompt: ○ Use application default ○ Prompt for original sides NOTE: If Start instantly upon selection is selected, the destination folder must be entered in the next step. 5. ENWW Click Next.
Dialog two: Folder Settings Use the Folder Settings dialog to configure the types of folders the printer sends scanned documents to.
Configure the destination folder for scanned documents Use one of the following options to configure the destination folder. ● Option 1: Shared folders or FTP folders ● Option 2: Personal shared folders Option 1: Shared folders or FTP folders To save scanned documents to shared folders or FTP folders, complete the following steps: 1. If it is not already selected, select Save to shared folders or FTP folders. 2. Click Add.... The Add Network Folder Path dialog opens. 3.
To restrict the subfolder access to the user who creates the scan job, select Restrict subfolder access to user. 4. To view the complete folder path for scanned documents, click Update Preview. 5. From the Authentication Settings list, select one of the following options: ○ Use credentials of user to connect after Sign In at the control panel ○ Always use these credentials NOTE: If Always use these credentials is selected, a user name and password must be entered in the corresponding fields. 6.
NOTE: If an FTP site is outside the firewall, a proxy server must be specified under the network settings These settings are located in the EWS Networking tab, under the Advanced options. 1. Select Save to an FTP Server. 2. In the FTP Server field, type the FTP server name or IP address. 3. In the Port field, type the port number. NOTE: In most cases, the default port number does not need to be changed. 4.
Select the destination folder permissions Use one of the following options to select the destination folder permissions. ● Option 1: Read and write access ● Option 2: Write access only Option 1: Read and write access To send scanned documents to a folder configured for read and write access, complete the following steps: NOTE: Send only to folders with read and write access supports folder verification and job notification 1.
1. Select Notify when job completes. 2. Select the method for delivering the notification from the Method Used to Deliver Notification list. If the method of notification selected is E-mail, type the email address in the Notification E-mail Address field. ● 3. To include a thumbnail of the first scanned page in the notification, select Include Thumbnail. 4. To prompt the user to review their notification settings, select Prompt user prior to job start, and then click Next.
Table 6-29 Scan settings and descriptions (continued) Feature Description Job Build Select this setting to combine several sets of original documents into one email attachment. Also, use this setting to scan an original document that has more pages than the document feeder can accommodate at one time. Automatic Tone Select this setting to set to automatic the Darkness, Contrast, and Background cleanup settings, which then makes these settings unavailable on this page.
Table 6-30 File settings and descriptions (continued) Feature Description Disable OCR file types Select this setting to prevent OCR file types from being available from the product control panel. Enable Blank Page Suppression If the Enable Blank Page Suppress option is enabled, blank pages will be ignored. Dialog six: Summary Review the summary of the Scan to Network setup. On the Summary dialog, review the Summary dialog, and then click Finish.
FutureSmart 4 Use the following steps for FutureSmart 4. ● Introduction ● Before you begin ● Set up Scan to Network Folder Introduction This document explains how to enable and configure the Scan to Network Folder function. The printer has a feature that enables it to scan a document and save it to a network folder. To use this scan feature, the printer must be connected to a network; however, the feature is not available until it has been configured.
Set up Scan to Network Folder Use one of the following methods to set up Scan to Network Folder. ● Method one: Use the Scan to Network Folder Wizard ● Method two: Use Scan to Network Folder Setup Method one: Use the Scan to Network Folder Wizard Use this option for basic configuration of the Save to Network Folder feature using the Scan to Network Folder wizard.
● Use credentials of user to connect after Sign In at the control panel ● Always use these credentials NOTE: If Always use these credentials is selected, a user name and password must be entered in the corresponding fields, and the printer’s access to the folder must be verified by clicking Verify Access. c. In the Windows Domain field, type the Windows domain. TIP: To find the Windows domain in Windows 7, click Start, click Control Panel, click System.
Method two: Use Scan to Network Folder Setup This option enables advanced configuration of the Save to Network Folder feature using the HP Embedded Web Server (EWS) for the printer. ● Step one: Begin the configuration ● Step two: Configure the Scan to Network Folder settings ● Step three: Complete the configuration NOTE: Before you begin: To display the printer's IP address or host name, touch the Information icon then touch the Network icon on the printer's control panel.
Step two: Configure the Scan to Network Folder settings Use the following procedure to complete Scan to Network Folder setup. ● Step one: Begin the configuration ● Dialog one: Set the Quick Set name, description, and options for user interaction at the control panel ● Dialog two: Folder Settings ● Dialog three: Notification Settings ● Dialog four: Scan Settings ● Dialog five: File Settings ● Dialog six: Summary Step one: Begin the configuration Use the following steps to begin configuration.
○ Prompt for original sides ○ Prompt for additional pages ○ Require Preview NOTE: If Start instantly upon selection is selected, the destination folder must be entered in the next step. 4. ENWW Click Next.
Dialog two: Folder Settings Use the Folder Settings dialog to configure the types of folders the printer sends scanned documents to and the folder permissions.
Configure the destination folder for scanned documents Select one of the following options to set up a destination folder. ● Option 1: Configure the printer to save to a shared folder or FTP folder ● Option 2: Configure the printer to save to a personal shared folder Option 1: Configure the printer to save to a shared folder or FTP folder To save scanned documents to a standard shared folder or an FTP folder, complete the following steps. 1.
To restrict the subfolder access to the user who creates the scan job, select Restrict subfolder access to user. 4. To view the complete folder path for scanned documents, click Update Preview. 5. From the Authentication Settings list, select one of the following options: ○ Use credentials of user to connect after Sign In at the control panel ○ Always use these credentials NOTE: If Always use these credentials is selected, a user name and password must be entered in the corresponding fields. 6.
NOTE: If an FTP site is outside the firewall, a proxy server must be specified under the network settings. These settings are located in the EWS Networking tab, under the Advanced options. 1. Select Save to an FTP Server. 2. In the FTP Server field, type the FTP server name or IP address. 3. In the Port field, type the port number. NOTE: In most cases, the default port number does not need to be changed. 4.
NOTE: This option is used in domain environments where the administrator configures a shared folder for each user. If the Save to a personal shared folder feature is configured, users will be required to sign in at the printer control panel using Windows credentials or LDAP authentication. 1. Select Save to a personal shared folder. 2. In the Retrieve the device user’s home folder using this attribute field, type the user’s home folder in the Microsoft Active Directory. NOTE: 3.
Select the destination folder permissions Select one of the following options to set up destination folder permissions. ● Option 1: Configure read and write access ● Option 2: Configure write access only Option 1: Configure read and write access To send scanned documents to a folder configured for read and write access, complete the following steps. NOTE: Send only to folders with read and write access supports folder verification and job notification. 1.
1. Select Notify when job completes. 2. Select the method for delivering the notification from the Method Used to Deliver Notification list. If the method of notification selected is Email, type the email address in the Notification Email Address field. ● 3. To include a thumbnail of the first scanned page in the notification, select Include Thumbnail. 4. To prompt the user to review their notification settings, select Prompt user prior to job start, and then click Next.
Dialog five: File Settings Complete the file settings as follows. On the File Settings dialog, set the default file settings for the Quick Set, and then click Next. Table 6-32 File settings Feature Description File Name Prefix Set the default file name prefix used for files saved to a network folder. File Name Default file name for the file to be saved. Select the User editable check box to make this setting editable at the printer control panel.
Set up Scan to SharePoint Learn how to set up the Scan to SharePoint feature. ● Video overview ● FutureSmart 3 ● FutureSmart 4 NOTE: The steps vary according to the type of control panel. Table 6-33 Control panels Firmware Version Control panels FutureSmart 3 FutureSmart 4 Video overview View information about how to enable Scan to SharePoint.
FutureSmart 3 Use the following steps for FutureSmart 3. ● Introduction ● Before you begin ● Enable Save to SharePoint and create a Save to SharePoint Quick Set ● Scan and save a file directly to a Microsoft SharePoint site ● Quick set scan settings and options for Save to SharePoint Introduction Use Save to SharePoint® to scan documents directly to a Microsoft® SharePoint site.
c. Paste the SharePoint folder path into the SharePoint® Path: field. d. By default, the printer overwrites an existing file that has the same file name as the new file. Clear Overwrite existing files so that a new file with the same name as an existing file is given an updated time/date stamp. e. Select an option from the Authentication Settings drop-down menu. Select whether it is necessary to sign in to the SharePoint site with credentials, or store the credentials within the Quick Set.
14. Select options from the File Settings page, and then click Next. For more information, see Table 6-35 File settings for Save to SharePoint on page 198. 15. Review the summary of settings, and then click the Finish button to save the Quick Set, or click the Previous button to edit the settings. Scan and save a file directly to a Microsoft SharePoint site Use the following steps to scan a document directly to a SharePoint site. 1.
Table 6-34 Scan settings for Save to SharePoint (continued) Feature Description Contrast Select a value to adjust the contrast of the file. Sharpness Select a value to adjust the sharpness of the file. Image Preview Select whether to require or make optional a displayed preview of the job or to disable a preview. Cropping Options Select whether or not to allow a job to be cropped and the type of cropping option.
Table 6-35 File settings for Save to SharePoint (continued) ENWW Feature Description PDF encryption If the file type is PDF, then this option encrypts the output PDF file. A password must be specified as part of the encryption. The same password must be used to open the file. The user will be prompted to enter a password prior to scanning their job if one has not been set prior to pressing start.
FutureSmart 4 Use the following steps for FutureSmart 4. ● Introduction ● Before you begin ● Enable Scan to SharePoint and create a Scan to SharePoint Quick Set ● Quick Set scan settings and options for Scan to SharePoint Introduction Set up the Scan to SharePoint feature, and then scan documents directly to a SharePoint site. Scan to SharePoint supports all scanning options, including the ability to scan documents as images or use the OCR features to create text files or searchable PDFs.
e. Select an option from the Authentication Settings drop-down menu. Select whether it is necessary to sign in to the SharePoint site with credentials, or store the credentials within the Quick Set. NOTE: If Use credentials of user to connect after Sign In at the control panel is selected in the Authentication Settings drop-down menu, the logged-in user must have permissions to write to the specified SharePoint site.
Quick Set scan settings and options for Scan to SharePoint Review the settings and options available in the Quick Set Wizard when adding, editing, or copying a Scan to SharePoint Quick Set. Table 6-36 Scan settings for Scan to SharePoint Feature Description Original Size Select the page size of the original document. Original Sides Select whether the original document is single-sided or double-sided. Optimize Text/Picture Select to optimize for the output of a particular type of content.
Table 6-37 File settings for Scan to SharePoint (continued) ENWW Feature Description Resolution Set the resolution for the file. Higher resolution images have more dots per inch (dpi), so they show more detail. Lower resolution images have fewer dots per inch and show less detail, but the file size is smaller. Quality and File Size Select the quality for the file. Higher-quality images require a larger file size than lower-quality images, and they take more time to send.
Set up Scan to USB Drive Learn how to set up the Scan to USB drive feature. ● Introduction ● FutureSmart 3 ● FutureSmart 4 Introduction The printer has a feature that enables it to scan a document and save it to a USB flash drive. The feature is not available until it has been configured through the HP Embedded Web Server (EWS).
FutureSmart 3 Use the following steps for FutureSmart 3. ● Step one: Enable Save to USB ● Step two: Create a Save to USB Quick Set (optional) ● Default scan settings for Save to USB setup ● Default file settings for Save to USB Setup Step one: Enable Save to USB Use the following steps to enable Save to USB. 1. Select the Security tab. 2. Scroll to Hardware Ports and make sure that Enable Host USB plug and play is enabled. 3. Select the Scan/Digital Send tab. 4.
8. 9. Select a default location where scanned files are saved on USB storage devices inserted into the USB port on the control panel, and then click Next. The default location options are: ● Save at root directory of the USB storage device ● Create or place in this folder on the USB Storage Device — The path to the folder on the USB storage device must be specified when using this file location option. A backslash \ must be used to separate folder\subfolder names in the path.
Table 6-38 Scan settings for Save to USB Setup: Option Description Default File Type Select the default file type that the for the scanned document: Default Color Preferences Default Output Quality Default Resolution ENWW ● PDF ● JPEG ● TIFF ● MTIFF ● XPS ● PDF/A ● Text (OCR) ● Unicode Text (OCR) ● RTF (OCR) ● Searchable PDF (OCR) ● Searchable PDF/A (OCR) ● HTML (OCR) ● CSV (OCR) Select the default color setting for the scanned document: ● Color ● Black ● Black/Gray ●
Default file settings for Save to USB Setup Review the default file settings for Save to USB Setup. Table 6-39 File settings for Save to USB Setup: Feature Description File Name Prefix Set the default file name prefix used for files saved to a network folder. Default File Name Default file name for the file to be saved. Select the User editable check box to make this setting editable at the product control panel.
FutureSmart 4 Use the following steps for FutureSmart 4. ● Step one: Enable Scan to USB Drive ● Step two: Configure the Quick Sets (optional) ● Default scan settings for Scan to USB Drive setup ● Default file settings for Save to USB setup Step one: Enable Scan to USB Drive Use the following steps to enable Scan to USB Drive. 1. Select the Security tab. 2. Scroll to Hardware Ports and make sure that Enable Host USB plug and play is enabled. 3. Select the Scan/Digital Send tab. 4.
5. ● Save at root directory of the USB storage device ● Create or place in this folder on the USB Storage Device — The path to the folder on the USB storage device must be specified when using this file location option. A backslash \ must be used to separate folder\subfolder names in the path. Select an option from the Condition on Which to Notify: drop-down list, and then click Next. This setting determines if, or how, users are notified when a Scan To USB Drive Quick Set job completes or fails.
Default file settings for Save to USB setup Review the options for Save to USB setup. Table 6-41 File settings for Save to USB setup Option name Description File Name Prefix Set the default file name prefix used for files saved to a network folder. File Name Default file name for the file to be saved. Select the User editable check box to make this setting editable at the printer control panel. File Name Suffix Set the default file name suffix used for files saved to a network folder.
Set up and configure the Address Book Learn how to set up and configure the Address Book. ● Introduction ● Step one: Set up the network contacts ● Step two: Set up the contacts stored on the printer Introduction An address book is a stored list of frequently-used contacts for quick selection when sending a document from the printer control panel.
Step one: Set up the network contacts Use the Network Contacts Setup area of the Address Book page to enable network contacts and to specify the search methods for locating network contacts. ● Set the search method ● Enable personal contacts (optional) ● Enable network contacts (optional) Set the search method Use the following steps to set the search method for network contacts. 1. Using the top navigation tabs, click Scan/Digital Send. 2.
Enable network contacts (optional) Learn how to enable network contacts. ● Introduction ● Before you begin ● Obtain contacts from an LDAP server Introduction The Lightweight Directory Access Protocol (LDAP) feature provides access to a network address book. Use the following sections to set up the Network Contacts feature. NOTE: The printer must have the correct firmware version to be compatible with the LDAP feature.
NOTE: If the LDAP server you want to use is not in this list, contact your administrator and obtain the IP address and the attribute codes. 6. To enable a secure (SSL) connection, select the Use a secure connection (SSL) check box. 7. If the LDAP server requires authentication, select the appropriate authentication type for the LDAP server in the Server Authentication Requirements area.
Step two: Set up the contacts stored on the printer Use the Import button to load a large list of frequently-used contacts on to the printer all at once, rather than adding them one at a time. ● Address Book tasks ● Import or export an address book To add contacts to more than one printer, it is best to add them on one printer, make any edits to the list, and then use the Import and Export All buttons to transfer the addresses to other printers.
Address Book tasks Learn how to perform Address Book tasks. ● Add a contact ● Add a group ● Edit a contact or group ● Delete a contact or group Add a contact or group by clicking Add Contact or Add Group, which opens the Add Contact or Add Group page. Add a contact Use the following steps to add a contact. 1. Click Add Contact. The Add Contact page displays. 2.
3. 4. Add a folder group: a. Select Add Folder Group. b. Enter a name for the new group in the Group Name field. c. Add the folders from an address book. After adding all of the members or groups for the group, click the OK button to save the group. Edit a contact or group Use the following steps to edit a contact or group. 1. Select the contact or group to edit. Enter a name into the search field to find a specific contact. 2. Click the Edit button. 3.
Import or export an address book Use this page to import and export address book and user information to and from the printer. ● Import an address book ● Export an address book When data is imported to the printer, new contacts, fax speed dials, or user accounts are added, so that this information can be accessed on this printer. This can help make it easy to create initial lists or to keep the HP printer current with changes to the information.
Import an address book To import address-book information, first create a file with a comma-separated value (CSV) format. The CSV format is a common data format that is often used to transfer data between database programs or printers. ● Import an address book ● Required data and record limits ● Creating an import file using Microsoft Outlook This file can be created using either a spreadsheet program such as Microsoft Excel, or a text program such as Microsoft Notepad.
3. Save the import file. If created in Excel, choose Save As from the File menu, and then select .CSV (comma delimited)(*.csv) in the Save as type drop-down box. If created as a text file, choose Save As from the File menu, and then enter .csv in place of the .txt file extension. 4. To import the source file into the printer, click the Import button under Contacts Stored on the Device, and then click the Browse... button to browse to the source data file.
Creating an import file using Microsoft Outlook If contacts are saved in Microsoft Outlook, export them into a .CSV file, and then use that file to import them into the printer. 1. From the Outlook File menu, choose Import and Export.... 2. In the Import and Export Wizard, choose Export to a file, and then click Next. 3. Select Comma Separated Values (DOS), and then click Next. 4. Select the Contacts folder, and then click Next. 5. Enter in a name for the file, with a .CSV extension.
Configure scanner job shortcuts using Quick Sets Use the following information to configure scanner job shortcuts using Quick Sets. ● Introduction ● Add and manage Quick Sets ● Example Quick Sets Introduction To use a Quick Set on the printer control panel, enable the base application.
Add and manage Quick Sets Learn how to add and manage Quick Sets. ● Add a Quick Set ● Edit a Quick Set ● Copy a Quick Set ● Remove a Quick Set ● Quick Set settings and options Add a Quick Set Use the following steps to add a new Quick Set. 1. Using the top navigation tabs, click General. 2. In the left navigation pane, click Quick Sets Setup. 3. Click Add to begin the Quick Set Wizard.
NOTE: The settings available in the Quick Set Wizard vary by the type of Quick Set being added. Refer to the tables in Quick Set settings and options on page 117 to see the available settings and options for each type of Quick Set. 10. Review the summary of settings, and then click Finish to save the Quick Set, or click Previous to edit the settings. Edit a Quick Set Use the following steps to edit the settings of an existing Quick Set. 1. Using the top navigation tabs, click General. 2.
Copy a Quick Set Use the following steps to copy a Quick Set. 1. Using the top navigation tabs, click General. 2. In the left navigation pane, click Quick Sets Setup. 3. In the Quick Sets area, click the check box next to the appropriate Quick Set, and then click Copy. The Quick Set Wizard opens. NOTE: Click Cancel on any page of the Quick Set Wizard to cancel the current changes, exit the Quick Set Wizard, and return to the Quick Sets Setup page. 4. 5.
Table 6-44 Address and Message Field Control — Email Quick Sets (continued) Option Description From: Use the From: drop-down list to set the email address that displays in the From: field of the email. If Default From: is selected, the email address listed in the Default From: field is used. If User's address (sign-in required) is selected, the user is required to sign in to the printer with their email address when using the Quick Set. This field can be set to be user-editable.
Table 6-45 Signing and Encryption — Email Quick Sets (continued) Option Description Encryption Algorithm Use the Encryption Algorithm drop-down list to set the encryption algorithm used for encrypted emails sent using the Quick Set. Attribute for Recipient Public Key The Attribute for Recipient Public Key field is used to set the attribute used for retrieving the email recipient's public key from LDAP for signed or encrypted emails.
Table 6-46 Scan settings — Email, Fax, Save to Network Folder, and Save to USB Quick Sets (continued) Option Description Default Output Quality Select the default output quality for the scanned document: Default Resolution ● Low (small file) ● Medium ● High (large file) Select the default scan resolution for the scanned document: ● 75 dpi ● 150 dpi ● 200 dpi ● 300 dpi ● 400 dpi ● 600 dpi Table 6-47 File settings — Email, Save to Network Folder, and Save to USB Quick Sets Feature Desc
Table 6-47 File settings — Email, Save to Network Folder, and Save to USB Quick Sets (continued) Feature Description PDF encryption If the file type is PDF, then this option encrypts the output PDF file. A password must be specified as part of the encryption. The same password must be used to open the file. The user will be prompted to enter a password prior to scanning their job if one has not been set prior to pressing start.
Table 6-48 Copy settings — Copy Quick Sets (continued) Option Description Paper Selection Select which tray to use when printing or making copies: Image Adjustment Content Orientation ● Manually feed: The Paper Selection option is automatically set to Tray 1: Any Type, Any Size ● Automatically Detect: Automatically matches the paper size of the original to a paper size in one of the trays ● Tray 1: Any Type, Any Size ● Tray 2: Plain, Letter (8.
Table 6-48 Copy settings — Copy Quick Sets (continued) Option Description Pages per Sheet Select how many pages to print on one sheet and the page order: to copy to one, two, or four Pages per Sheet and select whether to Add page borders. Pages per Sheet ● One (1) ● Two (2) ● Four (4) Page Order ● Right, then down: Prints the pages in rows ● Down, then right: Prints the pages in columns Click the Add page borders check box to add borders on the pages.
Table 6-48 Copy settings — Copy Quick Sets (continued) Option Description 2-sided ID Scan Select to have 2-sided ID Scan on or off to scan both sides of a card, such as an identification card or business card. Book Mode Select to have Book Mode off or on. Example Quick Sets Below is an example of what the Quick Sets area looks like after quick sets have been created.
Configure faxing Use the following information to configure the fax features for a printer. ● Set up fax send ● Set up fax receive ● Create and manage fax speed dials ● Set up and configure fax archive NOTE: All features might not be available on every device.
Set up fax send Use the following information to set up fax send using the EWS. ● Introduction ● Before you begin ● Step one: Select the fax send method ● Step two: Set up the Common Job Settings ● Step three: Configure a fax send method ● Step four: Complete the setup Introduction Set up faxing from the internal modem, or set up the LAN fax service or an Internet fax service. Also, configure fax-send settings that are common for all fax jobs that are sent from the printer.
Step one: Select the fax send method Select the fax send method for either FutureSmart 3 or 4. ● FutureSmart 3 ● FutureSmart 4 FutureSmart 3 Use the following steps to select the fax send method (FutureSmart 3). 1. Using the EWS top navigation tabs, click Fax. 2. In the left navigation pane, click Fax Send Setup. 3. In the Fax Send Setup area, select the Enable Fax Send check box. 4.
Step two: Set up the Common Job Settings Set up the common job settings for either FutureSmart 3 or 4. ● FutureSmart 3 ● FutureSmart 4 FutureSmart 3 Use the following information to set up common fax job settings (FutureSmart 4). ● Quick Sets area: Use the controls in the Quick Sets area to create and save frequently-used settings for future use Quick Sets are short-cut jobs that are available from the Home screen or within the Quick Sets feature on the printer control panel.
Step three: Configure a fax send method Use one of the following methods, based on your needs, to configure a fax-send method: ● Option one: Configure the internal modem ● Option two: Configure LAN Fax Setup ● Option three: Configure Internet Fax Setup Option one: Configure the internal modem Use the settings on the Internal Modem tab to configure the printer to send and receive faxes using its internal modem. 1. In the Fax Send Setup area, click the Internal Modem tab. 2.
Option two: Configure LAN Fax Setup When signing up for LAN fax service, the service provider should have given the information needed to set up the service. Use that information to configure the service, and then follow these instructions to use the service with the printer. Depending on the service provider, some of these settings might not be available. 1. In the Fax Send Setup area, click the LAN Fax Setup tab. 2. In the LAN Fax Service Settings area, select the name of the LAN fax service.
5. Choose whether to enable the If available, use the signed in user’s e-mail address as the Fax Account address option. 6. If you are using a service in North America, choose whether to enable the Auto complete to North American Numbering Plan (NANP) format using area code option. If selected, enter the area code in the field provided. Step four: Complete the setup On the Fax Send Setup page, review the selected settings, and then click Apply to complete the setup.
Set up fax receive Use the following information to set up fax receive using the EWS.
Step one: Set up the Fax Job Options Learn how to set up the fax job options for either FutureSmart 3 or 4. ● FutureSmart 3 ● FutureSmart 4 FutureSmart 3 Use the following steps to select the fax job options (FutureSmart 3). 1. Using the top navigation tabs, click Fax. 2. In the left navigation pane, click Fax Receive Setup. 3. In the Fax Receive Setup area, select the Enable Fax Receive check box. If this check box is not selected, the feature is unavailable at the printer control panel. 4.
Step two: Set up the Fax Receive Settings Set the following features in the Fax Receive Settings area: FutureSmart 3 ● Ringer Volume ● Rings To Answer: Select the number of rings to allow before the fax answers ● Fax Receive Speed ● Ring Interval: Select a ring interval between 220 and 600 ms ● Ring Frequency: The default ring frequency is 68 Hz.
Step three: Set up the Notification Settings Set up the notification settings for either FutureSmart 3 or 4. ● FutureSmart 3 ● FutureSmart 4 FutureSmart 3 Use the settings in the Notification Settings area to specify when you, or the person who is sending the email, should be notified of the status of sent emails. The default setting is that the signed in user's email address will be used. If the recipient email address is blank, no notification is sent.
Step four: Set up the Fax Printing Schedule Set up the fax printing schedule for either FutureSmart 3 or 4. ● FutureSmart 3 ● FutureSmart 4 FutureSmart 3 Faxes print by default, but they can also be stored and printed on a schedule that you determine. Use the Fax Printing Schedule setting to specify when to print and when to store faxes.
1. Select the Use schedule option. 2. Choose whether to select to enable the Use Holiday Sleep Schedule check box. 3. Select an Event Type, or click Add to create a new fax schedule event: 4. a. Select an Event Type. b. Click in the Time field and then select a time for the fax schedule event. c. Select one or more Event Days. d. Click Apply. To edit a fax scheduled event, select the event and click Edit.
Create and manage fax speed dials Learn how to create and manage fax speed dials. ● Introduction ● Before you begin ● Method one: Manage speed dials in the HP Embedded Web Server (EWS) ● Method two: Manage speed dials using the control panel Introduction Use the control panel or HP Embedded Web Server (EWS) to manage the speed dials for the printer. There are 1000 speed dials (numbered 000–999) available on the printer control panel using the fax job screen.
7. Use the Import... button to import comma-separated value (.csv) files containing lists of contacts, speed dials, or user access codes. The import feature allows you to load multiple contacts, speed dials, or user access codes all at once instead of one at a time. 8. Use the Export All... button to save a list of the printer's address book contacts, speed dials, and/or user access codes to a single .csv file. The resulting .csv file can then be saved to a location of your choice.
Method two: Manage speed dials using the control panel Use the following steps to manage speed dials using the control panel. ● Create a speed dial list (FutureSmart 3) ● Create a speed dial list or new speed dial contact (FutureSmart 4) ● Add a number to an existing speed dial list ● Delete a speed dial list ● Delete a single number from a speed dial list ● Search a speed-dial list by name NOTE: The steps vary according to the type of control panel.
6. Type a Fax Number for the contact, or, if creating a list, type numbers for all contacts in the list. 7. Touch Save.
Add a number to an existing speed dial list Add a number to an existing speed dial list as follows. ● FutureSmart 3 ● FutureSmart 4 FutureSmart 3 Use the following steps to add a number to an existing speed dial list. 1. From the Home screen on the product control panel, scroll to and touch the Fax button. 2. Touch the Speed Dials button to display the Speed Dials screen. 3. Touch the One Touch Speed Dials number of the list to be edited. 4.
Delete a speed dial list Delete a speed dial list for either FutureSmart 3 or 4. ● FutureSmart 3 ● FutureSmart 4 FutureSmart 3 Use the following steps to delete a speed dial list. 1. From the Home screen on the product control panel, scroll to and touch the Fax button. 2. Touch the Speed Dials button to display the Speed Dials screen. 3. Touch the One Touch Speed Dials number of the list to be deleted. 4. Touch the Delete button. 5.
Delete a single number from a speed dial list Delete a single number from a speed dial list for either FutureSmart 3 or 4. ● FutureSmart 3 ● FutureSmart 4 FutureSmart 3 Use the following steps to delete a single number from a speed dial list. 1. From the Home screen on the product control panel, scroll to and touch the Fax button. 2. Touch the Speed Dials button to display the Speed Dials screen. 3. Touch the One Touch Speed Dials number of the list to open the keyboard. 4.
Search a speed-dial list by name Search a speed-dial list by name for either FutureSmart 3 or 4. ● FutureSmart 3 ● FutureSmart 4 NOTE: If you do not know the unique name of the speed dial, type a letter to select any portion of the list. For example, to view speed-dial names that begin with the letter N, type the letter N. If no matching entries exist, a message appears before the search shows the entry that is closest to the letter N.
Set up and configure fax archive Learn how to configure settings for archiving and forwarding faxes. ● Introduction ● Before you begin ● Step one: Set up Fax Archive ● Step two: Set up Fax Forwarding ● Step three: Complete the setup Introduction Use the Fax Archive and Forwarding page to configure settings for archiving and forwarding faxes on the printer control panel.
4. ● Do not archive (print only) ● Archive and print ● Archive only Configure the settings. Select the Type of Fax Job to Archive. Choose whether to select to enable the Print archive failure notice check box. Select the Archive Destination: ● E-mail: Select an outgoing SMTP server in the Outgoing E-mail Servers (SMTP) area, or click Add... to start the Outgoing E-mail Servers (SMTP) wizard, and add a new outgoing SMTP server.
NOTE: If using a signed-in user's credentials, set email to require sign in by the user on the product control panel. Deny device guest access to email by clearing the check box for email in the Device Guest column in the Sign in and Permission Policies area on the Access Control dialog of the Security tab. The icon in the check box changes from a check mark to a lock. On the Server Usage dialog, choose the product functions that will send email through this SMTP server, and then click the Next button.
258 Chapter 6 Configure printer features using the EWS ENWW
7 Manage printers Use the EWS to manage printers, including the following tasks: ENWW ● Manage security ● Troubleshoot printers ● Back up and restore printer data ● Print tasks and printable reports ● View printer information ● Update the firmware ● Set up and use HP Web Services 259
Manage security Use the following information to manage the security features for printers using the EWS. ● Use the Self Test page ● Manage security certificates Use the Self Test page Use the Self Test page, located in the Security tab, to perform the following tests on the printer: ● Function Integrity Test: Verify the correct operation of the selected security functions and verify that they are running according to expected system parameters.
Manage security certificates Use the following information to manage security certificates using the EWS. ● Introduction ● Manage the installed security certificates ● Manage the installed remote app certificates Introduction Use the Certificate Management page to manage certificates for identification of the printer on a network and to encrypt data used by the printer. The printer comes with a self-signed identity certificate and a self-signed Certificate Authority (CA) certificate.
Manage the installed security certificates Refer to the following information to manage the installed security certificates using the EWS. ● View the details of a certificate ● Remove a certificate ● Export a certificate ● Use a certificate for email and network identity NOTE: The following procedures may also be performed from the Authorization page of the Networking tab. View the details of a certificate Use the following steps to view the details of a certificate. 1.
● Only the public key can be exported for TPM-protected private keys. ● Private keys (for identity certificates) marked as exportable during import or generation require a password to be set when exporting. Use a certificate for email and network identity Use the following steps to use a certificate for email signing. 1. Using the top navigation tabs, click Security. 2. In the left navigation pane, click Certificate Management. 3. Select the certificate from the Certificates area. 4.
Manage the installed remote app certificates Learn how to manage the installed remote app certificates. ● View the details of a remote app certificate ● Remove a certificate ● Export a certificate The Manage Remote Apps page is available only for printers that have FutureSmart 4 with firmware version 4.5 or later. Use the Manage Remote Apps page to install and manage the certificates for the remote apps that are available on mobile devices.
Troubleshoot printers Use the following information to troubleshoot printer issues using the EWS. ● Begin troubleshooting ● Retrieve diagnostic information ● Access and use the remote control-panel ● Set up AutoSend of printer details to HP ● Reset printer settings Begin troubleshooting The General Troubleshooting page in the EWS can be used to begin the troubleshooting process and to gather information for HP technical support or your help desk. 1.
● OXPd Troubleshooting area: Select whether to enable the Allow a Non-Secure Connection for Web Services option (MFP and Digital Sender products only). ● Auto Recovery area: Select whether to enable the Enable Auto Recovery option. Retrieve diagnostic information Use the Diagnostics Page, located in the Troubleshooting tab, to retrieve diagnostic data from the printer that will help HP technical support troubleshoot printer problems. To view or print the Diagnostics Page: 1.
Access and use the remote control-panel Learn how to use the HP Remote Control-Panel feature in the EWS. ● Introduction ● Video overview ● Before you begin ● Use the Remote Control-Panel ● Remote Control-Panel FAQs (FutureSmart 4) Introduction HP Enterprise printers have a Web-based solution to help remotely troubleshoot printing issues, such as paper jams. Users, IT departments, or help desk agents can use the Remote Control-Panel provided in the printer’s Embedded Web Server (EWS).
● Make sure you have Administrator password credentials for the Embedded Web Server (EWS). NOTE: The Remote Control-Panel button on the Information tab will not be available until after an Administrator password is set in the EWS and the user is logged in using the administrator credentials. To set a password, if needed, click the Security tab, type credentials in the Set the Local Administrator Password box, scroll to the bottom of the page, and then click Apply.
2. In the left navigation pane, click Remote Control-Panel. Figure 7-2 Remote Control-Panel page 3. 4. Choose the type of Remote Control-Panel to launch: ● Click Launch Remote Control-Panel to launch a remote control panel where the active control panel session is still visible at the printer. In this case, the password will not be visible, however, key presses will be visible at the printer.
Figure 7-3 Remote Control-Panel in the EWS (FutureSmart 3 / FutureSmart 4) NOTE: The green frame at the control panel (as shown in the images above) indicates that the printer is being remotely controlled. 5. From the Remote Control-Panel window (EWS), select any of the options normally available to the user interacting directly with the control panel. If a user is at the control panel, they can follow along during the remote session. 6.
Table 7-1 Remote Control-Panel FAQs (continued) Question Answer green angle brackets are shown in all corners of the display indicating the screen is being shared. ● Launch Private Remote Control-Panel: This launches a private remote control panel where the printer's control panel is "blacked out." The person at the device cannot see activity from the remote session and will only see a black screen with a message that the device is being controlled by a remote user.
Set up AutoSend of printer details to HP Learn how to set up the AutoSend feature in the EWS. ● Introduction ● Before you begin ● Step one: Set up the AutoSend feature ● Step two: Set up the product email address ● Step three: Complete the setup Introduction The AutoSend feature enables your printer to periodically send printer configuration information including serial number, event logs, page usage counts, and supplies status information to HP web addresses (URLs), or e-mail addresses.
NOTE: If you do not know the SMTP server name, SMTP port number, or authentication information, contact the e-mail/Internet service provider or system administrator for the information. SMTP server names and port names are typically found by doing an Internet search. For example, use terms like "Gmail SMTP server name" or "yahoo SMTP server name" to search. ● SMTP server authentication requirements for outgoing e-mail messages, including the user name and password used for authentication, if applicable.
Step one: Set up the AutoSend feature Set up the AutoSend feature as follows. ● Enable AutoSend and choose settings ● Configure an SMTP server for the Send to E-mail option Enable AutoSend and choose settings Use the following procedure to enable AutoSend and select the settings for how it will function. 1. Using the top navigation tabs, click General. 2. In the left navigation pane, click AutoSend. 3. Click the Enable AutoSend check box. 4.
Configure an SMTP server for the Send to E-mail option Learn how to configure an SMTP server for the AutoSend feature in the EWS. ● Add an outgoing server ● Option one: Use a server already in use by another function ● Option two: I know my SMTP server address or host name ● Option three: Search network for outgoing e-mail server Add an outgoing server Use the following procedure to add and configure an outgoing SMTP server. 1. Click the Add button in the Outgoing E-mail Servers (SMTP) area. 2.
5. ● Automated E-mails: device alerts sent to an administrator or archived faxes are examples of automated e-mails sent by this device ● AutoSend: send device information to HP or other recipients On the Summary and Test page, review the settings. Enter an e-mail address into the Send a test e-mail to field, and click Test to test the configuration. Click Finish when done. Option three: Search network for outgoing e-mail server Use this option to search for outgoing SMTP servers.
The Reset Firmware option erases all partitions, settings, installed solutions, job data, and logs on the disk drive. The firmware will not be erased. This allows the disk drive to be reformatted without having to download a firmware upgrade file to return the product to a bootable state. NOTE: The Reset Firmware option is not available for all printer models. The administrator password must be set for the Reset Firmware option to display on supported models.
Back up and restore printer data Use the Back up and Restore feature in the HP Embedded Web Server (EWS) to back up data on the printer or to restore data files from a previous backup. ● Introduction ● Step one: Backup and restore data ● Step two: Set up the Authentication Settings Introduction The Back up creates a backup file of the current printer settings which allow the users to restore them later.
Print tasks and printable reports Learn about print tasks and printable reports in the EWS. ● Print files ● Print from a USB flash drive ● Print reports Print files Use the Print page, located in the Information tab, to upload a file from your hard drive and send it to the printer to be printed. The following file types are supported: .txt, .ps, .pdf, .pcl, .cht, .prn, .tiff, and .tif. FutureSmart 4: This feature must be manually enabled for printers with FutureSmart 4.
Print from a USB flash drive Learn how to print from a USB flash drive for either FutureSmart 3 or 4. ● Introduction ● Print USB documents from the printer control panel Introduction This printer features easy-access USB printing, for quickly printing files without sending them from a computer. The printer accepts standard USB flash drives in the USB port near the control panel. It supports the following types of files: .pdf, .prn, .pcl, .ps, and .cht.
Print USB documents from the printer control panel Learn how to print USB documents from the control panel for either FutureSmart 3 or 4. ● FutureSmart 3 ● FutureSmart 4 FutureSmart 3 Use the following steps to print to USB (FutureSmart 3). 1. Insert the USB flash drive into the easy-access USB port. NOTE: The port might be covered. For some printers, the cover flips open. For other printers, pull the cover straight out to remove it. 2. The printer detects the USB flash drive.
Figure 7-5 List of printable reports 282 Chapter 7 Manage printers ENWW
View printer information Learn how to view information about the printer and the status of supplies in the EWS.
View supplies status Use one of the following views in the EWS to monitor printer supplies status. ● Quick view of supplies and trays ● Detailed view of supplies Quick view of supplies and trays The Device Status page is the first page that displays in the EWS. This page provides a quick view of the status of all of the print cartridges and other supplies. This page also displays how much paper remains in the paper trays and how each tray is configured.
Figure 7-7 Supplies Status page ENWW View printer information 285
View recent activities Learn how to view the recent activities for a printer using the EWS.
View print jobs The Job Log page, located in the Information tab, provides a list of the jobs that have been printed. ● View additional information about a job ● Export the job list View additional information about a job Use the following steps to view details about a job. 1. Select the job. 2. Click View Details at the bottom of the page. 3. To return to the Job Log page, click Back. Export the job list Use the following steps to export the job list. 1. Click Export at the bottom of the page.
Figure 7-8 Configuration Page page Look up the list of open source programs used in the firmware The Open Source Licenses page, located in the Information tab, provides a complete list of all of the open source programs that are used in the printer’s firmware. Click on each program to see the full text of the license. View a snapshot of the control panel The Control Panel Snapshot page, located in the Information tab, provides an image of what is currently displayed on the control panel.
Figure 7-9 Control Panel Settings App page View other printer information The Device Information page, located in the Information tab, displays unique information about the product. For more information about changing what displays on this page, see the Device Information page on the General tab.
Update the firmware Learn how to update the printer firmware using a USB flash drive or the EWS. ● Introduction ● Before you begin ● Update the firmware ● About firmware downgrades ● Applicable printers ● Print a configuration page Introduction Similar to service packs for operating systems, HP provides firmware updates for printers to help address any known issues and add new features throughout the support life of the printer.
● ENWW You might need administrator privileges or a passcode to perform these steps.
Update the firmware There are four supported methods to perform a firmware update on this printer depending on whether the printer is in a ready state or an error state.
NOTE: If an Administrator password must be set warning message displays, select the Security tab, select the General Security option in the left pane, and then under the Set the Local Administrator password section, reset the password. 8. Browse to the location where the firmware files were extracted and select the .bdl file. If there is more than one .bdl file on the storage device, make sure to scroll and select the correct file for the printer and firmware version. 9.
NOTE: USB flash drives in a format other than Fat32, or with a CD formatted partition, might not be recognized by the printer. You might need to try a different USB flash drive. 5. Make sure the printer is On and in a ready state. 6. On the printer control panel, navigate to the USB Firmware Upgrade option using the following steps: ● FutureSmart 3: From the Home screen on the printer control panel, scroll to and select the Device Maintenance menu.
1. Go to the Latest Firmware Versions document, determine the latest version of firmware available for the printer, and compare it with the version installed on the printer. To view the installed version, see Print a configuration page on page 301. 2. Use the links in the Latest Firmware Versions document to go directly to the printer download page, download the firmware, and then extract all files. NOTE: The firmware file for HP FutureSmart is in the format "xxxxxxx.
NOTE: Do not interrupt the firmware update process. An update could take up to 30 minutes or more to complete. 16. Wait for the update to complete and when the printer returns to a Ready state, print a Configuration Page. 17. On the Configuration Page, make sure that the new firmware version is installed. If a Disk Full message displays when using this method, contact the HP support center in your country/region to help troubleshoot the issue.
Method four: Web Jetadmin (ready state, multiple printers at one time) Follow these steps to update the firmware remotely for a single printer or multiple printers at one time using HP Web Jetadmin 10.4 SR2 or newer. ● Manually import firmware files into WJA ● Set up automated firmware updates for WJA (optional) The duration of these steps varies depending on the printer firmware file size and server capacity.
7. Import the new firmware files into WJA. NOTE: If the client PC does not have internet access, see Manually import firmware files into WJA on page 299. 8. 1. Select the images to import (indicated by a No value in the Repository column) and click Next. 2. Confirm the selected images and click Import. 3. Wait for the firmware to import into the Web Jetadmin repository. 4. After the import completes, click Done to close the Import Firmware Images wizard. 5.
● For more information on how to certify images, go to the HP Web Jetadmin 10.4 User Guide or use the HP Web Jetadmin help (http://WJA_IP:8000/WebJetadmin/Help/en/Common/ dm_fwupgrade_available_editproperties.html where WJA_IP is the IP address of the WJA server). ● For information on how to determine newer qualified firmware files, or for other detailed ways to update the firmware using Web Jetadmin, go to the HP Web Jetadmin White Paper Upgrading firmware.
7. Select the policy option Upgrade Printer firmware, select the trigger option Devices added to group, select the policy action Update to latest version or Update to qualified version, and then click Close. 8. Click Next and click Save Policies. About firmware downgrades If you attempt to downgrade the firmware from a remote location to a version older than FutureSmart Version 4, the downgrade will fail and you will receive a 99.02.32 control panel error and a 33.05.09 event log.
Print a configuration page To determine the current firmware version that is installed on the printer, print a configuration page using one of the methods below. ● Method one: Printer control panel ● Method two: Embedded Web Server (EWS) NOTE: If the printer is in an error state, use Method three: USB flash drive —Preboot menu to update the firmware.
Method one: Printer control panel Follow the steps below to print a configuration page from the printer control panel. ● FutureSmart 3 ● FutureSmart 4 NOTE: The steps vary according to the control panel. Table 7-2 Control panels Firmware Version Control panels FutureSmart 3 ? OK 1 2 3 4 5 6 7 8 9 0 C FutureSmart 4 FutureSmart 3 Use the following steps to locate the firmware version and date (FutureSmart 3). 1.
1. From the Home screen on the printer control panel, scroll to and select Reports. 2. Select Configuration/Status Pages. 3. Select Configuration Page. 4. Select Print to print the configuration page. 5.
304 Chapter 7 Manage printers ENWW
8 Use EWS Online Help The EWS Help feature provides links to web-based help pages. For more information about a specific page in the EWS, click the Help link located in the upper-right corner of the page. NOTE: Some pages in the EWS do not have a Help link. Figure 8-1 EWS Help link When you click Help, you might see a notice that information will be sent to HP to connect to the correct help page. Click Continue to connect to the requested help page.