
HP LaserJet Enterprise, HP LaserJet Managed, HP PageWide Enterprise, HP PageWide Managed - Configuration Guide using the Embedded Web Server (EWS)


Copy a Quick Set
Use the following steps to copy a Quick Set.
1. Using the top navigation tabs, click General.
2. In the left navigation pane, click Quick Sets Setup.
3. In the Quick Sets area, click the check box next to the appropriate Quick Set, and then click Copy. The Quick
Set Wizard opens.
NOTE: Click Cancel on any page of the Quick Set Wizard to cancel the current changes, exit the Quick Set
Wizard, and return to the Quick Sets Setup page.
4. If necessary, modify the following settings, and then click Next:
● Quick Set Title
● Button Location
● Control Panel location
● Quick Set Description
● Quick Set Start Option
5. Select settings and complete tasks in the wizard. Click Next to proceed to the next page of available
options until reaching the Summary page.
NOTE: The settings available in the Quick Set Wizard vary by the type of Quick Set being copied. Refer to
the tables in Quick Set settings and options on page 117 to see the available settings and options for each
type of Quick Set.
6. Review the Summary page, and then click Finish to save the Quick Set.
Remove a Quick Set
Use the following steps to remove a Quick Set.
1. Using the top navigation tabs, click General.
2. In the left navigation pane, click Quick Sets Setup.
3. In the Quick Sets area, click the check box next to the appropriate Quick Set, and then click Remove....
4. When the Conrmation Page opens, click Remove to nish removing the Quick Set.
Quick Set settings and options
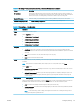
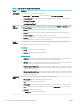
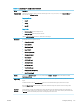
The following tables list the settings and options available in the Quick Set Wizard when adding, editing, or
copying a Quick Set.
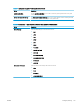
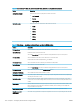
Table
6-6 Address and Message Field Control — Email Quick Sets
Option Description
Address Field Restrictions Use the Address Field Restrictions drop-down list to specify whether users can type an email
address or select an email address from an address book.
ENWW Congure printing 117