
HP LaserJet Enterprise, HP LaserJet Managed, HP PageWide Enterprise, HP PageWide Managed - Configuration Guide using the Embedded Web Server (EWS)


FutureSmart 3
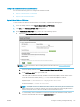
Use the following steps for FutureSmart 3.
●
Introduction
●
Before you begin
●
Set up Save to Network Folder
Introduction
This document explains how to enable and congure the Scan to Network Folder function. The printer has a
feature that enables it to scan a document and save it to a network folder. To use this scan feature, the printer
must be connected to a network; however, the feature is not available until it has been congured. There are two
methods for conguring Scan to Network Folder, the Save to Network Folder Quick Set Wizard for basic setup
and Save to Network Folder Setup for advanced setup.
Before you begin
Review the following information before you set up the Scan to Network Folder feature.
NOTE: To set up the Scan to Network Folder feature, the printer must have an active network connection.
Administrators need the following items before beginning the conguration process.
● Administrative access to the printer
● The fully-qualied domain name (FQDN) (e.g., \\servername.us.companyname.net\scans) of the
destination folder OR the IP address of the server (e.g., \\16.88.20.20\scans).
NOTE: The use of the term "server" in this context refers to the computer where the shared folder
resides.
NOTE: The network folder must be set up as a shared folder for the Scan to Network Folder feature to work.
For more information about setting up a shared folder, see Set up a shared folder (c04431534).
View a video demonstration on how to set up the Scan to Network feature on FutureSmart 3 printers
166 Chapter 6 Congure printer features using the EWS ENWW