
HP LaserJet Enterprise, HP LaserJet Managed, HP PageWide Enterprise, HP PageWide Managed - Configuration Guide using the Embedded Web Server (EWS)


Congure the destination folder for scanned documents
Select one of the following options to set up a destination folder.
●
Option 1: Congure the printer to save to a shared folder or FTP folder
●
Option 2: Congure the printer to save to a personal shared folder
Option 1: Congure the printer to save to a shared folder or FTP folder
To save scanned documents to a standard shared folder or an FTP folder, complete the following steps.
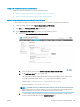
1. If it is not already selected, select Save to shared folders or FTP folders.
2. Click Add.... The Add Network Folder Path dialog opens.
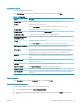
3. On the Add Network Folder Path dialog, select one of the following options:
● Option one: Save to a standard shared network folder.
1. If it is not already selected, select Save to a standard shared network folder.
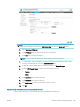
2. In the UNC Folder Path eld, type a folder path.
The folder path can either be the fully-qualied domain name (FQDN) or the IP address of the
server. Be sure that the folder path (e.g., \scans) follows the FQDN or IP address.
FQDN example: \\servername.us.companyname.net\scans
IP address example: \\16.88.20.20\scans
NOTE: The FQDN can be more reliable than the IP address. If the server gets its IP address via
DHCP, the IP address can change. However, the connection with an IP address might be faster
because the printer does not need to use DNS to nd the destination server.
3. To automatically create a subfolder for scanned documents in the destination folder, select a
format for the subfolder name from the Custom Subfolder list.
ENWW Congure scanning and digital sending 187