
HP LaserJet Enterprise, HP LaserJet Managed, HP PageWide Enterprise, HP PageWide Managed - Configuration Guide using the Embedded Web Server (EWS)

14. Select options from the File Settings page, and then click Next. For more information, see Table 6-35 File
settings for Save to SharePoint on page 198.
15. Review the summary of settings, and then click the Finish button to save the Quick Set, or click the
Previous button to edit the settings.
Scan and save a le directly to a Microsoft SharePoint site
Use the following steps to scan a document directly to a SharePoint site.
1. Place the document face-down on the scanner glass, or place it face-up in the document feeder and adjust
the paper guides to
t the size of the document.
2. From the Home screen on the printer control panel, touch Save to SharePoint®.
NOTE: In this step, the Home screen will display the title that the user named the quick set. In this step,
Save to SharePoint® is used as an example.
NOTE: It might be necessary to sign in to the printer to use this feature.
3. Select one of the items in the Quick Sets list.
4. Touch the File Name: text eld to open a keyboard, and then type the name for the le using either the on-
screen keyboard or the physical keyboard. Touch OK.
5. If necessary, touch the File Type drop-down menu to select a dierent output le format.
6. Touch More Options to view and congure settings for the document.
NOTE: Preview the image at any time by touching the Preview button in the upper-right corner of the
screen. For more information about this feature, touch the Help button on the preview screen.
7. Touch the Start button to save the le.
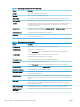
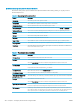
Quick set scan settings and options for Save to SharePoint
The following tables list the settings and options available in the Quick Set Wizard when adding, editing, or
copying a Save to SharePoint
®
Quick Set.
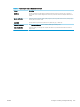
Table
6-34 Scan settings for Save to SharePoint
Feature Description
Original Size Select the page size of the original document.
Original Sides Select whether the original document is single-sided or double-sided.
Optimize Text/Picture Select to optimize for the output of a particular type of content, or select Manually adjust.
Optimize For This setting is only available when Optimize Text/Picture is set to Manually adjust. Select a manual-
adjust value.
Content Orientation Select the way the content of the original document is placed on the page: Portrait or Landscape, or
select Automatically detect.
2–Sided Format This setting is not available when Content Orientation is set to Automatically detect. Select to describe
the binding of the page to specify if the back side of the page is upside down or right side up.
Background Cleanup Select a value to remove faint images from the background or to remove a light background color.
Darkness Select a value to adjust the darkness of the le.
ENWW Congure scanning and digital sending 197