
HP LaserJet Enterprise, HP LaserJet Managed, HP PageWide Enterprise, HP PageWide Managed - Configuration Guide using the Embedded Web Server (EWS)

FutureSmart 4
Use the following steps for FutureSmart 4.
●
Introduction
●
Before you begin
●
Enable Scan to SharePoint and create a Scan to SharePoint Quick Set
●
Quick Set scan settings and options for Scan to SharePoint
Introduction
Set up the Scan to SharePoint feature, and then scan documents directly to a SharePoint site.
Scan to SharePoint supports all scanning options, including the ability to scan documents as images or use the
OCR features to create text les or searchable PDFs.
The feature is disabled by default. Enable Save to Sharepoint in the HP Embedded Web Server (EWS).
NOTE: The Scan to Sharepoint feature is available only on workow-equipped printers.
Before you begin
Before this procedure can be completed, the destination folder that the scanned les will be saved to must exist
on the SharePoint site, and write access must be enabled to the destination folder. Scan to SharePoint is disabled
by default.
Enable Scan to SharePoint and create a Scan to SharePoint Quick Set
Use the following steps to enable the Save to SharePoint feature and create a Quick Set.
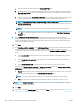
1. Using the top navigation tabs, click Scan/Digital Send.
2. In the left navigation pane, click Scan to SharePoint®.
NOTE: Quick Sets are short-cut jobs that can be accessed on the printer Home screen or within the Quick
Sets application.
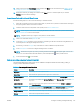
3. Select the Enable Scan to SharePoint® check box, and then click Add....
4. Enter a Quick Set Name (for example, “Scan to SharePoint”) and a Quick Set Description.
5. Select a Quick Set Start Option to determine what occurs after selecting a Quick Set on the printer control
panel, and then click the Next button.
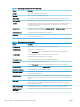
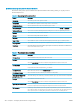
6. Use the following steps to add the path to the SharePoint folder.
a. Click Add on the SharePoint® Destination page to open the Add SharePoint® Path page.
b. Open another browser window, navigate to the SharePoint folder to use, and then copy the folder
path for the SharePoint folder from that browser window.
c. Paste the SharePoint folder path into the SharePoint® Path: eld.
d. By default, the printer overwrites an existing le that has the same le name as the new le. Clear
Overwrite existing les so that a new le with the same name as an existing le is given an updated
time/date stamp.
200 Chapter 6 Congure printer features using the EWS ENWW