
HP LaserJet Enterprise, HP LaserJet Managed, HP PageWide Enterprise, HP PageWide Managed - Configuration Guide using the Embedded Web Server (EWS)

Enable network contacts (optional)
Learn how to enable network contacts.
●
Introduction
●
Before you begin
●
Obtain contacts from an LDAP server
Introduction
The Lightweight Directory Access Protocol (LDAP) feature provides access to a network address book. Use the
following sections to set up the Network Contacts feature.
NOTE: The printer must have the correct rmware version to be compatible with the LDAP feature.
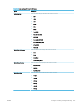
Before you begin
Administrators need the following information before beginning the conguration process.
Network contacts setup
● Server authentication requirements
● Path to start search (BaseDN, Search Root) (e.g., o=mycompany.com)
● Attributes for matching the name entered (e.g., cn or samAccountName), retrieving the email address (e.g.,
mail), and how the name will be displayed on the control panel (e.g., displayName)
Default SMTP Conguration
● SMTP server (e.g., smtp.mycompany.com)
● SMTP port (e.g., 25, 587, 465)
● Secure connection requirements (e.g., Always use secure connection (SSL/TLS))
● SMTP server authentication requirements for outgoing email messages, including the user name and
password used for authentication, if applicable
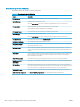
Obtain contacts from an LDAP server
Obtain addresses from a LDAP server so they are available to users at the printer control panel. These addresses
are available when the user selects the All Contacts address book view.
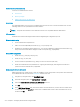
1. Using the top navigation tabs, click Scan/Digital Send.
2. In the left navigation pane, click Address Book or Contacts.
3. Select the Enable Network Contacts (use LDAP server) check box.
4. Click Add.
5. In the LDAP Server Address eld, enter the IP address for the LDAP server, or if the name of a LDAP server
to use is unknown, click Auto Find to obtain a list of available LDAP servers. Select the LDAP server to use,
and then click OK.
214 Chapter 6 Congure printer features using the EWS ENWW