Getting Started
For more information about HP products and services, see the HP Web site at http://www.hp.com. © Copyright 2010 Hewlett-Packard Development Company, L.P. Windows and Windows Vista are U.S. registered trademarks of Microsoft Corporation. The information contained herein is subject to change without notice. The only warranties for HP products and services are set forth in the express warranty statements accompanying such products and services.
End User License Agreement (EULA) BY INSTALLING, COPYING, DOWNLOADING, OR OTHERWISE USING ANY SOFTWARE PRODUCT PRE-INSTALLED ON THIS PC, YOU AGREE TO BE BOUND BY THE TERMS OF THE HP EULA. IF YOU DO NOT ACCEPT THESE LICENSE TERMS, YOUR SOLE REMEDY IS TO RETURN THE ENTIRE UNUSED PRODUCT (HARDWARE AND SOFTWARE) WITHIN 14 DAYS FOR A REFUND SUBJECT TO THE REFUND POLICY OF YOUR PLACE OF PURCHASE.
Warranty Information You may find the expressly provided HP Limited Warranty applicable to your product in the start menu on your PC and/or in the CD/DVD provided in the box. Some countries/regions may provide a printed HP Limited Warranty in the box. In countries/regions where the warranty is not provided in printed format, you may request a printed copy from www.hp.
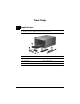
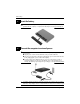
Basic Setup 1 Unpack the box color, features, and options may vary by computer model. The illustrations in ✎ Computer this guide may look slightly different from your computer. Component Component 1 AC adapter 3 Battery* 2 Computer 4 Power cord* *Batteries and power cords vary in appearance by country or region.
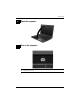
Basic Setup 2 Insert the battery To reduce potential safety issues, use only the AC adapter or battery Å WARNING: provided with the computer, or a replacement AC adapter or battery provided by HP. 3 Connect the computer to external power To reduce the risk of electric shock or damage to your equipment, observe Å WARNING: these practices: ■ Plug the power cord into an AC outlet that is easily accessible at all times.
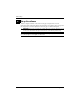
Basic Setup 4 Open the computer 5 Turn on the computer the computer does not start up, be sure that the power cord and AC adapter ✎ Ifconnections are secure.
Basic Setup 6 Set up the software After the computer is turned on, the software setup process begins. The on-screen instructions guide you through setting up and registering your computer. After you respond to the setup prompt, you must complete the entire setup process without interruption. Please select your language carefully. On some models, the languages you do Ä CAUTION: not choose are deleted from the system and cannot be restored during software setup.
What’s Next? This guide provides information for the following operating systems: ■ Windows® 7 ■ Windows Vista® ■ Windows® XP ■ Linux information in this chapter is common to all the listed operating systems unless ✎ The otherwise noted. Locating the electronic manuals (Windows) For detailed information about your computer, such as power management, drives, memory, security, and other features, click Start, click Help and Support, and then click User Guides.
What’s Next? Finding more information (Linux) For country- or region-specific support, go to http://www.hp.com/support, select your country or region, and follow the on-screen instructions. WARNING: To reduce the risk of serious injury, read the Safety & Comfort Guide. It Å describes proper workstation setup and proper posture, health, and work habits for computer users. The Safety & Comfort Guide also provides important electrical and mechanical safety information.
What’s Next? Recovering In case of system failure, use the f11 recovery tool to recover your original hard drive image. image includes the Windows operating system and software programs installed at ✎ The the factory. Using f11 completely erases hard drive contents and reformats the hard drive. All Ä CAUTION: files you have created and any software installed on the computer are permanently removed.
What’s Next? ■ ■ Restoring the computer to a previous state Recovering information using recovery tools ✎ For instructions on these procedures, go to Help and Support. ✎ For additional information, go to the User Guide in Help and Support. Backing up Recovery after a system failure is as complete as your most current backup. You should create your initial backup immediately after software setup.
What’s Next? T Backing up and recovering (Windows XP) To protect your information, use the Windows Backup utility (select models only) to back up files and folders or create recovery points. In case of system failure, you can use the backup files to restore your computer.
What’s Next? Performing an image recovery (Linux) : The f11 recovery tool reinstalls the operating system and drivers which were Ä CAUTION installed at the factory. Software not installed at the factory must be reinstalled. The partition containing the user’s home folders WILL NOT be erased. It is recommended that all personal files be backed up before proceeding. To recover the original hard drive image using f11, follow these steps: 1. If possible, back up all personal files. 2.
Product Information and Troubleshooting Input power The power information in this section may be helpful if you plan to travel internationally with the computer. The computer operates on DC power, which can be supplied by an AC or a DC power source. Although the computer can be powered from a standalone DC power source, it should be powered only with an AC adapter or a DC power source supplied and approved by HP for use with this computer.
Product Information and Troubleshooting Traveling with the computer For best results, follow these traveling and shipping tips: Prepare the computer for traveling or shipping: 1. Back up your information. 2. Remove all discs and all external media cards, such as digital cards and ExpressCards.
Product Information and Troubleshooting Routine care Cleaning the display : To prevent permanent damage to the computer, never spray water, cleaning Ä CAUTION fluids, or chemicals on the display. To remove smudges and lint, frequently clean the display with a soft, damp, lint-free cloth. If the screen requires additional cleaning, use premoistened antistatic wipes or an antistatic screen cleaner.
Product Information and Troubleshooting Quick troubleshooting The computer is unable to start up If the computer does not turn on when you press the power button, the following suggestions may help you resolve the problem: ■ If the computer is plugged into an AC outlet, unplug the computer and then plug another electrical device into the outlet to be sure that the outlet is providing adequate power. ✎ ■ Use only the AC adapter provided with the computer or one approved by HP for this computer.
Product Information and Troubleshooting The computer is on but is not responding If the computer is on but is not responding to software or keyboard commands, try the following emergency shutdown procedures, in the sequence provided, until shutdown occurs: Ä CAUTION: Emergency shutdown procedures will result in the loss of unsaved information. ■ ■ Press and hold the power button on the computer for at least 5 seconds. Disconnect the computer from external power and remove the battery.
Product Information and Troubleshooting The wireless network connection is not working (Windows 7 and Windows Vista) If a wireless network connection is not working as expected, follow these suggestions: ✎ If you are connecting to a corporate network, contact the IT administrator. ■ ■ ■ ■ ■ ■ ■ In Windows 7, click Start, click Control Panel, click Network and Internet, click Network and Sharing Center, and then click Troubleshoot problems. Follow the on-screen instructions.