Getting Started Mini
© Copyright 2010 Hewlett-Packard Development Company, L.P. Bluetooth is a trademark owned by its proprietor and used by Hewlett-Packard Company under license. Microsoft and Windows are U.S. registered trademarks of Microsoft Corporation. SD Logo is a trademark of its proprietor. The information contained herein is subject to change without notice. The only warranties for HP products and services are set forth in the express warranty statements accompanying such products and services.
Safety warning notice WARNING! To reduce the possibility of heat-related injuries or of overheating the computer, do not place the computer directly on your lap or obstruct the computer air vents. Use the computer only on a hard, flat surface. Do not allow another hard surface, such as an adjoining optional printer, or a soft surface, such as pillows or rugs or clothing, to block airflow.
iv Safety warning notice
Table of contents 1 Welcome Finding information ............................................................................................................................... 2 2 Getting to know your computer Top ....................................................................................................................................................... 4 TouchPad ............................................................................................................................
Using the TouchPad .......................................................................................................... 25 Navigating ......................................................................................................... 25 Selecting ........................................................................................................... 26 6 Maintenance Inserting or removing the battery ..............................................................................................
1 Welcome After you set up and register the computer, it is important to take the following steps: ● Set up HP QuickWeb—Immediately access your music, digital photos, and the Web without launching your main operating system. For more information, refer to HP QuickWeb (select models only) on page 12. ● Connect to the Internet—Set up your wired or wireless network so that you can connect to the Internet. For more information, refer to Networking on page 18.
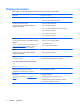
Finding information The computer comes with several resources to help you perform various tasks. Resources For information about Quick Setup poster ● How to set up the computer ● Help to identify computer components HP Notebook Reference Guide ● Power management features To access this guide, select Start > Help and Support > User Guides.
Resources For information about Limited Warranty* Warranty information To access this warranty: Select Start > Help and Support > HP Warranty. – or – Go to http://www.hp.com/go/orderdocuments. *You can find the expressly provided HP Limited Warranty applicable to your product in the start menu on your PC and/or in the CD/DVD provided in the box. For some countries/regions a printed HP Limited Warranty is provided in the box.
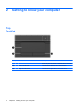
2 Getting to know your computer Top TouchPad Component 4 Description (1) TouchPad zone Moves the pointer and selects or activates items on the screen. (2) Left TouchPad button Functions like the left button on an external mouse. (3) Right TouchPad button Functions like the right button on an external mouse.
Lights Component (1) (2) (3) Description Caps lock light Mute light Wireless light ● White: Caps lock is on. ● Off: Caps lock is off. ● Amber: Computer sound is off. ● Off: Computer sound is on. ● White: An integrated wireless device, such as a wireless local area network (WLAN) device, a wireless wide-area network (WWAN) device, and/or a Bluetooth® device, is on. ● Amber: All wireless devices are off.
Keys Component 6 Description (1) esc key Displays system information when pressed in combination with the fn key. (2) fn key Executes frequently used system functions when pressed in combination with an arrow key or the esc key. (3) Windows logo key Displays the Windows Start menu. (4) Windows applications key Displays a shortcut menu for items beneath the pointer.
Front Component Description (1) Enable airflow to cool internal components. Vents (2) NOTE: The computer fan starts up automatically to cool internal components and prevent overheating. It is normal for the internal fan to cycle on and off during routine operation. (2) Speaker Produces sound.
Right side Component (1) (2) (3) Description Digital Media Slot Power light Power switch Supports the following digital card formats: ● MultiMediaCard (MMC) ● Secure Digital (SD) Memory Card ● Secure Digital Extended Capacity (SDxC) Memory Card ● Secure Digital High Capacity (SDHC) Memory Card ● White: The computer is on. ● Blinking white: The computer is in the Sleep state. ● Off: The computer is off or in Hibernation.
Left side Component Description (1) Power connector Connects an AC adapter. (2) AC adapter light ● White: The computer is connected to external power and the battery is fully charged. ● Amber: The computer is connected to external power and the battery is charging. ● Off: The computer is not connected to external power. (3) External monitor port Connects an external VGA monitor or projector. (4) Vent Enables airflow to cool internal components.
Display Component Description (1) WWAN antennas* (2) (select models only) Send and receive wireless signals to communicate with wireless wide-area networks (WWAN). (2) WLAN antennas (2)* Send and receive wireless signals to communicate with wireless local area networks (WLAN). (3) Webcam light On: The webcam is in use. (4) Webcam Records video and captures still photographs. To use the webcam: ● Select Start > All Programs > HP > HP Media Suite > HP Camera.
Bottom Component Description (1) Battery release latches (2) Release the battery from the battery bay. (2) Battery bay Holds the battery.
3 HP QuickWeb (select models only) After completing the Windows setup the first time you turn on the computer, the QuickWeb setup screen appears. HP QuickWeb is an optional, instant-on environment that is separate from the main operating system. QuickWeb allows you to access the following applications without the need to first start Windows.
Starting HP QuickWeb 1. Turn on the computer. The HP QuickWeb Home screen appears. 2. Click an icon on the QuickWeb Home screen to launch an application. NOTE: When the HP QuickWeb Home screen first appears, it displays an automatic timer above the Start Windows icon. If you do not move your mouse, or press a key for 15 seconds, the computer starts Microsoft Windows. For more information on the QuickWeb timer and changing the timer settings, refer to the HP QuickWeb software Help.
Identifying the QuickWeb LaunchBar The QuickWeb LaunchBar contains the QuickWeb control icons (1), LaunchBar icons (2), and the notification icons (3). Identifying the QuickWeb control icons Icon Function Launches the Windows operating system. Shuts the computer down. Returns to the QuickWeb Home screen. Identifying the QuickWeb LaunchBar icons Icon Function Launches the Web browser. You can browse and search the Web, open bookmarks, and create links to your favorite Web sites.
Icon Function Launches the Music Player so you can quickly browse and manage your music collection by artist, album, song, genre, or playlist. Supported music formats include .mp3 files. Launches the Photo Viewer. You can view your favorite photos and albums and manage your photo collection. Supports .bmp, .gif, .jpg, and .png file types. Identifying the QuickWeb notification icons Icon Function When a USB drive is inserted, the File Manager window containing a USB icon appears.
Icon Function Launches the Power Control dialog box to see information about battery capacity: ● When the computer is connected to AC power, the icon appears with an AC power cord. ● When the computer is running on battery power, the icon appears as only a battery. The state of charge is indicated by the color of the battery icon: ● Green: charged ● Yellow: low ● Red: critically low Launches the QuickWeb software Help.
Configuring the network You can set up a wireless connection in QuickWeb using the HP QuickWeb Configuration Tool. To access this tool: 1. Click the Settings icon in the system tray. 2. Select Network, and then select the Enable Wi-Fi check box. For more information on setting up a wireless connection using QuickWeb, refer to the software Help. Starting Microsoft Windows 1. Turn on the computer. The HP QuickWeb Home screen appears. 2. 3.
4 Networking NOTE: Internet hardware and software features vary depending on computer model and your location. Your computer supports two types of Internet access: 18 ● Wireless—For mobile Internet access, you can use a wireless connection. Refer to Connecting to an existing WLAN on page 19 or Setting up a new WLAN network on page 21. ● Wired—You can access the Internet by connecting to a wired network. For information on connecting to a wired network, refer to the HP Notebook Reference Guide.
Using an Internet service provider (ISP) Before you can connect to the Internet, you must establish an ISP account. Contact a local ISP to purchase Internet service and a modem. The ISP will help set up the modem, install a network cable to connect your wireless computer to the modem, and test the Internet service. NOTE: Your ISP will give you a user ID and password to access the Internet. Record this information and store it in a safe place.
20 3. Click the network icon in the notification area, at the far right of the taskbar. 4. Select a network to connect to. 5. Click Connect. 6. If required, enter the security key.
Setting up a new WLAN network Required equipment: ● A broadband modem (either DSL or cable) (1) and high-speed Internet service purchased from an Internet service provider (ISP) ● A wireless router (purchased separately) (2) ● Your new wireless computer (3) NOTE: Some modems have a built-in wireless router. Check with your ISP to determine what type of modem you have. The illustration shows an example of a completed WLAN network installation that is connected to the Internet.
Configuring a wireless router For help in setting up a WLAN, refer to the information provided by your router manufacturer or your ISP. The Windows operating system also provides tools to help you set up a new wireless network. To use the Windows tools to set up your network, select Start > Control Panel > Network and Internet > Network and Sharing Center > Set up a new connection or network > Set up a new network. Then follow the on-screen instructions.
5 Keyboard and pointing devices Using the keyboard Using the action keys Action keys are customized actions that are assigned to specific keys at the top of the keyboard. The icons on the f1 through f12 keys represent the action key functions. To use an action key, press and hold this key to activate the assigned function. NOTE: The action key feature is enabled at the factory. You can disable this feature in Setup Utility.
Icon Key Description f6 Plays, pauses, or resumes a track of an audio CD or a section of a DVD or a BD. f7 Stops playback. f8 Plays the next track of an audio CD or the next section of a DVD or a BD. f9 Decreases speaker volume incrementally when you hold down this key. f10 Increases speaker volume incrementally when you hold down this key. f11 Mutes or restores speaker sound. f12 Turns the wireless feature on or off. NOTE: This key does not establish a wireless connection.
Using pointing devices NOTE: In addition to the pointing devices included with your computer, you can use an external USB mouse (purchased separately) by connecting it to one of the USB ports on the computer. Setting pointing device preferences Use Mouse Properties in Windows® to customize settings for pointing devices, such as button configuration, click speed, and pointer options. To access Mouse Properties, select Start > Devices and Printers.
Selecting Use the left and right TouchPad buttons like the corresponding buttons on an external mouse.
6 Maintenance Inserting or removing the battery NOTE: For additional information on using the battery, refer to the HP Notebook Reference Guide. To insert the battery: ▲ Insert the battery (1) into the battery bay until it is seated. The battery release latches (2) automatically lock the battery into place. To remove the battery: CAUTION: Removing a battery that is the sole power source for the computer can cause loss of information.
2. 28 Remove the battery from the computer (2).
Replacing or upgrading the hard drive CAUTION: To prevent information loss or an unresponsive system: Shut down the computer before removing the hard drive from the hard drive bay. Do not remove the hard drive while the computer is on, in the Sleep state, or in Hibernation. If you are not sure whether the computer is off or in Hibernation, turn the computer on by sliding the power switch. Then shut down the computer through the operating system. Removing the hard drive 1.
9. Lift the hard drive (3) out of the hard drive bay. Installing a hard drive 1. Insert the hard drive into the hard drive bay (1). 2. Pull the hard drive tab (2) to the left until the hard drive snaps into place. 3. Replace the 4 hard drive screws (3). 4. Replace the vanity cover: a. 30 With the battery bay toward you, position the vanity cover at a 45–degree angle from the surface of the computer so that the tabs on the underside of the panel align with the matching slots on the computer (1).
b. Gently press the vanity cover (2) down, applying pressure to both the left and right edges of the panel, until it snaps into place. 5. Replace the battery. 6. Turn the computer right-side up, and then reconnect external power and external devices. 7. Turn on the computer. Adding or replacing memory modules The computer has one memory module compartment, which is located on the bottom of the computer, beneath the removable vanity cover.
6. Remove the vanity cover: a. Slide the inner release latch (1) to loosen the vanity cover. b. Pull away the vanity cover (2). 7. Loosen the 2 memory bracket screws (1). 8. Remove the memory bracket (2). 9. If you are replacing a memory module, remove the existing memory module: a. Pull away the retention clips (1) on each side of the memory module. The memory module tilts up.
b. Grasp the edge of the memory module (2), and then gently pull the memory module out of the memory module slot. CAUTION: To prevent damage to the memory module, hold the memory module by the edges only. Do not touch the components on the memory module. To protect a memory module after removal, place it in an electrostatic-safe container. 10. Insert a new memory module: CAUTION: To prevent damage to the memory module, hold the memory module by the edges only.
11. Replace the memory bracket (1). 12. Tighten the 2 memory bracket screws (2). 13. Replace the vanity cover: a. 34 With the battery bay toward you, position the vanity cover at a 45–degree angle from the surface of the computer so that the tabs on the underside of the panel align with the matching slots on the computer (1).
b. Gently press the vanity cover (2) down, applying pressure to both the left and right edges of the panel, until it snaps into place. 14. Replace the battery. 15. Turn the computer right-side up, and then reconnect external power and external devices. 16. Turn on the computer.
Updating programs and drivers HP recommends that you update your programs and drivers on a regular basis with the latest versions. Go to http://www.hp.com/support to download the latest versions. You can also register to receive automatic update notifications when they become available. Routine care Cleaning the display CAUTION: To prevent permanent damage to the computer, never spray water, cleaning fluids, or chemicals on the display.
7 Backup and recovery Recovery after a system failure is as good as your most recent backup. HP recommends that you create recovery discs immediately after software setup. As you add new software and data files, you should continue to back up your system on a regular basis to maintain a reasonably current backup.
● Number each disc before inserting it into the optical drive. ● If necessary, you can exit the program before you have finished creating the recovery discs. The next time you open Recovery Manager, you will be prompted to continue the disc creation process. To create a set of recovery discs: 1. Select Start > All Programs > Recovery Manager > Recovery Disc Creation. 2. Follow the on-screen instructions.
Recovering using the recovery discs 1. If possible, back up all personal files. 2. Insert the first recovery disc into the optical drive on your computer or an optional external optical drive, and then restart the computer. 3. Follow the on-screen instructions. Backing up your information You should back up your computer files on a regular schedule to maintain a current backup. You can back up your information to an optional external hard drive, a network drive, or discs.
Using system restore points A system restore point allows you to save and name a snapshot of your hard drive at a specific point in time. You can then recover back to that point if you want to reverse subsequent changes. NOTE: Recovering to an earlier restore point does not affect data files saved or e-mails created since the last restore point. You also can create additional restore points to provide increased protection for your files and settings.
8 Customer support Contacting customer support If the information provided in this user guide, in the HP Notebook Reference Guide, or in Help and Support does not address your questions, you can contact HP Customer Support at: http://www.hp.com/go/contactHP NOTE: For worldwide support, click Contact HP worldwide on the left side of the page, or go to http://welcome.hp.com/country/us/en/wwcontact_us.html. Here you can: ● Chat online with an HP technician.
Component (2) Serial number (s/n) (3) Part number/Product number (p/n) (4) Warranty period (5) Model description (select models only) Have this information available when you contact technical support. The serial number label is located inside the battery bay of your computer. ● Microsoft® Certificate of Authenticity—Contains the Windows® Product Key. You may need the Product Key to update or troubleshoot the operating system. This certificate is located under the vanity cover of the computer.
9 Specifications Input power The power information in this section may be helpful if you plan to travel internationally with the computer. The computer operates on DC power, which can be supplied by an AC or a DC power source. The AC power source must be rated at 100–240 V, 50–60 Hz. Although the computer can be powered from a standalone DC power source, it should be powered only with an AC adapter or a DC power source supplied and approved by HP for use with this computer.
Index A AC adapter light 9 action keys decrease screen brightness 23 Help and Support 23 identifying 6 increase screen brightness 23 next track 24 play, pause, resume 24 previous track 23 stop 24 switch screen image 23 volume down 24 volume mute 24 volume up 24 wireless 24 arrow keys, identifying 6 audio-in (microphone) jack, identifying 9 audio-out (headphone) jack, identifying 9 B backing up customized window, toolbar, and menu bar settings 39 personal files 39 battery bay 11 battery release latches 11 b
P pointing devices, setting preferences 25 ports external monitor 9 USB 8, 9 power connector, identifying 9 power light, identifying 8 power switch, identifying 8 product name and number, computer 41 Q QuickWeb configuring the network 17 control icons 14 Home screen 13 LaunchBar icons 14 notification icons 15 setting up 12 starting 13 starting Windows 17 turning off 17 turning on 17 QuickWeb software 12 R recovering a program or driver 37 recovering from the dedicated recovery partition 38 recovering from t