HP Commercial/Getting Started 2009 Flat: 11.6536 x 8.2677 in Folded: 5.8268 x 8.2677 GETTING STARTED © Copyright 2010 Hewlett-Packard Development Company, L.P. Windows is a U.S. registered trademark of Microsoft Corporation. The information contained herein is subject to change without notice. The only warranties for HP products and services are set forth in the express warranty statements accompanying such products and services. Nothing herein should be construed as constituting an additional warranty.
User Guides HP is committed to reducing the environmental impact of our products. As part of this effort, we provide user guides and learning centers on your computer hard drive in Help and Support. Additional support and updates to the user guides are available on the Web. Windows Users Looking for more user guides? They are on your computer. Click: Start > Help and Support > User Guides Linux Users Looking for more user guides? You can find them on the User Guide disc that came with your computer.
For more information about HP products and services, see the HP Web site at http://www.hp.com. © Copyright 2010 Hewlett-Packard Development Company, L.P. Windows is a U.S. registered trademark of Microsoft Corporation. The information contained herein is subject to change without notice. The only warranties for HP products and services are set forth in the express warranty statements accompanying such products and services. Nothing herein should be construed as constituting an additional warranty.
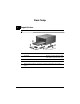
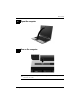
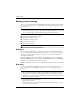
Basic Setup 1 Unpack the box ✎ Computer color, features, and options may vary. Component Component 1 Computer 4 Country- or region-specific modem cable adapter (select models only) 2 AC adapter 5 Power cord 3 Battery 6 Modem cable (select models only) ✎ Getting Started Modem cables, batteries, and power cords vary in appearance by country or region.
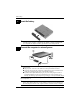
Basic Setup 2 Insert the battery To reduce potential safety issues, use only the AC adapter or battery Å WARNING: provided with the computer, a replacement AC adapter or battery provided by HP, or a compatible AC adapter or battery purchased as an accessory from HP. 3 Connect the computer to external power To reduce the risk of electric shock or damage to your equipment, observe Å WARNING: these practices: ■ Plug the power cord into an AC outlet that is easily accessible at all times.
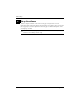
Basic Setup 4 Open the computer 5 Turn on the computer the computer will not start up, be sure that the power cord and AC adapter ✎ Ifconnections are secure.
Basic Setup 6 Set up the software After the computer is turned on, the software setup process begins. The on-screen instructions guide you through setting up and registering your computer. After you respond to the setup prompt, you must complete the entire setup process without interruption. Select your language carefully. some models, the languages you do not choose are deleted from the system and ✎ On cannot be restored during software setup.
What’s Next? Locating the electronic manuals For detailed information about your computer, such as power management, drives, memory, security, and other features, click Start, click Help and Support, and then click User Guides. You do not need to connect to the Internet to access the user guides in Help and Support. ✎ A User Guides disc may have also been included with your computer.
What’s Next? Backing up and recovering To protect your information, use the Windows® Backup utility to back up files and folders or create recovery points. In case of system failure, you can use the backup files to restore your computer. Windows Backup utility is available only on the computers with the Windows XP ✎ The Professional operating system. If your computer has Windows XP Home, you can back up your personal files to a USB external hard drive (purchased separately).
What’s Next? 4. Turn on the computer. 5. Follow the on-screen instructions to install the operating system. 6. After the operating system is installed, remove the Operating System disc and insert the Driver Recovery disc. 7. Follow the on-screen instructions to install the drivers and programs. ✎ For additional information about recovery tools, go to Help and Support.
What’s Next? To update the software using the HP Web site, follow these steps: 1. Identify your computer model, product category, and series or family. Prepare for a system BIOS update by identifying the BIOS version currently installed on the computer. For details, refer to the “Determining the BIOS version” section. If your computer is connected to a network, consult the network administrator before installing any software updates, especially system BIOS updates.
What’s Next? Downloading a BIOS update CAUTION: To prevent damage to the computer or an unsuccessful installation, Ä download and install a BIOS update only when the computer is connected to reliable external power using the AC adapter. Do not download or install a BIOS update while the computer is running on battery power, docked in an optional docking device, or connected to an optional power source.
What’s Next? 3. Using the hard drive path you recorded earlier, open the folder on your hard drive that contains the update. 4. Double-click the file that has an .exe extension (for example, filename.exe). The BIOS installation begins. 5. Complete the installation by following the instructions on the screen. a message on the screen reports a successful installation, you may delete the ✎ After downloaded file from your hard drive. Updating programs and drivers 1. Open your Web browser, go to http://www.hp.
Product Information and Troubleshooting Input power The power information in this section may be helpful if you plan to travel internationally with the computer. The computer operates on DC power, which can be supplied by an AC or a DC power source. Although the computer can be powered from a standalone DC power source, it should be powered only with an AC adapter or a DC power source supplied and approved by HP for use with this computer.
Product Information and Troubleshooting Traveling with the computer The computer is built to go with you for work and play. For best results, follow these traveling and shipping tips: ■ Prepare the computer for traveling or shipping: 1. Back up your information. 2. Remove all optical discs from the optical drive (select models only) and external media cards, such as digital cards.
Product Information and Troubleshooting Routine care Cleaning the display : To prevent permanent damage to the computer, never spray water, cleaning Ä CAUTION fluids, or chemicals on the display. To remove smudges and lint, frequently clean the display with a soft, damp, lint-free cloth. If the screen requires additional cleaning, use premoistened antistatic wipes or an antistatic screen cleaner.
Product Information and Troubleshooting Quick troubleshooting The computer is unable to start up If the computer does not turn on when you press the power button, adequate power may not be available to the computer. The following suggestions may help you determine why the computer will not start up: ■ If the computer is plugged into an AC outlet, unplug the computer and then plug another electrical device into the outlet to be sure that the outlet is providing adequate power.
Product Information and Troubleshooting The computer is unusually warm It is normal for the computer to feel warm to the touch while it is in use. But if the computer feels unusually warm, it may be overheating because a vent is blocked. If you suspect that the computer is overheating, turn off the computer to allow the computer to cool to room temperature. Then be sure to keep all vents free from obstructions while you are using the computer.
Contacting Customer Support If the information provided in your User Guide or Learning Center does not address your questions, you can contact HP Customer Support at: www.hp.com/go/contactHP Here you can: • Chat online with an HP technician. When technical support chat is not available in a particular language, it is available in English. • E-mail HP Customer Support. • Find HP Customer Support worldwide telephone numbers. • Locate an HP service center.