Getting Started Guide
© Copyright 2017 HP Development Company, L.P. Microsoft and Windows are either a registered trademarks or trademarks of Microsoft Corporation in the United States and/or other countries. The information contained herein is subject to change without notice. The only warranties for HP products and services are set forth in the express warranty statements accompanying such products and services. Nothing herein should be construed as constituting an additional warranty.
Table of contents 1 Safety instructions ........................................................................................................................................ 1 2 Getting started ............................................................................................................................................. 2 Kit contents ............................................................................................................................................................
iv
1 Safety instructions WARNING! To reduce the risk of electric shock or damage to your equipment: — Do not disable the power cord grounding plug. The grounding plug is an important safety feature. — Plug the power cord into a grounded (earthed) outlet that is easily accessible at all times. — Disconnect power from the equipment by unplugging the power cord from the AC outlet.
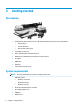
2 Getting started Kit contents ● HP 3D Structured Light Scanner Pro S3 or HP 3D Structured Light Scanner Pro S2, preassembled – Video projector – Camera (with lens) – Base rail with camera slide ● Tripod with carrying case ● Glass calibration panel and 90° brackets (2) ● USB flash drive with HP 3D Scan Software and camera drivers ● AC adapter ● HDMI cable ● USB cable ● Cable strap and carrying case System requirements NOTE: ● 2 Technical specifications are subject to change without
● Recommended: Dual-core processor, 2 GHz ● Recommended: 8 GB RAM ● Recommended: NVIDIA or AMD graphics card System requirements 3
3 Setup Installing the software and drivers 1. Connect the USB flash drive to your computer. 2. Optionally, go to http://www.hp.com/go/3DScanSupport, and then select drivers, software & firmware. Select your scanner, select your operating system, and then download HP 3D Scan Software Pro v5. NOTE: Do not disconnect the USB flash drive from your computer. It contains the license file to use the software. 3. Open Windows Explorer, and double-click HP_3D_Scan_Setup_5.x.x.
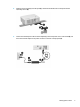
2. Slide the scanner assembly onto the tripod (1), and fasten the thumbscrew on the tripod until the assembly is secure (2). 3. Connect the included power cable to the AC adapter (1), connect the power cord to an AC outlet (2), and then connect the AC adapter to the power connector on the rear of the projector (3).
4. Connect one end of the included HDMI cable to the HDMI port on the rear of the projector, and then connect the other end of the cable to an HDMI port on your computer. NOTE: By default, the projector source is set to HDMI. However, if you press the source button on top of the projector twice within 4 seconds, the source is set to VGA. To reset the projector source, see Using the projector controls on page 10. 5. To turn the projector on, press the power button on top of the projector. 6.
NOTE: If you are using two cameras (second camera sold separately), mount one camera on each side of the projector. Size of the object or region to be scanned Mounted position of the camera (as seen from the rear) < 110 mm Left 110 to 350 mm Either, but optimally the left > 350 mm Right If necessary, you might have to mount the camera slide to the corresponding side of the base rail. Use the following procedure: 1.
▲ To scan a large object, the camera is mounted to the right a longer distance from the projector. Rotating the camera To aim the camera at the projection area: 1. 8 Loosen the thumbscrew under the camera.
2. Set the rotation angle using the degree scale printed on the camera slide. NOTE: Typically, an angle of 22° is used. For very large objects or regions, or objects with deep cavities, a smaller camera angle might be necessary. Angles less than 20° cause reduced scan quality, introducing more camera noise and inaccuracies. For flat objects, a large camera angle (up to 30°) might be necessary. Large camera angles reduce the depth of the measurement range.
Setting up the projector Using the projector controls Press the power button (6) to turn the projector on or off. Slide the focus lever from left to right to set the focus (1). During a scan, you want the projected stripe pattern to be perfectly focused on the scan object surface. Press the source button (2) to change the input source. Press the up button (2) and down button (4) to switch between HDMI and VGA.
● Auto Keystone: Off ● Manual Keystone: 0 Setting the projector as an extended desktop 1. On your computer, right-click a blank area of the desktop. 2. Select either Screen resolution or Properties. 3. Verify that your computer monitor is set as the primary monitor. 4. Under Display, select the projector. 5. Under Multiple displays, select Extend these displays. 6. Under Resolution, select 1280 × 800. 7. Select Advanced settings. 8. On the Monitor tab, set the refresh rate to 60 Hz. 9.
NOTE: You can move the scanner assembly and tilt or adjust the tripod, but do not change any of the projector or camera settings. If you move the camera or projector separately or adjust the focus, repeat the calibration process. For more information, see the HP 3D Scan Software Pro v5 Online Instructions. Go to http://www.hp.com/go/ HP3DSWProV5manual.
4 Troubleshooting Scan quality Problem Solution The scans are noisy (that is, the surface of the object is rough). Set the camera aperture (f-stop) so that the red intensity curves (in the scanner software) are not cropped. After you reset the aperture, recalibrate the scanner using the calibration panel. Increase the camera angle to at least 20°, and then increase the distance between the camera and the projector lenses.
Problem Solution Make sure that the scanner and projector are both focused on the object. The scan contains irregular distortions or outliers. Make sure that the ambient light is constant. Avoid fluorescent lights and all flickering light sources. Make sure that nothing moves in view of the camera, including behind the object. Be sure the scanner and object do not move during a scan. If you are scanning a person, be sure they sit comfortably and hold their breath.