Technical white paper FutureSmart configuration changes for Microsoft channel binding and LDAP signing requirements for Windows Table of contents Introduction 2 Detailed Description 2 HP FutureSmart Printer Configuration Changes 2 Configuration changes using HP Fleet Management Tools HP Web Jetadmin HP Security Manager 3 3 7 References 8 March 2020 Version 1.
Introduction Microsoft release a security advisory1 in August 2019 providing guidance to increase security for communications between LDAP clients and Active Directory domain controllers. Unsafe default configurations for LDAP channel binding and LDAP signing exist on Active Directory domain controllers. See Microsoft Advisory “ADV190023 - Microsoft Guidance for Enabling LDAP Channel Binding and LDAP Signing” for additional information.
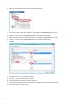
Note: For assistance in acquiring this certificate, please contact your account technical representative or HP customer support. 2. Install the CA certificate using the device Embedded Web Server a. Using a browser, enter the IP address of the printer. Logon to the EWS if required. b. Select the Security Tab, then select Certificate Management from the left navigation menu c. In the CA Certificates section, select Choose File to browse to the certificate file (with extension .p7b, cer, etc. ) d.
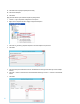
2. Right-Click on Templates and select “Create configuration template…” 3. In the “Devices-Search” field, enter “Enterprise”, then highlight “HP ENTERPRISE MFP UPI” from list. 4. Click the “>” button to move “HP ENTERPRISE MFP UPI” to the Selected models dialog 5. In the “Network Cards-Search” field Enter “Enterprise”, then highlight “HP ENTERPRISE NIC” from list. 6. Click the “>” button to move “HP ENTERPRISE MFP UPI” to the Selected models dialog 7. Click Next 8.
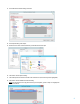
13. In the Add Device Certificate dialog, select Edit 14. In the Options dialog, select Import 15. Browse to the location of the Active Directory CA Certificate and select Open 16. Select OK to close the Options dialog 17. Select the imported certificate now listed in the Certificates list (certificate entry will be highlighted) 18.
19. Select Next in the “Specify Template options” dialog 20. Select Create Template 21. Select Done Apply the Active Directory CA certificate template to printing devices 6 1. Click the “+” sign to expand the “Configuration” tree options 2. Right-Click on Templates and select “Apply configuration template…” 3. Select the “CA_Certificate_Template” template for the “Use template” drop-down list 4. Select Next 5.
8. Select Apply Template 9. Monitor the Results dialog to validate Success or Error HP Security Manager Use the steps outlined in the “HP JetAdvantage Security Manager Certificate Management” whitepaper to install the CA Certificate on multiple printing devices. • “Using Security Manager to Manage CA Certificates” (page 34) http://h10032.www1.hp.com/ctg/Manual/c04677863.
References 1. Microsoft Security Advisory ADV190023 - Microsoft Guidance for Enabling LDAP Channel Binding and LDAP Signing https://portal.msrc.microsoft.com/en-us/security-guidance/advisory/ADV190023 2. 2020 LDAP channel binding and LDAP signing requirements for Windows https://support.microsoft.com/en-us/help/4520412/2020-ldap-channel-binding-and-ldap-signingrequirement-for-windows 3.