V VDPC C174 4 19 92-CHANNEL DMX CON NTROLLE ER WITH H JOYST TICK 19 92-KANAALS DMX CON NTROLLE ER MET JOYSTICK CO ONTRÔL LEUR DM MX 192 CANAUX X AVEC MANETT TE CO ONTROL LADOR DMX D DE E 192 CA ANALES CON PA ALANCA DE CON NTROL DMX-CON NTROLLE ER FÜR 192 KA ANÄLE MIT M JOYS STICK USER MAN U NUAL G GEBRUIKE ERSHANDLEIDING N NOTICE D’EMPLOI M MANUAL D DEL USUA ARIO B BEDIENUN NGSANLEIITUNG 3 11 20 28 36
VDPC174VDPC174 15.03.
VDPC174 4 Rev 01 USE ER MANUAL 1.. Introdu uction To o all reside ents of the e European Union Im mportant environme e ental inforrmation ab bout this product p This symbol on the devic ce or the pa ackage indicates that disposal off the device e after its cycle could harm the environment. Do not dispose of the unit (or batteries)) as unsorted lifec municipal was ste; it should be taken n to a specialized company for re ecycling.
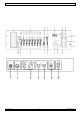
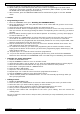
VDPC174 Rev 01 4. Description a. Front Panel (fig. 1) 1. Scanner Buttons (1 ~ 12) Select the desired fixture. 2. Scene Buttons (1 ~ 8) Press the scene buttons to load or store your scenes. There is a maximum of 240 programmable scenes. 3. Faders These faders are used to control the intensity of channel 1 ~ 8 or channel 9 ~ 16, depending on the selected page. 4. Page Select Button Select page A (1 ~ 8) or page B (9 ~ 16). 5. Speed Slider Adjust the chase speed within the range of 0.1 second to 10 minutes.
VDPC174 Rev 01 5. Operation a. Operation • General The VDPC174 allows you to program 12 scanners with 16 DMX channels each, 30 banks of 8 programmable scenes, 6 chases of 240 scenes and all this by means of 8 channel sliders, a joystick and other buttons. By means of the joystick you can easily and more accurately control the movement of a fixture. To increase your ability to dazzle the audience, this unit allows you to assign and reverse DMX channels.
VDPC174 Rev 01 5. Press the button corresponding to the scanner you wish to assign. 6. While holding the mode button press the scene number corresponding to the slider which controls the movement (example: If the pan is controlled by slider number 4, press and hold the MODE button while tapping scene button 4). 7. When finished, press the MODE and FINE buttons simultaneously again to exit the ASSIGN mode. c. Scenes • Programming a Scene 1. Enter the PROGRAM mode (See “Enabling the PROGRAM Mode”). 2.
VDPC174 Rev 01 • Copying Scanner Settings This setting allows you to copy the settings of one scanner to another. 1. Press and hold down the scanner button you wish to copy. 2. While holding down the button, tap the button of the scanner you wish to copy the settings to. • Copying a Scene 1. Enable the PROGRAM mode. 2. Tap the bank UP / DOWN button to select the bank containing the scene you wish to copy. 3. Select the scene you wish to copy by pressing its scene button. 4.
VDPC174 Rev 01 4. Press the bank UP / DOWN button and scroll to the step you wish to insert the step after. 5. Press the MIDI / REC button. The segment display will read the step one step higher than before. 6. Tap the TAP / DISPLAY button again. The LCD shows the current chase, scene, and bank. Create a desired scene and record it as a new step or select a previously programmed scene to add to the chase. 7. Once you have selected the scene you wish to add, press the MIDI / REC button again.
VDPC174 Rev 01 • Deleting a Scanner of a DMX Channel 1. Activate the ASSIGN or REVERSE mode. 2. Tap the scanner button to select the scanner you wish to delete. 3. Press the MODE and AUTO / DEL buttons simultaneously. All LEDs will flash three times indicating the requested operation has been performed. • Deleting All DMX Channels 1. Switch off the unit. 2. Press the MODE and AUTO / DEL buttons simultaneously. 3. While holding the two buttons, turn the power back on to the unit.
VDPC174 Rev 01 h. Playing the Chases • Manual Mode 1. When the power is turned on, the unit enters MANUAL mode automatically. 2. Select the chase you wish to run by pressing the corresponding chase button. Pressing this button a second time will unselect the chase. • Auto Mode 1. Press the AUTO / DEL button to activate AUTO mode. 2. Select the desired chase by pressing one of six CHASE buttons. Pressing this button a second time will negate this selection. 3.
Rev 01 VDPC174 4 7.. Technic cal Specifications s powe er supply 9 ~ 12VDC C/500mA DMX input/output 3-pin female/ma ale XLR soc cket MID DI input 5-pin DIN N socket dime ensions 482 x 134 x 85mm totall weight 2.7k kg m max. ambient tempera ature 45° °C se this dev vice with original o ac ccessories s only. Velleman nv cannot be e held resp ponsible in n Us the event off damage or injury resulted r frrom (incorrect) use e of this de evice.
VDPC174 Rev 01 • Schade door wijzigingen die de gebruiker heeft aangebracht aan het toestel vallen niet onder de garantie. • Houd dit toestel uit de buurt van kinderen en onbevoegden. 3. Algemene richtlijnen Raadpleeg de Velleman® service- en kwaliteitsgarantie achteraan deze handleiding. • Dit toestel is ontworpen voor professioneel gebruik op podia, in disco's, enz. U mag dit toestel enkel binnenshuis gebruiken en aansluiten op een spanning van maximum 9-12VDC / 500mA. • Schud het toestel niet dooreen.
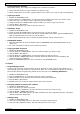
VDPC174 Rev 01 18. Fine-knop Wanneer deze is ingedrukt, dan kunt u met de pan of tilt joystick de scanner met de kleinste stappen besturen. 19. Mode-knop Druk gelijktijdig op FINE en MODE om de ASSIGN- of REVERSE-modus in te schakelen. b. Achterpaneel (zie fig. 2) 1. MIDI In Ontvangt MIDI-gegevens. 2. DMX Polarity Select Keuze van de DMX-polariteit. 3. DMX Out Deze aansluiting zendt uw DMX-waarde naar de DMX scanner of DMX pack. 4. DMX In Deze aansluiting aanvaardt uw DMX ingangssignalen. 5.
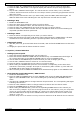
VDPC174 Rev 01 Geef het DMX-adres in volgens volgende tabel: Toestelnummer Digitale DMX-adres 1 2 3 4 5 6 7 8 9 10 11 12 1 17 33 19 65 81 97 113 129 145 161 177 Instelling van de DIP-schakelaars van de scanner 1 is ON 1 and 5 are ON 1 and 6 are ON 1, 5 and 6 are ON 1 and 7 are ON 1, 5 and 7 are ON 1, 6 and 7 are ON 1, 5, 6 and 7 are ON 1 and 8 are ON 1, 5 and 8 are ON 1, 6 and 8 are ON 1, 5, 6 and 8 are ON • De PROGRAM-modus inschakelen Om de mode in te schakelen, houd de PROGRAM-knop gedurende enkel
VDPC174 Rev 01 • Voorbeeld hoe een scène te programmeren 1. Schakel de PROGRAM-modus in. 2. Druk op SCANNER 1 zodat de fader ingeschakeld wordt. 3. Zorg dat pagina A geselecteerd staat. Zoniet, druk op PAGE SELECT om pagina A te selecteren. 4. Plaats de eerste en de tweede fader op hun maximumpositie. 5. Selecteer bank 1 met de UP / DOWN-knoppen. 6. Druk op MIDI / REC. 7. Druk op scène 1 om die op te slaan. 8. Herhaal stap 4 tot 7 tot alle scènes in bank 1 zijn geprogrammeerd. 9.
VDPC174 Rev 01 d. Chases • Een chase programmeren Om een scène te kunnen programmeren, moet er eerst en vooral een scène bestaan. Deze functie laat u toe om 240 scènes in een vooraf bepaalde volgorde af te lopen. Het is aangeraden eerst alle chases te wissen vooraleer u chases begint te programmeren. Zie “Alle scènes wissen”. 1. 2. 3. 4. 5. Schakel de PROGRAM-modus in. Druk op CHASE om de gewenste chase te selecteren. Selecteer de gewenste scène uit de bank. Druk op MIDI / REC.
VDPC174 Rev 01 3. 4. 5. 6. Selecteer met UP en DOWN de as die u wenst toe te kennen (pan of tilt). Gebruik de TAP / DISPLAY-knop om de 16- of 8-kanaals modus te selecteren. Druk op de scanner die wenst toe te kennen. Houd de MODE-knop ingedrukt en druk op de scène overeenkomend met de schuifknop die de beweging bestuurt. (voorbeeld: de pan-beweging wordt bestuurd door schuifknop 4, houd MODE ingedrukt en druk op scèneknop 4). 7.
VDPC174 Rev 01 g. Weergave • Weergave van scènes Er zijn drie weergavemogelijkheden: MANUEEL, AUTOMATISCH en MUZIEKGESTUURD. • Manuele modus 1. Het toestel begeeft zich automatisch in de manuele mode wanneer u het inschakelt. 2. Ga na of zowel de AUTO en de MUSIC LEDs niet oplichten. 3. Gebruik UP / DOWN om de bank met de scènes te selecteren. 4. Druk op de SCENE-knop die u wenst weer te geven. • Automatische modus Hiermee kunt u een bank met geprogrammeerde scènes sequentieel weergeven. 1.
VDPC174 Rev 01 • Een dump-bestand verzenden 1. Schakel het toestel uit en houd gelijktijdig SCANNER 2 en 3 en SCENE 1 ingedrukt. 2. Schakel het toestel terug in terwijl u de drie knoppen ingedrukt houdt. De LCD geeft TRANSMIT weer om aan te geven dat het toestel klaar staat om de bestanden te verzenden. 3. Druk gelijktijdig op SCENE 7 en 8 om de bestanden te verzenden. 4. Bij een fout geeft de LCD ERROR weer.. • Een dump-bestand ontvangen 1.
Rev 01 4 VDPC174 NOTIC CE D’EM MPLOI 1.. Introdu uction Au ux résiden nts de l'Un nion europ péenne De es informa ations env vironneme entales imp portantes concernant ce prod duit Ce symbole sur l'apparreil ou l'emballage indique que l’é élimination d’un appareil en fin de d onnement.
VDPC174 Rev 01 • N’utilisez votre VDPC174 qu’à sa fonction prévue. Tout autre usage peut causer des courtscircuits, des brûlures, des électrochocs etc. Un usage impropre annule d'office la garantie. 4. Description a. Panneau frontal (voir ill. 1) 1. Boutons scanner (1 ~ 12) Sélection de l’appareil. 2. Boutons scène (1 ~ 8) Chargement ou sauvegarde d’un maximum de 240 scènes programmables. 3.
VDPC174 Rev 01 4. DMX In Entrée des signaux DMX. 5. DC Input 9-12VDC / 500mA. 6. Interrupteur de puissance Switch the power on or off. 7. AUDIO In Entrée des signaux audio entre 0.1V ~ 1Vpp. 5. Emploi a. Opération • En général Le VDPC174 permet la programmation de 12 scanners à 16 canaux DMX, 30 bancs de 8 scènes programmables, 6 poursuites de 240 scènes à l’aide de 8 glissières, d’une manette et d’autres boutons.
VDPC174 Rev 01 • Configuration de la manette 1. Maintenez enfoncé le bouton « PROGRAM » jusqu’à ce que la LED s’allume. 2. Maintenez enfoncé les boutons « MODE » et « FINE » simultanément. La LED « ASSIGN » s’allume. Si la LED « REVERSE » s’allume, renfoncez « FINE » et « MODE » pour accéder au mode « ASSIGN ». 3. Sélectionnez l’axe (pan ou tilt) à allouer à l’aide des boutons « UP » et « DOWN ». 4. Utilisez le bouton « TAP / DISPLAY » pour sélectionner le mode 16 ou 8 canaux. 5.
VDPC174 Rev 01 Dans les étapes 3 et 6, veillez à sélectionner la même scène pour ne pas effacer des scènes existantes. • Copie de la configuration du scanner Ceci vous permet de copier la configuration d’un scanner vers un autre. 1. Maintenez enfoncé le bouton de scanner à copier. 2. En maintenant le bouton de scanner enfoncé, enfoncez le bouton du scanner-cible. • Copie d’une scène 1. Activez le mode « PROGRAM ». 2. Enfoncez le bouton UP / DOWN pour sélectionner le banc contenant la scène à copier. 3.
VDPC174 Rev 01 • Ajout d’une étape 1. Activez le mode « PROGRAM ». 2. Enfoncez le bouton correspondant à la poursuite à laquelle vous désirez ajouter une étape. 3. Enfoncez le bouton « TAP / DISPLAY ». L’afficheur LCD affiche l’étape actuelle. 4. Enfoncez UP / DOWN et défilez vers l’étape souhaitée. 5. Enfoncez le bouton « MIDI / REC ». L’afficheur affiche l’étape suivant à la précédente. 6. Renfoncez le bouton « TAP / DISPLAY ». Le LCD affiche la poursuite, la scène et le banc actuel.
VDPC174 Rev 01 • Effacement d’un scanner du canal DMX 1. Activez le mode « ASSIGN » ou « REVERSE ». 2. Enfoncez le bouton « SCANNER » du scanner que vous désirez effacer. 3. Enfoncez simultanément les boutons « MODE » et « AUTO / DEL ». Toutes les LEDs flashent trois fois pour indiquer le complètement de l’opération. • Effacement de tous les canaux DMX 1. Débranchez l’appareil. 2. Enfoncez simultanément les boutons « MODE » et « AUTO / DEL ». 3. Maintenez enfoncé les deux boutons et rebranchez l’appareil.
VDPC174 Rev 01 h. Reproduction des poursuites • Le mode manuel 1. L’appareil entre automatiquement en mode manuel dès la mise en marche. 2. Sélectionnez la poursuite que vous désirez reproduire en enfonçant le bouton de la poursuite correspondant. Enfoncez ce bouton une seconde fois pour désélectionner la poursuite. • Le mode automatique 1. Enfoncez le bouton « AUTO / DEL » pour accéder au mode « AUTO ». 2. Sélectionnez la poursuite en enfonçant un des six boutons « CHASE ».
Rev 01 VDPC174 4 7.. Spécific cations technique es alime entation 9 ~ 12VCC C/500mA entrée/sortie DMX X prise fem melle/mâle XLR à 3 brroches entré ée MIDI p prise DIN à 5 broches dime ensions 482 x 134 x 85mm p poids 2.7k kg te empérature ambiante max. 45° °C ec des acce essoires d’origine. d S Vellem SA man ne sera a N’’employer cet apparreil qu’ave au ucunement responsa able de do ommages ou lésions s survenus s à un usa age (incorr rect) de ce et ap ppareil.
VDPC174 Rev 01 • Los daños causados por modificaciones no autorizadas, no están cubiertos por la garantía. • Mantenga el VDPC174 lejos del alcance de personas no capacitadas y niños. 3. Normas generales Véase la Garantía de servicio y calidad Velleman ® al final de este manual del usuario. • Este aparato ha sido diseñado para uso profesional en una discoteca, un teatro, etc. El VDPC174 sólo está permitido para una conexión con una fuente de corriente de máx. 9-12VCC / 500mA. • No agite el aparato.
VDPC174 Rev 01 20. Botón « Mode » Active el modo « ASSIGN » o « REVERSE » al pulsar simultáneamente los botones « FINE » y « MODE ». b. Panel trasero (véase fig. 2) 1. MIDI In Entrada de datos MIDI. 2. DMX Polarity Select Selección de la polaridad DMX. 3. DMX Out Envío del valor DMX al escáner DMX o el pack DMX. 4. DMX In Entrada de las señales DMX. 5. DC Input 9-12VDC / 500mA. 6. Interruptor ON/OFF Para activar y desactivar el aparato. 7. AUDIO In Entrada de las señales audio entre 0.1V ~ 1Vpp. 5.
VDPC174 7 8 9 10 11 12 97 113 129 145 161 177 Rev 01 1, 6 y 7 en la posición ON 1, 5, 6 y 7 en la posición ON 1 y 8 en la posición ON 1, 5 y 8 en la posición ON 1, 6 y 8 en la posición ON 1, 5, 6 y 8 en la posición ON • Activar el modo de programación Para activar el modo de programación, mantenga pulsado el botón « PROGRAM » durante algunos segundos hasta que el LED se ilumine. • Configurar la palanca 1. Mantenga pulsado el botón « PROGRAM » hasta que el LED se ilumine. 2.
VDPC174 Rev 01 7. Pulse el botón de escena 1 para guardar la primera escena. 8. Repita los pasos de 4 a 7 hasta que todas las escenas estén programadas en el banco 1. 9. Pulse el botón « SCANNER 1 » para desactivar el fader. 10. Para terminar, desactive el modo « PROGRAM ». Ahora, puede hojear los programas manualmente. • Editar una escena 1. Active el modo « PROGRAM ». 2. Para seleccionar un banco que contiene la escena que quiere editar, pulse « UP / DOWN ». 3.
VDPC174 1. 2. 3. 4. 5. Rev 01 Active el modo « PROGRAM ». Pulse el botón CHASE para seleccionar el chase que quiere programar. Seleccione la escena en el banco. Pulse el botón « MIDI / REC ». Repita los pasos 3 y 4 hasta que todas las escenas estén introducidas. • Introducir un banco de escenas en un chase 1. Active el modo « PROGRAM ». 2. Seleccione el chase que quiere programar. 3. Utilice los botones UP / DOWN para seleccionar el banco de escenas que quiere copiar. 4. Pulse el botón MUSIC / BANK COPY.
VDPC174 Rev 01 • Invertir el movimiento de la palanca / el canal DMX 1. Active el modo « PROGRAM ». 2. Pulse « FINE » y « MODE » para entrar en el modo « ASSIGN ». Vuelva a pulsar « FINE » y « MODE » para entrar en el modo « REVERSE ». El LED « REVERSE » se ilumina para indicar la activación del modo. 3. Utilice « UP / DOWN » para conmutar entre pan y tilt. El LED correspondiente se ilumina para indicar la selección. 4. Pulse TAP / DISPLAY para seleccionar entre el modo de 8 canales y 16 canales. 5.
VDPC174 Rev 01 • El modo automático Esta función permite la reproducción secuencial de escenas. 1. Pulse el botón « AUTO / DEL » para entrar en el modo « AUTO ». El LED « AUTO » se ilumina indicando la activación del modo « AUTO ». 2. Utilice los botones « UP / DOWN » para seleccionar el banco con las escenas que quiere reproducir. 3. Después de la selección, utilice los deslizadores « SPEED » y « FADE TIME » para ajustar la velocidad de la progresión de la escena. 4.
Rev 01 4 VDPC174 j. Ajuste de el canal MI IDI 1. Mantenga pulsado o el botón « MIDI / RE EC » durantte tres segu undos. La p pantalla LCD D visualiza el último canal c MIDI utilizado. 2. Utilice el e botón « UP U / DOWN N » para seleccionar el canal DMX X (01 ~ 16) que quierre atribuir al a canal MIDI. M 3. Mantenga pulsado o « MIDI / REC R » para guardar la configurac ción. Todos s los LEDs parpadean p ces para ind dicar que la a operación n está term minada. tres vec 6..
VDPC174 4 Rev 01 2.. Sicherh heitsvors schriften n Schützen Sie e das Gerätt vor Feuch htigkeit und d Nässe. Seien Sie vo orsichtig bei der Installlation: Fassen Sie keiine stromfü ührenden Kabel K an, bensgefährrlichen elek ktrischen Sc chlag zu vermeiden. um einen leb Ö vom Netz. Trennen Sie das Gerät vor dem Öffnen • Bei Schäde en, die durch Nichtbea achtung de er Bedienun ngsanleitung verursacht werden, erlischt de er Garantiean nspruch.
VDPC174 Rev 01 4. Page Select Wählen Sie Seite A (1 ~ 8) oder Seite B (9 ~ 16). 5. Speed-Schiebeschalter Regelung der Chase-Geschwindigkeit zwischen 0.1 Sekunde bis 10 Minuten. 6. Fade Time-Schiebeschalter Regelung der Dimmzeit. Die Dimmzeit ist die Zeit, die der Scanner braucht um von der einen Position zu der anderen Position zu bewegen oder die Zeit, die der Scanner braucht um ein- oder auszufaden. 7. LCD-Display Wiedergabe der aktuellen Aktivität oder des aktuellen Programmstatus. 8.
VDPC174 Rev 01 5. Anwendung a. Bedienung • Allgemeines Mit dem VDPC174 können Sie 12 Scanner von jeweils 16 DMX-Kanälen programmieren, 30 Banken mit 8 programmierbaren Szenen und 6 Chases mit 240 Szenen, steuerbar mit 8 Schiebeschaltern, einem Joystick und anderen Tasten. Mit dem Joystick können Sie einfach und genau die Bewegung eines Gerätes steuern. Um das Publikum zu überraschen, können Sie DMXKanäle zuteilen und sogar umkehren.
VDPC174 Rev 01 steuern, halten Sie die MODE-Taste gedrückt und drücken Sie Szenentaste 4#). 7. Drücken Sie danach gleichzeitig die MODE- und FINE-Taste um den ASSIGN-Modus zu verlassen. c. Szenen • Eine Szene programmieren 1. Öffnen Sie den Programmmodus (siehe “Programmmodus einschalten”). 2. Überprüfen Sie die BLACKOUT-Taste und sorgen Sie dafür, dass die LED nicht aufleuchtet. Sollte die LED trotzdem aufleuchten, drücken Sie einmal die Taste um den BLACKOUT-Modus zu verlassen. 3.
VDPC174 Rev 01 • Eine Szene kopieren 1. Schalten Sie den Programmmodus ein. 2. Wählen Sie die gewünschte Bank mit der zu kopierenden Szene mithilfe der UP / DOWN-Taste. 3. Wählen Sie eine zu kopierende Szene, indem Sie die Szenetaste drücken. 4. Verwenden Sie die UP / DOWN-Taste um die Bank, nach der Sie die Szene kopieren wollen, zu wählen. 5. Drücken Sie MIDI / REC. 6. Drücken Sie die Taste der Szenen, nach der Sie die Szene kopieren wollen. • Eine Szene löschen 1. Schalten Sie den Programmmodus ein. 2.
VDPC174 Rev 01 • Einen Schritt löschen 1. Schalten Sie den Programmmodus ein. 2. Selektieren Sie die Chase mit dem zu löschenden Schritt. 3. Drücken Sie TAP / DISPLAY, das LCD zeigt den heutigen Schritt. 4. Drücken Sie Bank UP / DOWN und scrollen Sie zum Schritt, den Sie löschen wollen. 5. Drücken Sie AUTO / DEL um den Schritt zu löschen. Alle LEDs blinken dreimal als Anzeige, dass die Aufgabe ausgeführt ist. • Eine Chase löschen 1. Drücken Sie die Taste, die der zu löschenden Chase entspricht. 2.
VDPC174 Rev 01 • Alle DMX-Kanäle löschen 1. Schalten Sie das Gerät aus. 2. Drücken Sie zur gleichen Zeit auf MODE und AUTO / DEL. 3. Halten Sie MODE und AUTO / DEL gleichzeitig gedrückt und schalten Sie das Gerät ein. Alle LEDs blinken dreimal, als Anzeige, dass die Aufgabe ausgeführt wurde. • Den DMX-Kanal anzeigen 1. Drücken Sie gleichzeitig FINE und MODE. 2. Drücken Sie erneut FINE und MODE. Die REVERSE LED leuchtet auf. 3.
VDPC174 Rev 01 • Automatischer Modus 1. Drücken Sie AUTO / DEL um den AUTO-Modus einzuschalten. 2. Wählen Sie die gewünschste Chase über eine der 6 CHASE-Tasten. Wenn Sie erneut dieselbe Taste drücken, wird die Auswahl aufgehoben. 3. Verwenden Sie den SPEED- und FADE TIME-Schiebeschalter um die Chase nach Wunsch einzustellen. • Musikgesteuerter Modus 1. Drücken Sie MUSIC / BANK COPY um den Modus einzuschalten. 2. Wählen Sie die gewünschte Chase mit der entsprechenden Chase-Taste.
VDPC174 Rev 01 7. Technische Daten Stromversorgung 9 ~ 12VDC/500mA DMX IN/OUT 3-polig XLR-Stecker/Buchse MIDI IN 5-poliger DIN-Stecker Abmessungen 482 x 134 x 85mm Gewicht 2.7kg max. Umgebungstemperatur 45°C Verwenden Sie dieses Gerät nur mit originellen Zubehörteilen. Velleman nv übernimmt keine Haftung für Schaden oder Verletzungen bei (falscher) Anwendung dieses Gerätes. Für mehr Informationen zu diesem Produkt und die neueste Version dieser Bedienungsanleitung, siehe www.velleman.eu.
Velleman® Service and Quality Warranty Velleman® has over 35 years of experience in the electronics world and distributes its products in more than 85 countries. All our products fulfil strict quality requirements and legal stipulations in the EU. In order to ensure the quality, our products regularly go through an extra quality check, both by an internal quality department and by specialized external organisations.
dûment conditionné (de préférence dans l’emballage d’origine avec mention du défaut) ; • conseil : il est conseillé de consulter la notice et de contrôler câbles, piles, etc. avant de retourner l’appareil.