Das HTC 7 Mozart Handbuch
In diesem Handbuch benutzte Symbole Folgende Symbole werden in diesem Handbuch verwendet, um auf hilfreiche und wichtige Informationen hinzuweisen: Dies zeigt einen Hinweis an. Er kann zusätzliche Informationen enthalten, welche nur für bestimmte Situationen gelten. Oder es wird eine bestimmte Funktion ausführlicher erläutert. Dies zeigt wichtige Informationen an. Sie sollten dies wissen, um eine bestimmte Aufgabe oder Funktion ohne Probleme nutzen zu können. Dies zeigt einen Tipp an. Dieser kann z. B.
Inhalt Inhalt Grundlagen Inhalt des Kartons 6 Das Telefon 6 Abdeckung auf Unterseite 8 SIM-Karte 9 Der Akku 10 Ein- und Ausschalten des Telefons 12 Eingabe der PIN 12 Fingerbewegungen 12 Erste Schritte Erstmalige Einrichtung des Telefons 14 Startseite 14 Zugriff auf Apps und Einstellungen 15 Hubs 15 Standbymodus 15 Entsperren des Displays 16 Wechseln des Displaysperren-Hintergrunds 16 Statusanzeigen 17 Einstellen der Lautstärke 17 Suchen 18 Spracheingaben auf dem Tele
Inhalt Tastatur Verwendung der Displaytastatur 31 Eingabe von Text mit Wortvorhersage 32 Ändern der Tastatureinstellungen 32 Messaging Über Messaging 33 Senden einer SMS 33 Senden einer Bildnachricht 34 Lesen und Beantworten einer Nachricht 34 Verwalten von Nachrichten-Threads 35 E-Mail Hinzufügen eines POP3/IMAP-E-Mail-Kontos 36 Hinzufügen eines Microsoft Exchange-Server-Kontos 36 Öffnen des Posteingangs 37 Senden einer E-Mail 38 Kalender Über den Kalender 41 Erstellen eines Kalendertermins 41 W
Inhalt Zune Synchronisierung von Computer und Telefon 58 Musik + Videos Hub 59 Anhören von Musik 59 Anschauen von Videos 60 Anhören oder Anschauen von Podcasts 60 Hören von Radio 60 Karten und Standort Aktivieren von Ortsdiensten 61 Bing Maps 61 HTC-Hub Über den HTC-Hub 65 Weitere Apps Microsoft Office Mobile 2010 71 Windows Marketplace 72 Spiele 72 Sicherheit Schützen der SIM-Karte mit einer PIN 73 Schützen des Telefons mit einem Kennwort 74 Schützen des Telefons über das We
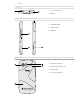
Grundlagen Grundlagen Inhalt des Kartons Der Karton enthält Folgendes: Telefon Akku USB-Kabel 3,5 mm Stereo-Headset Netzteil Anleitung “Hier starten” Kurzanleitung Informationen zur Sicherheit und behördliche Bestimmungen Das Telefon Vorderseite 1 7 1 Benachrichtigungs-LED 2 Touchscreen 3 ZURÜCK 4 Mikrofon 2 5 SUCHE 6 START 7 Hörmuschel 3 6 5 4
Grundlagen Oberseite 1 1 2 3,5 mm Audiobuchse 2 EIN/AUS Linke und rechte Seite 1 LAUTER/LEISER 2 USB-Anschluss 3 KAMERA 1 2 3 Rückseite 1 4 3 1 8-Megapixel-Kamera 2 Abdeckung auf Unterseite 3 Lautsprecher 4 Xenon-Taschenlampe 2
Grundlagen Abdeckung auf Unterseite Entfernen der Abdeckung auf Unterseite Entfernen Sie die Abdeckung auf der Unterseite, um auf das Akkufach und den SIMKarten-Einschub zuzugreifen. 1. Schalten Sie das Telefon aus, drehen Sie es auf den Kopf und halten Sie es sicher fest, wobei die Vorderseite auf Sie gerichtet ist. 2. Schieben Sie die untere Abdeckung mit Ihren Daumen vom Telefon ab. Wiederaufsetzen der Abdeckung auf Unterseite 1. Richten Sie die Abdeckung unten am Telefon aus. 2.
Grundlagen Akkufachabdeckung Öffnen der Akkufachabdeckung 1. Halten Sie das Telefon sicher fest, wobei die Vorderseite nach unten zeigt. 2. Klappen Sie die Akkufachabdeckung auf der linken Seite auf. Schließen der Akkufachabdeckung 1. Halten Sie das Telefon sicher fest, wobei die Vorderseite nach unten zeigt. 2. Klappen Sie die Akkufachabdeckung nach oben und drücken Sie sie zu, bis sie einrastet.
Grundlagen Herausnehmen der SIM-Karte 1. Entfernen Sie die Abdeckung auf Unterseite. Siehe “Entfernen der Abdeckung auf Unterseite”. 2. Öffnen Sie die Akkufachabdeckung. Siehe “Öffnen der Akkufachabdeckung”. 3. Nehmen Sie den Akku heraus. Siehe “Der Akku”. 4. Drücken Sie die Zunge der SIM-Karte nach unten und schieben Sie die Karte heraus. Der Akku Das Telefon wird über einen Akku mit Strom versorgt. Verwenden Sie nur Akkus und Zubehör, welche mit dem Telefon geliefert oder von uns zugelassen wurden.
Grundlagen 5. Schließen Sie die Akkufachabdeckung Herausnehmen des Akkus 1. Entfernen Sie die Abdeckung auf Unterseite. Siehe “Entfernen der Abdeckung auf Unterseite”. 2. Öffnen Sie die Akkufachabdeckung. Siehe “Öffnen der Akkufachabdeckung”. 3. Schieben Sie den Akku heraus. Laden des Akkus Der Akku ist bei Auslieferung bereits zum Teil geladen. Bevor Sie das Telefon einschalten und verwenden, sollten Sie den Akku erst laden.
Grundlagen Ein- und Ausschalten des Telefons Einschalten des Telefons Drücken Sie auf die EIN/AUS-Taste. So einfach ist das. Wenn Sie das Telefon zum ersten Mal einschalten, müssen Sie es einrichten. Lesen Sie “Erstmalige Einrichtung des Telefons”, um alles darüber zu erfahren. Ausschalten des Telefons 1. Wenn das Display deaktiviert ist, drücken Sie auf die EIN/AUS-Taste, um es wieder zu aktivieren. 2. Entsperren Sie das Telefon, wenn das Sperrfenster angezeigt wird.
Grundlagen Drehen Bei den meisten Fenstern können Sie die Displayausrichtung automatisch vom Hochformat zum Querformat wechseln, indem Sie das Telefon einfach seitlich halten. Bei der Eingabe von Text können Sie das Telefon seitlich drehen, um eine größere Tastatur aufzurufen. Kneifen Bei einigen Anwendungen, z. B.
Erste Schritte Erste Schritte Erstmalige Einrichtung des Telefons Wenn Sie das Telefon zum ersten Mal einschalten, werden Sie aufgefordert, einige Optionen wie z. B. die Zeitzone und Ihre Windows-Live-ID einzustellen. Befolgen Sie einfach die Anweisungen auf dem Display und im Nu ist das Telefon zur Verwendung bereit. Startseite Auf der Startseite sehen Sie eine Reihe von “Live-Kacheln”, welche jederzeit aktualisiert werden, um das anzuzeigen, was Ihnen am wichtigsten ist. Sie sehen z. B.
Erste Schritte Wenn Sie etwas, z. B. einen Kontakt, auf der Startseite anheften möchten, drücken Sie solange, bis ein Menü erscheint. Tippen Sie in diesem Menü auf Auf Startseite. Entfernen einer Kachel Drücken Sie auf der Startseite etwas länger auf die Kachel, die Sie entfernen möchten, und tippen Sie anschließend auf . Zugriff auf Apps und Einstellungen Einfach. Tippen Sie auf der Startseite einfach auf nach links.
Erste Schritte Beenden des Standbymodus Das Telefon wird automatisch aus dem Standbymodus aufgeweckt, wenn Sie einen Anruf erhalten. Wenn Sie es manuell aufwecken möchten, drücken Sie kurz auf die EIN/AUS-Taste. Sie müssen dabei das Display entsperren. Entsperren des Displays Wenn Sie die Displaysperre sehen, drücken Sie unten auf das Fenster und streichen Sie Ihren Finger dann nach oben, um das Display zu entsperren und einen eingehenden Anruf anzunehmen.
Erste Schritte Statusanzeigen Die Symbole in der Statusleiste geben Ihnen Aufschluss über den aktuellen Zustand des Telefons. Tippen Sie einfach oben auf das Fenster, um die Status-Symbole anzuzeigen. Sie werden nach ein paar Sekunden wieder ausgeblendet.
Erste Schritte Suchen Suche auf dem Web 1. Drücken Sie bei Anzeige der Startseite auf SUCHEN. Das Fenster für die Bing™-Suche wird angezeigt. 2. Tippen Sie auf das Suchfeld, geben Sie einen Suchbegriff ein und tippen Sie anschließend auf der Tastatur auf . Es wird dann eine Liste mit übereinstimmenden Elementen angezeigt. 3. Tippen Sie auf die Kategorie unterhalb des Suchfelds (z. B. lokal) oder streichen Sie links oder rechts über das Fenster, um die Ergebnisse für die anderen Kategorien anzuzeigen.
Erste Schritte Ändern des Klingeltons Wählen Sie einen der verfügbaren Klingeltöne auf dem Telefon aus. 1. Tippen Sie auf der Startseite auf . 2. Tippen Sie auf Einstellungen > Klingeltöne & Sounds. 3. Tippen Sie auf das Klingelton-Feld. 4. Hören Sie sich einen Klingelton an, indem Sie auf das Wiedergabesymbol neben seinem Namen tippen. 5. Tippen Sie auf den Namen des Klingeltons, den Sie verwenden möchten.
Anrufe Anrufe Absetzen von Anrufen Die meisten SIM-Karten besitzen eine PIN (Personal Identification Number), welche vom Netzbetreiber eingestellt wurde. Wenn Sie zur Eingabe einer PIN aufgefordert werden, geben Sie die Nummer ein und tippen Sie anschließend auf OK. Wenn Sie drei Mal eine falsche PIN eingeben, wird die SIM-Karte gesperrt. Unter “Wiederherstellen einer SIM-Karte, die gesperrt wurde” im Kapitel Sicherheit erfahren Sie, wie Sie die SIM-Karte entsperren können. 1.
Anrufe Empfangen von Anrufen Wenn Sie einen Anruf von einem Kontakt erhalten, wird das Fenster Eingehender Anruf angezeigt. Dort sehen Sie das Anrufer-ID-Bild, den Namen und die Telefonnummer des Anrufers. Wenn Sie einen Anruf von einer Person erhalten, die nicht in den Kontakten gespeichert ist, wird nur das standardmäßige Anrufer-ID-Bild und die Telefonnummer im Fenster Eingehender Anruf angezeigt.
Anrufe Optionen während eines Anrufs Während eines Telefonats können Sie die Tasten auf dem Display nutzen, um das Mikrofon stumm zu schalten oder zu aktivieren oder den Lautsprecher ein- oder auszuschalten. Sie können auch auf MENÜ drücken und entscheiden, ob Sie einen Anruf hinzufügen oder in die Warteschleife legen, das Mikrofon deaktivieren, usw. möchten. Legen eines Anrufs in die Warteschleife 1. Tippen Sie auf . 2. Tippen Sie auf Halten.
Anrufe Ein- und Ausschalten der Freisprechfunktion während eines Anrufes 1. Tippen Sie auf . 2. Tippen Sie auf Lautsprecher. Tippen Sie erneut auf Lautsprecher, um die Freisprechfunktion auszuschalten. Halten Sie das Telefon nicht an Ihr Ohr, wenn die Freisprechfunktion aktiviert ist. Sie könnten sich sonst die Ohren verletzen. Deaktivierung des Mikrofons während eines Anrufes 1. Tippen Sie auf . 2. Tippen Sie auf Ton aus. Tippen Sie erneut auf Ton aus, um das Mikrofon auszuschalten.
Anrufe Löschen der Anrufliste Im Anrufliste-Fenster können Sie Folgendes ausführen: Wenn Sie einen Namen oder eine Nummer aus der Liste entfernen möchten, drücken Sie etwas länger auf ihn/sie und tippen Sie anschließend auf Element löschen. Wenn Sie die gesamte Liste löschen möchten, tippen Sie auf ... und anschließend auf Alle löschen.
Anrufe Ein- und Ausschalten des Flugmodus In vielen Ländern ist es gesetzlich vorgeschrieben, das Telefon an Bord eines Flugzeuges auszuschalten. Eine Möglichkeit, die Telefonfunktion auszuschalten, ist die Aktivierung des Flugmodus (Flugzeugmodus) auf dem Telefon. Wenn Sie den Flugmodus aktivieren, werden sämtliche Funkfunktionen auf dem Telefon, einschließlich der Anruffunktion, Datendiensten, Bluetooth und WLAN, ausgeschaltet. 1. Tippen Sie auf der Startseite auf . 2.
Kontakte Kontakte Über den Kontakte-Hub Wenn Sie Ihr E-Mail-Konto und andere Konten auf dem Telefon einrichten, werden Ihre Kontakte automatisch zum Kontakte-Hub importiert. Sie können Kontakte aus Windows Live, Facebook und andere E-Mail-Konten wie z. B. Google und Outlook (Microsoft Exchange ActiveSync) sehen. Die Windows-Live- und Facebook-Feeds Ihrer Freunde werden ebenfalls im Kontakte-Hub angezeigt. Deren Fotos erscheinen im Bilder-Hub und Ihre eigenen Feeds finden Sie auf der Ich-Kachel.
Kontakte Kontakt informationen Wenn Sie auf einen Kontakt auf dem Kontakte-Hub tippen, wird das Profil-Fenster geöffnet und Sie sehen die Kontaktdetails. Vom Profil-Fenster aus können Sie einen Kontakt anrufen oder ihm eine SMS oder E-Mail senden. Rufen Sie den Kontakt auf der Profil-Seite an oder senden Sie ihm eine SMS oder E-Mail. Streichen Sie mit Ihrem Finger nach links, um zu sehen, was es Neues für den Kontakt gibt.
Kontakte Importieren von Kontakten von einer SIM-Karte 1. Tippen Sie auf der Startseite auf die Kontakte-Kachel. 2. Tippen Sie unter Alle im Kontakte-Hub auf SIM-Kontakte importieren. Wenn Sie bereits ein Konto eingerichtet haben, drücken Sie etwas länger auf Kontakte oben im Fenster und anschließend auf Einstellungen. 3. Entscheiden Sie, wie Sie die Kontakte sortieren und anzeigen möchten, und tippen Sie anschließend auf SIM-Kontakte importieren.
Kontakte 4. Tippen Sie auf . Suche nach einem Kontakt 1. Tippen Sie auf der Startseite auf die Kontakte-Kachel. 2. Drücken Sie auf SUCHEN. 3. Geben Sie in die Suchleiste die ersten paar Buchstaben des Vor- oder Nachnamens des Kontaktes ein, nach dem Sie suchen. Übereinstimmende Kontakte werden angezeigt. 4. Tippen Sie auf den Kontakt, um dessen Kontaktdetails-Fenster zu öffnen. Unter “Kontaktinformationen” in diesem Kapitel finden Sie weitere Einzelheiten.
Kontakte Im Ich-Fenster können Sie Folgendes antippen: Ihre Statusnachricht rechts neben Ihrem Foto, um eine neue Statusnachricht einzugeben. Ihr Foto, um es zu ändern. Ein Foto, um es anzuschauen. Ein Eintrag, um Kommentare hinzuzufügen oder auf einen Kommentar zu antworten.
Tastatur Tastatur Verwendung der Displaytastatur Wenn Sie eine App starten oder ein Feld auswählen, in das Text oder Ziffern eingegeben werden, wird die Displaytastatur aufgerufen. Nachdem Sie den Text eingegeben haben, drücken Sie auf ZURÜCK, um die Tastatur auszublenden. Wenn Sie sie wieder einblenden und verwenden möchten, tippen Sie auf ein Textfeld. Eingabe von Text Je nach App, in der Sie sich gerade befinden, kann sich das Layout der Tastatur etwas unterscheiden.
Tastatur Wechseln zur Tastatur im Querformat Während der Eingabe von Text können Sie die Tastatur im Querformat anzeigen. Drehen Sie das Telefon zur Seite, um eine größere Tastatur zu benutzen, welche Sie einfach mit Ihren Daumen bedienen können. Aktivierung anderer Tastatursprachen Sie können andere Sprachen auf der Tastatur anzeigen. Die Verfügbarkeit dieser Funktion und anderer Sprachen hängt von der Version des Telefons ab, welches Sie verwenden. 1. Tippen Sie auf der Startseite auf . 2.
Messaging Messaging Über Messaging Bleiben Sie stets mit den wichtigen Menschen in Ihrem Leben in Kontakt. Mit der Anwendung Messaging können Sie Text- (SMS) und Bildnachrichten schreiben und senden. Tippen Sie auf der Startseite auf die SMS/MMS-Kachel. Im Fenster Konversationen werden all Ihre gesendeten und empfangenen Nachrichten nach Kontaktnamen oder Telefonnummern in Konversationen gruppiert.
Messaging Senden einer Bildnachricht Wenn Sie eine Bildnachricht senden möchten, erstellen Sie erst eine SMS und fügen Sie dieser dann ein Foto an. 1. Tippen Sie auf der Startseite auf die SMS/MMS-Kachel. 2. Tippen Sie im Konversationen-Fenster auf . 3. Geben Sie einen oder mehrere Empfänger ein. Sie können Folgendes tun: Geben Sie vollständige Telefonnummern oder E-Mail Adressen direkt ins An Feld ein. Verwenden Sie ein Semikolon, um mehrere Empfänger zu trennen.
Messaging Verwalten von Nachrichten-Threads Löschen einer Konversation 1. Drücken Sie im Fenster Konversationen etwas länger auf einen Kontakt (oder eine Telefonnummer), dessen Nachrichten Sie löschen möchten, und tippen Sie anschließend auf Löschen. 2. Wenn Sie zur Bestätigung aufgefordert werden, tippen Sie auf Löschen. Löschen einer Nachricht: 1. Tippen Sie im Fenster Konversationen auf einen Kontakt (oder eine Telefonnummer), um die mit dem Kontakt ausgetauschten Nachrichten anzuzeigen. 2.
E-Mail E-Mail Hinzufügen eines POP3/IMAP-E-Mail-Kontos 1. Tippen Sie auf der Startseite auf . 2. Gehen Sie auf eine der folgenden Weisen vor: Wenn Sie noch keine Konten eingerichtet haben, tippen Sie auf E-Mail-Setup auf der Startseite. Öffnen Sie Einstellungen und tippen Sie anschließend auf E-Mail & Konten > Konto hinzufügen. 3. Tippen Sie auf Einstellungen > E-Mail & Konten > Konto hinzufügen. 4. Tippen Sie auf die Art von Konto, das Sie einrichten möchten.
E-Mail Öffnen des Posteingangs Nachdem Sie ein E-Mail-Konto eingerichtet haben, wird der Startseite eine neue Kachel für dieses Konto hinzugefügt. Wenn Sie ein E-Mail-Konto öffnen möchten, tippen Sie auf dessen Kachel auf der Startseite. Können Sie die Kachel nicht sehen, tippen Sie auf den Pfeil auf der Startseite und anschließend auf das Konto in der Liste mit den Apps. Streichen Sie mit Ihrem Finger nach links oder rechts, um nur ungelesene, gekennzeichnete oder dringende E-Mails abzurufen.
E-Mail Auswahl mehrerer E-Mails im Posteingang zum Löschen oder Verschieben 1. Gehen Sie im Posteingang des E-Mail-Kontos folgendermaßen vor: Tippen Sie auf . Tippen Sie auf den Bereich links neben einer E-Mail. 2. Tippen Sie auf die Kontrollkästchen der E-Mails, welche Sie löschen oder in einen anderen Ordner verschieben möchten. 3. Tippen Sie auf verschieben. , um sie zu löschen, oder auf , um sie in einen anderen Ordner zu Senden einer E-Mail 1.
E-Mail Fortfahren mit einem E-Mail-Entwurf 1. Tippen Sie im Posteingang des E-Mail-Kontos auf und anschließend auf Entwürfe. 2. Tippen Sie auf die Nachricht. 3. Nachdem Sie die Nachricht bearbeitet haben, tippen Sie auf . Lesen und Beantworten einer E-Mail 1. Tippen Sie auf der Startseite auf die Konto-Kachel. 2. Tippen Sie im Posteingang des E-Mail-Kontos auf die E-Mail, welche Sie lesen möchten. 3. Tippen Sie auf und anschließend auf Antworten, Allen antworten oder Weiterleiten.
E-Mail Löschen eines E-Mail-Kontos 1. Tippen Sie auf der Startseite auf . 2. Tippen Sie auf Einstellungen > E-Mail & Konten. 3. Drücken Sie etwas länger auf das E-Mail-Konto, das Sie löschen möchten, und tippen Sie anschließend auf Löschen.
Kalender Kalender Über den Kalender Mit dem Kalender des Telefons können Sie Termine erstellen und verwalten. Sie können das Telefon auch so einstellen, dass es die Inhalte folgender Arten von Kalendern synchronisiert: Melden Sie sich auf dem Telefon bei Ihrem Windows Live-Konto an. Sie können dann den Kalender auf dem Telefon mit dem Windows-Live-Kalender online synchronisieren.
Kalender Senden einer Einladung Sie können mit dem Kalender eine Besprechung oder einen Termin anberaumen und Personen zu Teilnahme einladen. Eine Einladungs-E-Mail wird vom ausgewählten Konto abgesendet. 1. Öffnen Sie den Kalender und erstellen Sie einen neuen Termin. Unter “Erstellen eines Kalendertermins” sehen Sie die Vorgehensweise. 2. Fügen Sie Einzelheiten, wie z. B. das Datum und die Uhrzeit, den Ort usw. hinzu.
Kalender Anzeigen, Bearbeiten oder Löschen eines Termins Sie können Termine, welche Sie erstellt haben, anzeigen, bearbeiten und löschen. Anzeige der Details eines Termins 1. Tippen Sie auf der Startseite auf die Kalender-Kachel. 2. Tippen Sie in der Tages- oder Agenda-Ansicht auf den Termin. Bearbeitung eines Termins 1. Tippen Sie auf der Startseite auf die Kalender-Kachel. 2.
Kalender Anzeigen und Synchronisieren von Kalender Sie können festlegen, welche Kalender im Kalender des Telefons angezeigt oder ausgeblendet und welche synchronisiert werden. Anzeigen und Ausblenden von Kalendern 1. Tippen Sie in der Tages- oder Agenda-Ansicht auf ... und anschließend auf Kalender. 2. Tippen Sie auf den Schalter für den Kalender, den Sie ausblenden möchten. Die Kalender werden unabhängig davon, ob sie angezeigt oder ausgeblendet werden, synchronisiert.
Herstellung von Verbindungen Herstellung von Verbindungen Datenverbindung Das Telefon wird automatisch so eingestellt, dass es die Datenverbindung des Netzbetreibers nutzt, wenn Sie es zum ersten Mal einschalten (und die SIM-Karte eingesetzt ist). Hinzufügen eines Zugangspunkts Bevor Sie dem Telefon eine neue Datenverbindung hinzufügen, erfragen Sie den Zugangspunktnamen und die Einstellungen (einschließlich Benutzername und Kennwort, falls erforderlich) beim Netzbetreiber. 1.
Herstellung von Verbindungen Aktivierung von Daten-Roaming Daten-Roaming ermöglicht Ihnen die Herstellung einer Verbindung zu Partnernetzen Ihres Netzbetreibers, so dass Sie auf Datendienste zugreifen können, wenn Sie sich außerhalb der Reichweite Ihres Netzbetreibers befinden. Die Verwendung von Datendiensten während des Roamings kann kostspielig sein. Erkundigen Sie sich beim Netzanbieter über die Gebühren für das Datenroaming, bevor Sie dies nutzen. 1. Tippen Sie auf der Startseite auf . 2.
Herstellung von Verbindungen Verwendung des Webbrowsers auf dem Telefon Sie müssen eine aktive Daten- oder WLAN-Verbindung besitzen, um auf das Internet zugreifen zu können. Öffnen des Browsers Tippen Sie auf der Startseite auf die Internet-Explorer-Kachel, um das Internet zu besuchen. Besuchen einer Webseite 1. Tippen Sie im Browser-Fenster auf das URL-Feld oben. 2. Geben Sie über die Tastatur die Webseitenadresse ein. 3. Tippen Sie auf auf der Tastatur.
Herstellung von Verbindungen Hinein- und Herauszoomen auf einer Webseite Tippen Sie zwei Mal schnell hintereinander auf das Fenster, um hineinzuzoomen, tippen Sie erneut zwei Mal schnell, um wieder herauszuzoomen. Sie können das Fenster auch mit Ihren Fingern “zusammenziehen” oder “auseinanderschieben”, um hinein- und herauszuzoomen.
Herstellung von Verbindungen 3. Tippen Sie auf zu wechseln. oder , um zum vorherigen oder nächsten gefundenen Element Markieren einer Webseite mit einem Lesezeichen 1. Tippen Sie bei Anzeige einer Webseite im Hochformat auf . 2. Geben Sie bei Bedarf den Namen des Lesezeichens ein und tippen Sie anschließend auf OK. Öffnen eines Lesezeichens Öffnen Sie schnell Seiten, welche Sie häufig besuchen. 1. Tippen Sie bei Anzeige einer Webseite im Hochformat auf . 2.
Herstellung von Verbindungen Bluetooth Aktivierung von Bluetooth-Funktion Wenn Sie die Bluetooth-Funktion aktivieren, wird das Telefon auch für andere erkennbar. 1. Tippen Sie auf der Startseite auf . 2. Tippen Sie auf Einstellungen > Bluetooth. 3. Tippen Sie auf den Ein/Aus-Schalter. Das Telefon wird automatisch übertragungsbereit gemacht und es sucht nach Bluetooth-Geräten in Reichweite.
Herstellung von Verbindungen Neuverbindung eines Headsets oder einer Autofreisprechanlage Normalerweise können Sie die Headsetverbindung einfach wiederherstellen, indem Sie Bluetooth auf dem Telefon aktivieren und anschließend das Headset einschalten. Wenn Sie es aber zusammen mit einem anderen Bluetooth-Gerät verwendet haben, müssen Sie die Verbindung zum Headset möglicherweise manuell wiederherstellen. 1. Stellen Sie sicher, dass das Headset erkennbar ist. 2. Tippen Sie auf der Startseite auf . 3.
Kamera Kamera Kamera-Grundlagen Ob Sie nun geschäftlich oder privat reisen, mit der Kamera des Telefons werden Sie viel Spaß beim Aufnehmen von Fotos und Videos unterwegs haben. Wenn Sie die Kamera-Anwendung öffnen möchten, drücken Sie auf KAMERA oder tippen Sie auf auf der Startseite und anschließend auf Kamera. Wenn Sie die KameraAnwendung zum ersten Mal öffnen, werden Sie gefragt, ob Sie den Standort des Telefons teilen möchten.
Kamera Aufnahme eines Fotos 1. Tippen Sie auf der Startseite auf . 2. Tippen Sie auf Kamera. 3. Bevor Sie das Foto aufnehmen, können Sie erst in das Motiv hineinzoomen. Unter “Zoomen” finden Sie weitere Einzelheiten. und wählen Sie anschließend einen Kamera-Blitzmodus je nach 4. Tippen Sie auf Lichtverhältnissen aus. 5. Richten Sie das Bild im Suchfenster ein. 6. Drücken Sie auf KAMERA, um das Foto aufzunehmen. 7. Entscheiden Sie, was Sie mit dem gerade aufgenommenen Foto anstellen möchten.
Kamera 8. Entscheiden Sie, was Sie mit dem gerade aufgenommenen Video anstellen möchten. Unter “Nach der Aufnahme” finden Sie weitere Einzelheiten. Nach der Aufnahme Nachdem Sie ein Foto oder Video aufgenommen haben, streichen Sie mit Ihrem Finger von links nach rechts, um das gerade aufgenommene Foto oder Video anzuzeigen.
Bilder Bilder Über den Bilder-Hub Mit dem Bilder-Hub können Sie sich Fotos und Videos anschauen, die Sie mit der Kamera des Telefons aufgenommen, heruntergeladen oder mit dem Telefon synchronisiert haben. Sie können sich auch Fotos in Ihren Windows Live- und Facebook-Konten anschauen. Tippen Sie auf die Bilder-Kachel auf der Startseite, um den Bilder-Hub zu öffnen. Nachdem Sie den Bilder-Hub geöffnet haben, schauen Sie links nach den letzten Fotos und Fotos auf Facebook und Windows Live.
Bilder Anzeige von Fotos und Videos 1. Legen Sie fest, wie Sie Ihre Fotos und Videos anzeigen möchten (Alle, Datum, Favoriten). 2. Wählen Sie ein Album aus, das Sie anschauen möchten. 3. Tippen Sie auf ein Foto oder Video, um es im Vollbildmodus anzuzeigen. Anzeige von Fotos und Videos im Querformat Die Anzeigeausrichtung für Fotos richtet sich danach, wie Sie das Telefon halten. Drehen Sie das Telefon zur Seite, um ein Foto im Querformat anzuzeigen. Video wird immer im Querformat wiedergegeben.
Bilder 5. Wählen Sie das E-Mail-Konto aus, das Sie zum Senden des Fotos verwenden möchten. 6. Schreiben Sie die Nachricht und tippen Sie auf . Senden einer Bildnachricht 1. Tippen Sie auf der Startseite auf die Bilder-Kachel. 2. Tippen Sie auf Alle. 3. Tippen Sie auf das Album, in dem sich das Foto befindet, das Sie senden möchten. 4. Drücken Sie etwas länger auf das Foto, das Sie senden möchten, und tippen Sie anschließend auf Versenden. 5. Tippen Sie auf SMS/MMS.
Zune Zune Synchronisierung von Computer und Telefon Wenn Sie Musik, Videos und Podcasts von einem Computer zum Telefon übertragen möchten, benötigen Sie die Zune-Software. Verwenden Sie die Software, um Daten zwischen Computer und Telefon zu synchronisieren. Wenn Sie die Zune-Software noch nicht auf dem Computer installiert haben, laden Sie sie von der Website www.zune.net herunter und installieren Sie sie. Einstellung von Zune für das Synchronisieren von Computer und Telefon 1.
Zune Musik + Videos Hub Der Musik + Videos Hub verschafft Ihnen Zugang zu Ihrer Mediensammlung. Hören Sie sich Musik an, schauen Sie sich Videos an, geben Sie Podcasts wieder, hören Sie Radio und kaufen Sie sich im Marketplace Musik — dies alles können Sie vom Musik + Videos Hub aus tun. Anhören von Musik 1. Holen Sie sich Musik auf das Telefon, indem Sie den Schritten “Auswahl der Elemente, welche mit dem Telefon synchronisiert werden sollen” weiter oben in diesem Kapitel folgen. 2.
Zune Anschauen von Videos 1. Holen Sie sich Videos auf das Telefon, indem Sie den Schritten “Auswahl der Elemente, welche mit dem Telefon synchronisiert werden sollen” weiter oben in diesem Kapitel folgen. 2. Tippen Sie auf der Startseite auf die Musik + Videos Kachel. 3. Tippen Sie im Zune des Musik + Videos Hubs auf Videos. 4. Streichen Sie mit Ihrem Finger nach links oder rechts, um die Videos je nach gewünschter Kategorie zu durchsuchen. 5.
Karten und Standort Karten und Standort Aktivieren von Ortsdiensten Damit Sie Ihren Standort auf dem Telefon finden können, müssen Sie Ortsquellen aktivieren. 1. Tippen Sie auf der Startseite auf . 2. Tippen Sie auf Einstellungen > Standort. 3. Tippen Sie zum Ein- und Ausschalten auf den Ein/Aus-Schalter für Ortsdienste. Bing Maps Mit Bing Maps können Sie Ihren aktuellen Standort bestimmen, Verkehrssituationen in Echtzeit anzeigen und genaue Wegbeschreibungen erhalten.
Karten und Standort Beziehen von Adresse und weiteren Informationen über einen Ort 1. Drücken Sie etwas länger auf einen Ort auf der Karte. Über dem Ort erscheint ein Ballon mit der Adresse. 2. Tippen Sie auf den Ballon, um weitere Informationen anzuzeigen. Sie können Wegbeschreibungen zu dem Ort abrufen, den Ort auf der Startseite hinzufügen, ihn per SMS oder E-Mail mit anderen teilen usw.
Karten und Standort Anzeige von Suchergebnissen Die Suchergebnisse werden als Markierungen auf der Karte angezeigt. Nachdem Sie auf den Ballon getippt haben, welcher den gewünschten Ort anzeigt, sehen Sie die Adresse, die Bewertung, Orte in der Nähe und Rezensionen, falls vorhanden. Wenn Sie die Ergebnisse in einer Liste anzeigen möchten, tippen Sie bei Anzeige der Karte auf .... Tippen Sie schließlich auf Ergebnisliste.
Karten und Standort Abfrage von Verkehrsbedingungen Informationen zu Verkehrsbedingungen können nur an bestimmten Orten abgefragt werden. Sie können Echtzeit-Verkehrsbedingungen auf einer Karte anzeigen. Verkehrsbedingungen werden als farbige Linien über Straßen angezeigt. Anhand der Farben können Sie erkennen, wie schnell sich der Verkehr auf einer Straße bewegt. Wenn Sie Verkehrsbedingungen anzeigen möchten, tippen Sie bei Anzeige der einer Karte auf ... und anschließend auf Verkehrsinfo ein.
HTC-Hub HTC-Hub Über den HTC-Hub Mit Apps von HTC können Sie Ihr Telefon noch vielfältiger einsetzen. Öffnen Sie den HTCHub und schauen Sie einmal nach, was da alles für Sie bereit steht. Die integrierte WetterApp zeigt das Wetter für Ihren Standort oder einen Ort Ihrer Wahl in einer ansprechenden 3D-Animation an und gibt auch eine Vorhersage für die nächsten Tage. Mit nur einem Fingertipp können Sie auf Apps zugreifen, die von tollen Spielen bis hin zu ManagementTools reichen.
HTC-Hub 3. Tippen Sie auf Weitere. 4. Tippen Sie auf die App, die Sie öffnen oder herunterladen möchten. Wenn die App bereits auf dem Telefon geladen wurden, wird sie auch in der Liste mit Apps angezeigt. Wetter Sollte ich heute einen Schirm mitnehmen? Schauen Sie sich die Wettervorhersage an, bevor Sie sich auf den Weg machen. Anzeige des Wetters 1. Tippen Sie auf der Startseite auf . 2. Tippen Sie auf HTC-Hub. Das Wetter für Ihren aktuellen Ort wird auf der Wetteruhr angezeigt. 3.
HTC-Hub Rechner Halten Sie das Telefon aufrecht, um einen einfachen Taschenrechner zu öffnen. Drehen Sie das Telefon zur Seite, um einen wissenschaftlichen Taschenrechner zu öffnen. Verbindungs-Setup Richten Sie die Datenverbindung des Telefons basierend auf der SIM-Karte oder dem ausgewählten Netzbetreiber ein. Setzen Sie die SIM-Karte in das Telefon ein, bevor Sie fortfahren. Das Verbindungs-Setup steht nur in bestimmten Versionen des Telefons zur Verfügung.
HTC-Hub Erstellen einer Notiz 1. Tippen Sie auf der Startseite auf . 2. Tippen Sie auf HTC-Hub. 3. Tippen Sie auf Weitere. 4. Tippen Sie auf Notizen. 5. Tippen Sie auf . Sie können auch auf den Notizenstapel unten links im Fenster tippen, um eine neue Notiz zu erstellen. 6. Geben Sie die Notiz ein und tippen Sie auf . Bearbeiten einer Notiz 1. Tippen Sie im Notiz-Fenster auf . Sie können bei Anzeige der Korkwand auch Ihren Finger nach links streichen, um die Listenansicht aufzurufen. 2.
HTC-Hub 3. Tippen Sie auf Weitere. 4. Tippen Sie auf Fotoverbesserung. 5. Tippen Sie auf Bild auswählen. 6. Öffnen Sie das Album mit dem Fotos, das Sie bearbeiten möchten, und tippen Sie anschließend auf dieses Foto. 7. Streichen Sie mit Ihrem Finger oben über das Fenster, um den Effekt auszuwählen, den Sie auf das Foto anwenden möchten. . Das verbesserte Foto wird in einem anderen Album namens 8. Tippen Sie auf Gespeicherte Bilder gespeichert.
HTC-Hub Löschen eines Aktienangebotes oder Börsenindexes 1. Tippen Sie im Aktien-Fenster auf ... > Bearbeiten. 2. Tippen Sie auf den roten Kreis neben dem Element, das Sie löschen möchten. 3. Tippen Sie auf Fertig. Ändern der Aktienreihenfolge 1. Tippen Sie im Aktien-Fenster auf ... > Bearbeiten. 2. Drücken Sie etwas länger auf am Ende des Elementes, das Sie verschieben möchten. Wenn die Zeile hervorgehoben wird, ziehen Sie sie an die neue Position. 3. Tippen Sie auf Fertig.
Weitere Apps Weitere Apps Microsoft Office Mobile 2010 Das Microsoft® Office Hub besteht aus folgenden Apps: Mit Microsoft OneNote Mobile 2010 können Sie die Übersicht über Angelegenheiten zu Hause, in der Schule und bei der Arbeit behalten — Ihre großen Ideen, Einkaufslisten, Besprechungsnotizen, Projekte usw. Mit Microsoft® Word Mobile 2010 können Sie auf dem Telefon Dokumente erstellen und bearbeiten.
Weitere Apps Verwendung von Microsoft Office Mobile 1. Tippen Sie auf der Startseite auf . 2. Tippen Sie auf Office. 3. Wählen Sie die Office-App aus, welche Sie verwenden möchten. Scrollen Sie nach links, um weitere Office-Apps anzuzeigen.
Sicherheit Sicherheit Schützen der SIM-Karte mit einer PIN Sie können Ihr Telefon noch besser schützen, indem Sie eine PIN (Persönliche Identifikationsnummer) zuweisen. Stellen Sie sicher, dass Sie die vom Netzbetreiber bereitgestellte Standard-SIM PIN besitzen, bevor Sie fortfahren. 1. Tippen Sie auf der Startseite auf die Telefon-Kachel. 2. Tippen Sie auf ... und anschließend auf Anrufeinstellungen. 3. Tippen Sie auf den Ein/Aus-Schalter für SIM-Sicherheit. 4.
Sicherheit Schützen des Telefons mit einem Kennwort Sie können das Telefon schützen, indem Sie die Eingabe eines Kennwortes erforderlich machen, wenn das Telefon eingeschaltet oder aus dem Standbymodus (Display deaktiviert) aufgeweckt wird. 1. Tippen Sie auf der Startseite auf . 2. Tippen Sie auf Einstellungen > Sperre & Hintergrund. 3. Tippen Sie auf den Ein/Aus-Schalter für das Kennwort. 4. Geben Sie das Kennwort in die Felder Neues Kennwort und Kennwort bestätigen ein. 5. Tippen Sie auf Fertig.
Einstellungen Einstellungen Einstellungen auf dem Telefon Im Einstellungen-Fenster können Sie die Einstellungen des Telefons festlegen und ändern. 1. Tippen Sie auf der Startseite auf . 2. Tippen Sie auf Einstellungen. 3. Streichen Sie mit Ihrem Finger links oder rechts über die System- oder Anwendungseinstellungen. Systemeinstellungen Klingeltöne & Sounds Schalten Sie das Klingeln oder Vibrieren ein oder aus.
Einstellungen Telefon suchen Wenn Sie sich nicht bei einem Windows-Live-Konto angemeldet haben, stellen Sie das Telefon für Kommunikation mit einem WebBrowser ein. Wenn Sie bereits angemeldet sind, ändern Sie die Einstellungen für das Auffinden des Telefons. Telefon-Update Legen Sie fest, ob Sie benachrichtigt werden möchten, wenn ein Update verfügbar wird, und wie Sie nach Updates suchen möchten. Info Schauen Sie sich Informationen über das Telefon an.
Einstellungen Wenn Vibrieren aktiviert ist, wechselt das Telefon in den Vibrationsmodus, sollten Sie die Lautstärke ganz herunterdrehen. Wenn Vibrieren deaktiviert ist, wechselt das Telefon in den Lautlosmodus, sollten Sie die Lautstärke ganz herunterdrehen. Wechseln zwischen den Modi Lautlos, Vibrieren und Normal Wechseln Sie vom Normalmodus zum Modus Vibrieren oder Lautlos, indem Sie die LEISER-Taste solange drücken, bis Sie die Lautstärke ganz heruntergedreht haben.
Aktualisieren und Zurücksetzen Aktualisieren und Zurücksetzen Aktualisierung der Telefonsoftware Von Zeit zu Zeit werden Updates für das Telefon verfügbar gemacht. Das Telefon kann nach diesen Aktualisierungen suchen und Sie bei Bedarf auf deren Verfügbarkeit hinweisen. Telefon so einstellen, dass eine Benachrichtigung angezeigt wird, wenn ein Update zur Verfügung steht 1. Tippen Sie auf der Startseite auf . 2. Tippen Sie auf Einstellungen > Telefon-Update. 3.
Aktualisieren und Zurücksetzen Wiederherstellen der Standardeinstellungen (Hardware-Zurücksetzung) Wenn Sie das Telefon einer anderen Person überlassen möchten oder es ein nicht lösbares Problem gibt, können Sie die Standardeinstellungen wiederherstellen (dies wird auch als Hardware-Zurücksetzung bezeichnet). Das Telefon wird dabei in den Zustand zurückversetzt, in dem es sich beim ersten Einschalten befand. Das Wiederherstellen der Standardeinstellungen sollte reiflich überlegt werden.
Handelsmarken und Copyright Handelsmarken und Copyright Copyright © 2010 HTC Corporation. Alle Rechte vorbehalten. Das HTC Logo, das HTC quietly brilliant Logo, HTC 7 Mozart und HTC Care sind Handelsmarken und/oder Dienstmarken der HTC Corporation. Microsoft, Windows, Windows XP, Windows Vista, Windows Phone, Windows Marketplace, Outlook, Zune, Bing und XBox sind entweder eingetragene oder nicht eingetragene Handelsmarken der Microsoft Corporation in den USA und/oder anderen Ländern.
Index Index A Abdeckung auf Unterseite 8 Abweisen eines eingehenden Anrufes 21 Akku 10 Aktualisierung der Telefonsoftware 78 Ändern der Telefonsprache 77 Ändern des Klingeltons 19 Annehmen eines eingehenden Anrufs 21 Anrufdienste 24 Anrufer-ID 21 Anrufliste 23 Anzeige von Fotos und Videos 56 Aufnahme eines Fotos 53 B Bearbeitung von Kontaktinformationen 28 Beenden eines Anrufes 23 Benachrichtigungston 77 Bilder 55 Bing Maps 61 Blitz (Kamera) 53 Bluetooth 50 - Anschließen eines Headsets oder einer Frei
Index Konferenzschaltung 22 Kontakte 26, 27 L Laden des Akkus 11 Lautstärke 17 Legen eines Anrufs in die Warteschleife 22 Löschen von Kontakten 29 M Makeln zwischen Anrufen 22 Marketplace 72 Messaging 33 O Office Mobile 71 Ortsdienste 61 P POP3/IMAP 36 Prüfen von Informationen über das Telefon 77 PUK 73 S Schützen der SIM-Karte mit einer PIN 73 Senden einer Bildnachricht 34 Senden einer SMS 33 Senden von Fotos oder Videos per E-Mail 56 SIM-Karte 9 - Importieren von Kontakten 28 SkyDrive - Hochlade