Your HTC 7 Mozart User guide
Icons used in this guide In this user guide, we use the following symbols to indicate useful and important information: This is a note. It might give extra information that’s only applicable in certain situations. Or explain a specific feature in a bit more detail. This is important info. Stuff you really need to know to accomplish a task or get a feature to work properly. This is a tip. It might provide an alternative way to do something or tell you about a special option you might find useful.
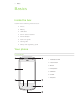
Contents Contents Basics Inside the box 6 Your phone 6 Bottom cover 8 SIM card 9 Battery 10 Switching your phone on or off 12 Entering your PIN 12 Finger gestures 12 Getting started Setting up your phone for the first time 13 Start screen 13 Accessing apps and settings 14 Hubs 14 Sleep mode 14 Unlocking the screen 15 Changing your lock screen wallpaper 15 Status icons 16 Adjusting the volume 16 Searching 17 Interacting with your phone by speaking 1
Contents Keyboard Using the onscreen keyboard 29 Entering words with predictive text 30 Changing keyboard settings 30 Messaging About Messaging 31 Sending a text message 31 Sending a picture message 32 Viewing and replying to a message 32 Managing message conversations 33 Email Adding a POP3/IMAP email account 34 Adding a Microsoft Exchange Server account 34 Checking your inbox 35 Sending an email message 36 Calendar About Calendar 38 Creating a calendar appointment 38 Changing calendar views 39 View
Contents Zune Synchronizing your computer and phone 55 Music + Videos hub 56 Listening to music 56 Watching videos 57 Listening to or watching your podcasts 57 Listening to the radio 57 Maps and location Turning on location services 58 Bing Maps 58 HTC Hub About the HTC Hub 62 More apps Microsoft Office Mobile 2010 67 Windows Marketplace 68 Games 68 Security Protecting your SIM card with a PIN 69 Protecting your phone with a password 70 Protecting your phone thr
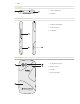
Basics������ ������������ Basics Inside the box You’ll find the following inside the box: Phone Battery USB cable 3.
Basics������ ������������ Top panel 1 1 3.
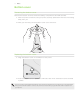
Basics������ ������������ Bottom cover Removing the bottom cover Remove the bottom cover to access the battery compartment and SIM card slot. 1. With the phone turned off, hold your phone securely upside down with the front facing away from you. 2. With your thumbs, push the bottom cover out to remove it. Replacing the bottom cover 1. Align the bottom cover on the bottom of the phone. 2. Push the bottom cover in place. You will hear a click when the bottom cover is locked in place.
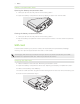
Basics������ ������������ Battery compartment door Opening the battery compartment door 1. Hold your phone securely with the front facing down. 2. Open the battery compartment door by flipping it open from the left side. Closing the battery compartment door 1. Hold your phone securely with the front facing down. 2. Flip the battery compartment door up and push the door in until it clicks into place to lock it.
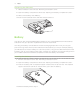
Basics������ ������������ Removing the SIM card 1. Take the bottom cover off. See “Removing the bottom cover.” 2. Open the battery compartment door. See “Opening the battery compartment door.” 3. Take out the battery. See “Battery.” 4. Push the SIM card tab down and slide the SIM card out. Battery Your phone uses a rechargeable battery. Please use only original batteries and accessories that came with your phone or replacements that we recommend.
Basics������ ������������ 5. Close the battery compartment door. Removing the battery 1. Take the bottom cover off. See “Removing the bottom cover.” 2. Open the battery compartment door. See “Opening the battery compartment door.” 3. Slide the battery out. Charging the battery The battery is partially charged when shipped. Before you turn on and start using your phone, it is recommended that you charge the battery. Some batteries perform best after several full charge/discharge cycles.
Basics������ ������������ Switching your phone on or off Switching your phone on Press the POWER button. Easy. When you turn on the phone for the first time, you’ll need to set it up. Go to “Setting up your phone for the first time” and we’ll take you through it. Switching your phone off 1. If the display is off, press the POWER button to turn it back on. 2. Unlock your phone if the Lock screen is displayed. See “Unlocking the screen” in the Getting started chapter. 3.
Getting ��������������������� started������ Getting started Setting up your phone for the first time When you switch on your phone for the first time, you’ll be asked to set some options such as your time zone and your Window Live ID. Just follow the onscreen instructions and you’ll be up and running with your phone in no time. Start screen Up front on the Start screen, you get to see at a glance Windows® Phone live tiles that continuously update and show what’s most personal to you.
Getting ��������������������� started������ To pin something, let’s say a contact, to the Start screen, press and hold it until a menu appears, and then tap pin to start. Unpinning a tile On the Start screen, press and hold the tile you want to remove, and then tap . Accessing apps and settings Easy. On the Start screen, just tap or slide your finger left. Hubs Simplify your everyday tasks with hubs.
Getting ��������������������� started������ Waking up from Sleep mode Your phone automatically wakes up when you have an incoming call. To wake it up manually, press the POWER button. You’ll need to unlock the screen. Unlocking the screen When you see the lock screen, press the bottom of the screen and then slide your finger up to unlock the screen or answer an incoming call. If you’ve set up a phone password, you’ll need to enter the it to unlock the screen.
Getting ��������������������� started������ Status icons You can tell a lot about your phone by checking the icons in its status bar. Simply tap the top of the screen to show the status icons. The status icons disappear after a few seconds.
Getting ��������������������� started������ Searching Searching the Web 1. On the Start screen, press SEARCH. The Bing™ search screen opens. 2. Tap the search box, enter what you want to search for, and then tap keyboard. You’ll then see a list of matched items onscreen. on the 3. Tap the category below the search box (for example, local) or swipe left or right on the screen to check the other results for the other categories.
Getting ��������������������� started������ Changing the ringtone Choose from the available selections of ringtones on your phone. 1. On the Start screen, tap . 2. Tap Settings > ringtones & sounds. 3. Tap the Ringtone box. 4. Listen to a ringtone by tapping the play icon beside its name. 5. Tap the name of the ringtone that you want to use. Changing the theme Feeling a little blue? You can change the theme of your phone to match your mood for the day. 1. On the Start screen, tap . 2.
Phone ����������������� calls������ Phone calls Making calls Most SIM cards come with a PIN (personal identification number) set by your mobile operator. If you’re asked for a PIN, enter it and then tap OK. If you enter the PIN wrong three times, your SIM card is blocked. To unlock your SIM card, see “Restoring a SIM card that has been locked out” in the Security chapter. 1. On the Start screen, tap the Phone tile. 2. Tap . 3. Dial the number you want to call, and then tap call.
Phone ����������������� calls������ Receiving calls When you receive a phone call from a contact, the Incoming call screen appears and displays the caller ID icon, name, and phone number of the calling party. When you receive a phone call from someone who is not stored in People, only the default caller ID icon and phone number appear on the Incoming call screen. Answering or rejecting an incoming call If To answer the call To reject the call Display is on Tap answer. Tap ignore.
Phone ����������������� calls������ Putting a call on hold 1. Tap . 2. Tap hold. Tap hold again to resume the call. Switching between calls If you’re already on a call and accept another call, you can choose to switch between the two calls. 1. When you receive another call, tap answer to accept the second call, and to put the first call on hold. 2. To switch between the calls, tap the bar at the top of the screen. 3. To end the current call and return to the other call, tap end call.
Phone ����������������� calls������ Muting the microphone during a call 1. Tap . 2. Tap mute. Tap mute again to turn on the microphone. Ending a call On the screen, tap end call. If the phone display is off, press POWER to turn on the screen so you can tap end call. Using call history Use the call history to check missed calls, your dialed numbers and received calls. Checking calls in the call history 1. On the Start screen, tap the Phone tile. 2.
Phone ����������������� calls������ Clearing the call history list On the call history screen, you can do the following: To remove a name or number from the list, press and hold it, and then tap delete item. To clear the entire list, tap ... , and then tap delete all. Call services Your phone can directly link to the mobile phone network, and enable you to access and change the settings of various phone services for your phone.
People������ ������������ People About the People hub When you set up your email and other accounts on your phone, your contacts are imported automatically into your People hub. You’ll be able to see contacts from your Windows Live, Facebook, as well as other email accounts like Google and Outlook (Microsoft Exchange ActiveSync). Your friends’ Windows Live and Facebook feeds also appear in your People hub. Their photos show up in your Pictures hub, and your own feeds pop up in your Me tile.
People������ ������������ If you signed in to your Windows Live account when you first set up the phone, your contacts from those accounts will appear in the contacts list when you first open People. Contact information When you tap a contact on the People hub, the profile screen opens, showing you the person’s contact details. You can call, send text, or send an email to the contact from the profile screen. Call, send a message, or send an email to that contact in the profile page.
People������ ������������ Importing contacts from your SIM card 1. On the Start screen, tap the People tile. 2. In all of the People hub, tap import SIM contacts. If you have an account already set up, press and hold people on top of the screen, and then tap settings. 3. Choose how you want to sort and display the contacts, and then tap import sim contacts.
People������ ������������ Searching for a contact 1. On the Start screen, tap the People tile. 2. Press SEARCH. 3. In the search bar, enter the first few letters of the first or last name of the contact you are looking for. Matching contacts are displayed. 4. Tap the contact to open his or her contact details screen. See “Contact information” in this chapter for details. Looking for your contacts that start with the letter M? Tap the letter box, for example particular letter on your contacts list.
People������ ������������ While on the Me screen, you can tap: Your status message to the right of your photo to post a new status message. Your photo to change it. A photo to view it. An entry to add comments or reply to a comment.
Keyboard������ �������������� Keyboard Using the onscreen keyboard When you start an app or select a box that requires text or numbers, the onscreen keyboard becomes available. After entering your text, press BACK to close the keyboard. To open and use it again, tap a text box. Entering text Depending on the app you’re in, you may see a slightly different keyboard layout. Use the following keys while entering text: Some keys have multiple characters or accents associated with them.
Keyboard������ �������������� Changing to the landscape keyboard When entering text, you can choose to use the landscape orientation of the keyboard. Turn your phone sideways to use a larger keyboard that lets you type easily using your thumbs. Enabling other keyboard languages You can choose to show other keyboard languages on the keyboard. The availability of this feature and the languages available to choose from may depend on the version of phone you have. 1. On the Start screen, tap . 2.
Messaging������ ��������������� Messaging About Messaging Keep in touch with important people in your life. Use the Messaging application to compose and send text and picture messages. On the Start screen, tap the Messaging tile. On the conversations screen, all your sent and received messages are neatly grouped into conversations, by contact name or phone number. You can: Scroll up or down the list of conversations by swiping your finger on the screen.
Messaging������ ��������������� Sending a picture message To send a picture message, start by creating a new text message, and then attach a photo to include it. 1. On the Start screen, tap the Messaging tile. 2. On the conversations screen, tap . 3. Fill in one or more recipients. You can: Enter complete phone numbers or email addresses directly in the To field. Use the semicolon to separate recipients. Enter the first few letters of a contact name.
Messaging������ ��������������� Managing message conversations Deleting a conversation 1. On the conversations screen, press and hold a contact (or phone number) whose messages you want to delete, and then tap delete. 2. When you’re asked to confirm, tap delete. Deleting a message 1. On the conversations screen, tap a contact (or phone number) to display the exchange of messages with that contact. 2. Press and hold the message that you want to delete. 3. Tap delete on the options menu. 4.
Email������ ����������� Email Adding a POP3/IMAP email account 1. On the Start screen, tap . 2. Do one of the following: If you haven’t set up any accounts yet, tap Email setup on the Start screen. Open Settings, and then tap email & accounts > add an account. 3. Tap Settings > email & accounts > add an account. 4. Tap the type of account you want to set up. If you don’t see the account type that you want, tap other account or advanced setup.
Email������ ����������� Checking your inbox After you set up an email account, a new tile is created on the Start screen for that account. To open an email account, tap its tile on the Start screen. If you don’t see the tile, tap the arrow on the Start screen, and then tap the account in the apps list. Slide your finger left or right to check only your unread, flagged, or urgent email.
Email������ ����������� Selecting multiple email messages from the inbox to delete or move 1. On the email account inbox, do one of the following: Tap . Tap the area to the left of an email. 2. Tap the check boxes of email messages you want to delete or move to another folder. 3. Tap to delete them or tap to move them to a different folder. Sending an email message 1. Open the email account that you want to use to send your email. 2. On the email account inbox, tap . 3.
Email������ ����������� Reading and replying to an email message 1. On the Start screen, tap the email account tile. 2. On the email account inbox, tap the email you want to read. 3. Tap , and then tap reply, reply all, or forward. Setting the priority for an email message 1. While composing the message, tap ... . 2. Tap priority. 3. Select the priority for the message. If you selected high or low priority, the priority appears below the subject line of the message. Flagging an email 1.
Calendar������ �������������� Calendar About Calendar Use your phone’s Calendar to create and manage your appointments. You can also set up your phone to stay in sync with the following types of calendars: On your phone, sign in to your Windows Live account so you’ll be able to sync your phone’s Calendar with your Windows Live Calendar online. If you haven’t signed in to your Windows Live account yet, see the Getting started chapter to find out how to sign in.
Calendar������ �������������� Sending an invitation You can use Calendar to schedule a meeting or an appointment and invite people to attend it. An invitation email will be sent to them from the account that you choose. 1. Open Calendar and create a new appointment. For the steps, see “Creating a calendar appointment.” 2. Add details, such as date and time, location, and more. Remember to choose the Account to use for sending the invitation email 3.
Calendar������ �������������� Viewing, editing or deleting an appointment You can view, edit, or delete appointments you’ve created. Viewing the details of an appointment 1. On the Start screen, tap the Calendar tile. 2. In day or agenda view, tap the appointment. Editing an appointment 1. On the Start screen, tap the Calendar tile. 2. In day or agenda view, press and hold the appointment, and then tap edit to open it. 3. Make your changes to the appointment. 4.
Calendar������ �������������� Displaying and synchronizing calendars You can choose which calendars to show or hide on your phone’s Calendar, and which ones to keep synchronized. Showing or hiding calendars 1. In day or agenda view, tap ... , and then tap calendars. 2. Tap the on switch for the calendar that you want to hide. The calendars are kept synchronized on your phone, whether or not you hide them.
Getting ����������������������� connected������ Getting connected Data connection Your phone will be automatically set up to use your mobile operator’s data connection when you turn on your phone (if the SIM card is inserted) for the first time. Adding an access point Before you add a new data connection on your phone, obtain the access point name and settings (including username and password if required) from your mobile operator. 1. On the Start screen, tap . 2. Tap Settings > cellular. 3.
Getting ����������������������� connected������ Enabling data roaming Data roaming lets you connect to your mobile operator’s partner networks and access data services when you are out of your mobile operator’s coverage area. Using data services while roaming will be costly. Check with your mobile operator for data roaming rates before you use data roaming. 1. On the Start screen, tap . 2. Tap Settings > cellular. 3. Tap the Data roaming options box, and then tap Roam.
Getting ����������������������� connected������ Using your phone’s web browser You must have an active data connection or Wi-Fi connection to access the Internet. Opening the browser On the Start screen, tap the Internet Explorer tile to start surfing the Web. Going to a web page 1. On the browser screen, tap the URL box on top of the screen. 2. Enter the web page address using the keyboard. 3. Tap on the keyboard.
Getting ����������������������� connected������ Zooming in or out on a web page Tap the screen twice quickly to zoom in, then tap the screen twice quickly again to zoom out. You can also use your fingers to spread or pinch the screen to zoom in or out. Selecting a link in a web page You can tap a link with your finger to open it, or press and hold a link for more options. Link What to do Web page address (URLs) Tap the link to open the web page.
Getting ����������������������� connected������ Bookmarking a web page 1. While viewing a web page in portrait orientation, tap . 2. Edit the bookmark name if needed, and then tap ok. Opening a bookmark Quickly view the pages that you access most often. 1. While viewing a web page in portrait orientation, tap . 2. In favorites, tap the bookmark you want to open. Editing a bookmark 1. While viewing a web page in portrait orientation, tap . 2.
Getting ����������������������� connected������ Bluetooth Turning Bluetooth on Turning Bluetooth on also makes the phone discoverable. 1. On the Start screen, tap . 2. Tap Settings > Bluetooth. 3. Tap the On/Off switch. Your device is automatically made discoverable, and searches for Bluetooth devices within range. Turn off Bluetooth when not in use to conserve battery power, or in places where using a wireless device is prohibited, such as on board an aircraft and in hospitals.
Getting ����������������������� connected������ Reconnecting a headset or car kit Normally, you can easily reconnect your headset by switching on Bluetooth on your phone, and turning on the headset. However, you might have to connect manually if your headset has been used with another Bluetooth device. 1. Make sure that the headset is set to discoverable. 2. On the Start screen, tap . 3. Tap Settings > Bluetooth. 4. If the Bluetooth switch is off, tap it to turn on Bluetooth. 5.
Camera������ ������������ Camera Camera basics Whether traveling for business or fun, enjoy taking photos and videos of your trip and encounters with your phone’s camera. To open the camera, press CAMERA, or tap on the Start screen and then tap Camera. When you open the camera app for the first time, it will ask you if you want to share the location of your phone. This will add a location tag to your captured photos so you’ll know where they were taken.
Camera������ ������������ Taking a photo 1. On the Start screen, tap . 2. Tap Camera. 3. Before taking the photo, you can zoom in first on your subject. See “Zooming” to find out how. 4. Tap , and then select a camera flash mode depending on your lighting conditions. 5. Frame your subject on the Viewfinder screen. 6. Press CAMERA to take the photo. 7. Choose what you want to do with the photo you’ve just taken. See “After capturing“ for details.
Camera������ ������������ After capturing After capturing a photo or video, slide your finger from left to right to see the photo or video you’ve just captured. Press and hold the photo or video so you can: add to favorites (Photo mode only) Add the photo to your favorites in the Pictures application. delete Delete the photo or video upload to SkyDrive: upload the photo to your SkyDrive online storage.
Pictures������ �������������� Pictures About the Pictures hub Using the Pictures hub, you can view photos and watch videos that you’ve taken with your phone’s camera, downloaded, or synchronized with your phone. You can also take a look at your photos on your Windows Live and Facebook accounts. To open the Pictures hub, tap the Pictures tile on the Start screen. After opening the Pictures hub, slide to the left to check out recent photos and photos on Facebook and Windows Live.
Pictures������ �������������� Viewing photos and videos 1. Choose how you want to browse through your photos and videos (all, date, favorites). 2. Select an album to view. 3. Tap a photo or video to view it in full screen. Viewing photos and videos in landscape orientation The photo orientation adjusts to how you hold your phone. Turn your phone sideways to view a photo in landscape mode. Video is always displayed in landscape mode when you play it.
Pictures������ �������������� Sending a picture message 1. On the Start screen, tap the Pictures tile. 2. Tap all. 3. Tap the album where the photo you want to share is in. 4. Press and hold the photo you want to send, and then tap share. 5. Tap Messaging. The photo is automatically added into the message. 6. Compose your message and then tap . Sharing your photos on the Web Using the Pictures hub, you can share your photos on Facebook and upload your photos to your Windows Live SkyDrive.
Zune������ ���������� Zune Synchronizing your computer and phone You’ll need the Zune® software to get your music, videos, and podcasts from your computer to your phone. Use it to sync these stuff between your computer and phone. If you don’t have the Zune software on your computer yet, go to www.zune.net to download and install it. Setting up Zune to sync your computer and phone 1. Connect your phone to your computer using the supplied USB cable.
Zune������ ���������� Music + Videos hub The Music + Videos hub is your gateway to your media collection. Listen to your music, watch your videos, check out your podcasts, listen to the radio, and go to the Marketplace to buy music — all in the Music + Videos hub. Listening to music 1. Get your music into your phone by following the steps in “Selecting items to sync with your phone” earlier in this chapter. 2. On the Start screen, tap the Music + Videos tile. 3.
Zune������ ���������� Turning on repeat or shuffle While playing a song, tap the album cover to loop or shuffle the songs in the album. You can also rate the album. Controlling music playback from the status bar When you exit the music player, you can still control music playback from the status bar. To show the playback controls on the status bar, press the VOLUME UP or VOLUME DOWN button. Watching videos 1.
Maps ����������������������� and location������ Maps and location Turning on location services In order to find your location on your phone, you need to enable location sources. 1. On the Start screen, tap . 2. Tap Settings > location. 3. Tap the Location services On/Off switch to turn it on. Bing Maps Bing Maps lets you track your current location, view real-time traffic situations, and receive detailed directions to your destination.
Maps ����������������������� and location������ Getting an address and additional information for a location 1. Press and hold a location on the map. A balloon opens over the location with the address. 2. Tap the balloon to see more information. You can get directions to the location, pin the location to the Start screen, share the location via text message or email, and more.
Maps ����������������������� and location������ Viewing search results The search results will be displayed as markers on the map. After tapping the balloon that shows the location that you want, you’ll see its address, rating, nearby places, and reviews, if available. To see the results as a list, tap ... while viewing a map, and then tap results list. Getting directions Get detailed directions to your destination. Bing Maps can provide directions for travel by foot or car. 1.
Maps ����������������������� and location������ Checking traffic conditions Traffic information is available only in selected areas. You can choose to show real-time traffic conditions on a map. Traffic conditions are displayed over roads as color-coded lines. Each color represents how fast the traffic is moving. To show traffic conditions, tap ... while viewing a map, and then tap show traffic.
HTC ������������� Hub������ HTC Hub About the HTC Hub Get more out of your phone with apps from us. Check out the HTC Hub and see what we have in store for you. The built-in Weather app shows the weather in rich 3D animation for your location or in cities that you select, and provides a forecast for coming days. Apps ranging from fun games to management tools are just a tap away. Some apps you see in HTC Hub are not really on your phone yet.
HTC ������������� Hub������ Weather Should I bring an umbrella today? Check what the weather’s like before you head out. Checking the weather 1. On the Start screen, tap . 2. Tap HTC Hub. The weather for your current location is displayed on the weather clock. 3. Tap the weather image to open the Weather screen. 4. Swipe your finger up or down the screen to check the weather in other cities.
HTC Hub Automatically setting up your data connection 1. On the Start screen, tap . 2. Tap HTC Hub. 3. Tap Get more. 4. Tap Connection Setup. Connection Setup automatically configures your phone’s settings. If you see more than one mobile operator, you can select your mobile operator. 5. Tap . If Connection Setup does not automatically configure your mobile phone settings, you can manually configure the settings. Tap ... > manual select, .
HTC ������������� Hub������ Editing a note 1. On the Note screen, tap . You can also slide your finger left while on the cork board to go to the List view. 2. Tap a note to open it, and tap the note again to edit it. Moving a note to another position on the cork board 1. On the cork board, press and hold a note until it floats. 2. Drag the note to the new position on the cork board, and then tap the note to dock it.
HTC Hub 4. Tap Sound Enhancer. 5. Tap Audio and Video to set the sound option you want to use. You can choose from No effects, Dolby Mobile, or SRS enhancement. For Audio, If you’re using a headset, you can also choose from various preset equalizer settings. (Dolby, SRS, and equalizer are not available when you’re using a Bluetooth stereo headset.) Stocks Get updates for the stocks you are following. Checking your stocks 1. On the Start screen, tap . 2. Tap HTC Hub. 3. Tap Get more. 4. Tap Stocks.
More ��������������� apps������ More apps Microsoft Office Mobile 2010 The Microsoft® Office hub consists of the following apps: Microsoft OneNote Mobile 2010 lets you keep track of stuff at home, school, or work — your big ideas, shopping lists, meeting notes, projects, you name it. Microsoft® Word Mobile 2010 lets you create and edit documents on your phone. Microsoft® Excel® Mobile 2010 lets you create, view, and edit Excel spreadsheets on your phone.
More ��������������� apps������ Using Microsoft Office Mobile 1. On the Start screen, tap . 2. Tap Office. 3. Select the Office app you want to use. Scroll left to see the other Office apps. Windows Marketplace On Windows® Marketplace, it’s easy to download and purchase new apps, games, and music that fit your needs and make your phone truly personal. A wide range of free and premium programs is available, from games to powerful business apps.
Security������ �������������� Security Protecting your SIM card with a PIN Add another layer of security for your phone by assigning a PIN (personal identification number). Make sure you have the default SIM PIN provided by your mobile operator before continuing. 1. On the Start screen, tap the Phone tile. 2. Tap ... , and then tap call settings. 3. Tap the SIM security On/Off switch. 4. Enter the default SIM card PIN, and then tap enter. 5. To change the SIM card PIN, tap Change SIM PIN.
Security������ �������������� Protecting your phone with a password You can secure your phone by requiring a password every time your phone is turned on or every time it wakes up from sleep mode (screen is off). 1. On the Start screen, tap . 2. Tap Settings > lock & wallpaper. 3. Tap the Password On/Off switch. 4. Enter the password in both the New password and Confirm password boxes. 5. Tap done.
Settings������ �������������� Settings Settings on your phone Control and customize phone settings on the Settings screen. 1. On the Start screen, tap . 2. Tap Settings. 3. Slide your finger left or right to access the system or application settings System settings ringtones & sounds theme Turn on or off ringer and vibrate. Choose sounds to use for your phone ringtone and notifications. Choose which events to play a notification sound. Set the background and accent color to use.
Settings������ �������������� Applications settings Check or change the settings for some apps on your phone. Tap the app name on the list to see what settings are available. Changing display settings Setting the screen brightness manually 1. On the Start screen, tap . 2. Tap Settings > brightness. 3. Tap the Automatically adjust On/Off switch to turn it off. 4. Select the Level to use.
Settings������ �������������� Checking information about your phone 1. On the Start screen, tap . 2. Tap Settings > about. Changing the phone language When you turn your phone on for the first time, you are asked to select the language you would like to use. You can also change the language on the fly whenever you like. Changing the language adjusts the keyboard layout, date and time formatting, and more. The languages available to choose from may depend on the version of phone you have. 1.
Update ���������������������� and reset������ Update and reset Updating the phone software From time to time, updates for your phone may be available. Your phone can check and then notify you if there’s a new update. Setting the phone to notify you when an update is available 1. On the Start screen, tap . 2. Tap Settings > phone update. 3. Select the Notify me when new updates are found check box. 4. Choose whether to allow the use of your phone’s data connection to check for updates.
Update ���������������������� and reset������ Performing a factory reset (hard reset) If you’re passing your phone on to someone else or your phone has a persistent problem that cannot be solved, you can do a factory reset (also called a hard reset). This returns your phone to the state it was in before the first time you turned it on. Factory reset is not a step to be taken lightly.
Trademarks ������������������������������ and copyright������ Trademarks and copyright Copyright © 2010 HTC Corporation. All Rights Reserved. The HTC logo, the HTC quietly brilliant logo, HTC 7 Mozart, and HTC Care are trademarks and/or service marks of HTC Corporation. Microsoft, Windows, Windows XP, Windows Vista, Windows Phone, Windows Marketplace, Outlook, Zune, Bing, and XBox are either registered trademarks or trademarks of Microsoft Corporation in the United States and/or other countries.
Index Index A Access point 42 Adding a new contact 25 Airplane mode 23 Answering an incoming call 20 B Battery 10 Bing Maps 58 Bluetooth 47 - connecting headset or car kit 47 Bottom cover 8 Browser 44 C Calendar 38 - creating an appointment 38 - sending an invitation 39 Caller ID 20 Call history 22 Call services 23 Camera 49 Capturing video 50 Changing the phone language 73 Changing the ringtone 18 Charging the battery 11 Checking information about your phone 73 Conference call 21 Connection Setup 42
Index N Notification sound 72 O Office Mobile 67 P People 24 Phone - front, top, left, and back panels 6 - making an emergency call 19 - making calls 19 - phone dialer 19 Photo capture 50 Pictures 52 POP3/IMAP 34 Powering on or off 12 Predictive text 30 Protecting your SIM card with a PIN 69 PUK 69 Putting a call on hold 21 R Rejecting an incoming call 20 Removing the battery 11 Removing the bottom cover 8 Removing the SIM card 10 Replacing the bottom cover 8 S Searching 17 Searching for a contact