
America PDA User Manual for Telus


Table Of Contents
- 080715_Victor_C_Telus_English_UM.pdf
- 1.1 Getting to Know Your Touch Phone and Accessories
- 1.2 Installing the Battery
- 1.3 Charging the battery
- 1.4 Using the Strap Holder
- 1.5 Starting Up
- 1.6 Navigating Your Device
- 1.7 Home Screen
- 1.8 Status Icons
- 1.9 Start Menu
- 1.10 Quick Menu
- 1.11 LED Alerts
- 1.12 Adjusting the Volume
- 1.13 Using your Device as a USB Drive
- 2.1 Using the Phone
- 2.2 Voice Call
- 2.3 Smart Dial
- 3.1 About TouchFLO™ 3D
- 3.2 Using the TouchFLO 3D Home Screen
- 3.3 Finger Gestures
- 4.1 Selecting an Input Method
- 4.2 Using the Full QWERTY
- 4.3 Using the Compact QWERTY
- 4.4 Using the Phone Keypad
- 4.5 Using Multitap and T9 Modes
- 4.6 Using Numeric and Symbol Mode
- 4.7 Using Block Recognizer
- 4.8 Using Letter Recognizer
- 4.9 Using Transcriber
- 5.1 About Synchronization
- 5.2 Setting Up Windows Mobile® Device Center on Windows Vista®
- 5.3 Setting Up ActiveSync® on Windows XP®
- 5.4 Synchronizing With Your Computer
- 5.5 Synchronizing via Bluetooth
- 5.6 Synchronizing Music and Video
- 6.1 Messaging
- 6.2 Text Messages
- 6.3 Types of E-mail Accounts
- 6.4 E-mail Setup Wizard
- 6.5 Using E-mail
- 7.1 Synchronizing with the Exchange Server
- 7.2 Working With Company E-mails
- 7.3 Managing Meeting Requests
- 7.4 Finding Contacts in the Company Directory
- 8.1 Ways of Connecting to the Internet
- 8.2 Starting a Data Connection
- 8.3 Using Opera Mobile™
- 8.4 Using YouTube™
- 8.5 Using Windows Live™
- 8.6 Using Your Device As a Modem (Wireless Modem)
- 8.7 Using RSS Hub
- 9.1 Bluetooth Modes
- 9.2 Bluetooth Partnerships
- 9.3 Connecting a Bluetooth Hands-free or Stereo Headset
- 9.4 Beaming Information Using Bluetooth
- 9.5 Bluetooth Explorer and Bluetooth File Sharing
- 9.6 Printing Files via Bluetooth
- 10.1 Guidelines and Preparation for Using GPS
- 10.2 Downloading Satellite Data via QuickGPS
- 11.1 Taking Photos and Videos
- 11.2 Viewing Photos and Videos Using Album
- 11.3 Using Windows Media® Player Mobile
- 11.4 Using Audio Booster
- 11.5 Using MP3 Trimmer
- 12.1 Programs on your Device
- 12.2 Adding and Removing Programs
- 12.3 Adobe® Reader® LE
- 12.4 Calendar
- 12.5 Contacts
- 12.6 Comm Manager
- 12.7 Microsoft® Office Mobile
- 12.8 Notes
- 12.9 Tasks
- 12.10 Voice Recorder
- 12.11 ZIP
- 13.1 Copying and Managing Files
- 13.2 Settings on your Device
- 13.3 Changing Basic Settings
- 13.4 Using Task Manager
- 13.5 Protecting Your Device
- 13.6 Managing Memory
- 13.7 Resetting Your Device
- 13.8 Windows Update
- 13.9 Battery Saving Tips
- A.1 Specifications
- A.2 Regulatory Notices
- A.3 Additional Safety Information
Experiencing Multimedia 111
Shutter Sound. Choose whether or not you want the camera to make a shutter sound when you press
the ENTER button.
Shoot Option. The camera comes with an auto-focus feature that is activated when the ENTER button is
either touched or pressed.
Touch and Press. Requires you to touch the ENTER button to activate the auto-focus; when focus is
set, press the ENTER button to take the shot.
Touch. Requires you to touch the ENTER button to activate autofocus; when focus is set, Camera
automatically takes the shot.
Full Press. Requires you to press the ENTER button to activate auto-focus; when focus is set, Camera
automatically takes the shot.
Review Duration. Set a time length for displaying the captured image/video on the Review screen.
Select No Limit if you do not want to impose a time limit. Select No Review to immediately return to
the live Camera screen after capturing and saving.
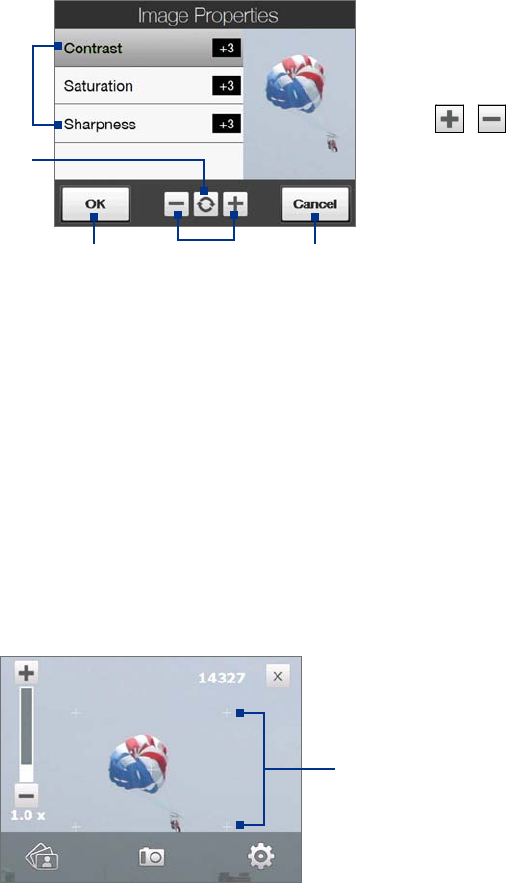
Image Properties. This option lets you adjust the capture properties, such as Contrast, Saturation, and
Sharpness.
1 Tap a property to adjust.
2 Tap to reset all properties to their
default values.
3 Tap to save the settings.
4
Tap
/ or press Navigation
left/right (Landscape orientation) to
increase/decrease the value.
5 Tap to close the submenu without
applying and saving the changes.
1
2
53 4
Effect. Choose a special effect such as Grayscale, Sepia, or others, to apply to your photos or video clips.
Metering Mode. Select a metering mode to allow the camera to measure the amount of light and
calculate the best-fit exposure value before capturing. Choose either Center Area to measure light
using the center area of the subject, or Average to measure light using the area around the subject.
Prefix. When Default is selected as the prefix, the file name of each new captured file is set to “IMAGE”
or “VIDEO” followed by a sequential number, for example: IMAGE_001.jpg. You may also choose to name
files using either the current Date or Date & Time as the prefix.
Counter. To reset the file naming counter back to 1, tap Reset.
Flicker Adjustment. When taking indoor shots, flicker on the camera screen may be caused by
inconsistencies between the vertical scan rate of the camera display and the flicker frequency of
fluorescent lighting. To reduce flicker, you can change the flicker adjustment setting to Auto or to the
proper frequency (50Hz or 60Hz) of the power in the country where your device is being used.
Grid (Photo mode). Choose whether or not to show a grid on the Camera screen. Showing a grid helps
you frame and center your subject easily and accurately.
Grid marks
Record with Audio (Video mode). Select On to record audio with the captured video clips, or select Off
to capture video without audio.
•
•
•
•
•
•
•
•
•
•
•
•
•
•