
America PDA User Manual for Telus


Table Of Contents
- 080715_Victor_C_Telus_English_UM.pdf
- 1.1 Getting to Know Your Touch Phone and Accessories
- 1.2 Installing the Battery
- 1.3 Charging the battery
- 1.4 Using the Strap Holder
- 1.5 Starting Up
- 1.6 Navigating Your Device
- 1.7 Home Screen
- 1.8 Status Icons
- 1.9 Start Menu
- 1.10 Quick Menu
- 1.11 LED Alerts
- 1.12 Adjusting the Volume
- 1.13 Using your Device as a USB Drive
- 2.1 Using the Phone
- 2.2 Voice Call
- 2.3 Smart Dial
- 3.1 About TouchFLO™ 3D
- 3.2 Using the TouchFLO 3D Home Screen
- 3.3 Finger Gestures
- 4.1 Selecting an Input Method
- 4.2 Using the Full QWERTY
- 4.3 Using the Compact QWERTY
- 4.4 Using the Phone Keypad
- 4.5 Using Multitap and T9 Modes
- 4.6 Using Numeric and Symbol Mode
- 4.7 Using Block Recognizer
- 4.8 Using Letter Recognizer
- 4.9 Using Transcriber
- 5.1 About Synchronization
- 5.2 Setting Up Windows Mobile® Device Center on Windows Vista®
- 5.3 Setting Up ActiveSync® on Windows XP®
- 5.4 Synchronizing With Your Computer
- 5.5 Synchronizing via Bluetooth
- 5.6 Synchronizing Music and Video
- 6.1 Messaging
- 6.2 Text Messages
- 6.3 Types of E-mail Accounts
- 6.4 E-mail Setup Wizard
- 6.5 Using E-mail
- 7.1 Synchronizing with the Exchange Server
- 7.2 Working With Company E-mails
- 7.3 Managing Meeting Requests
- 7.4 Finding Contacts in the Company Directory
- 8.1 Ways of Connecting to the Internet
- 8.2 Starting a Data Connection
- 8.3 Using Opera Mobile™
- 8.4 Using YouTube™
- 8.5 Using Windows Live™
- 8.6 Using Your Device As a Modem (Wireless Modem)
- 8.7 Using RSS Hub
- 9.1 Bluetooth Modes
- 9.2 Bluetooth Partnerships
- 9.3 Connecting a Bluetooth Hands-free or Stereo Headset
- 9.4 Beaming Information Using Bluetooth
- 9.5 Bluetooth Explorer and Bluetooth File Sharing
- 9.6 Printing Files via Bluetooth
- 10.1 Guidelines and Preparation for Using GPS
- 10.2 Downloading Satellite Data via QuickGPS
- 11.1 Taking Photos and Videos
- 11.2 Viewing Photos and Videos Using Album
- 11.3 Using Windows Media® Player Mobile
- 11.4 Using Audio Booster
- 11.5 Using MP3 Trimmer
- 12.1 Programs on your Device
- 12.2 Adding and Removing Programs
- 12.3 Adobe® Reader® LE
- 12.4 Calendar
- 12.5 Contacts
- 12.6 Comm Manager
- 12.7 Microsoft® Office Mobile
- 12.8 Notes
- 12.9 Tasks
- 12.10 Voice Recorder
- 12.11 ZIP
- 13.1 Copying and Managing Files
- 13.2 Settings on your Device
- 13.3 Changing Basic Settings
- 13.4 Using Task Manager
- 13.5 Protecting Your Device
- 13.6 Managing Memory
- 13.7 Resetting Your Device
- 13.8 Windows Update
- 13.9 Battery Saving Tips
- A.1 Specifications
- A.2 Regulatory Notices
- A.3 Additional Safety Information
90 Internet
Dial up and connect to the Internet
Whenever you want to dial up to the Internet on your notebook using your device as a modem, tap Menu >
Start in Wireless Modem of your device, then do the following steps to connect to the Internet.
1. If Wireless Modem has not yet been activated on your device, select the type of connection (USB or
Bluetooth) then tap
Menu > Start.
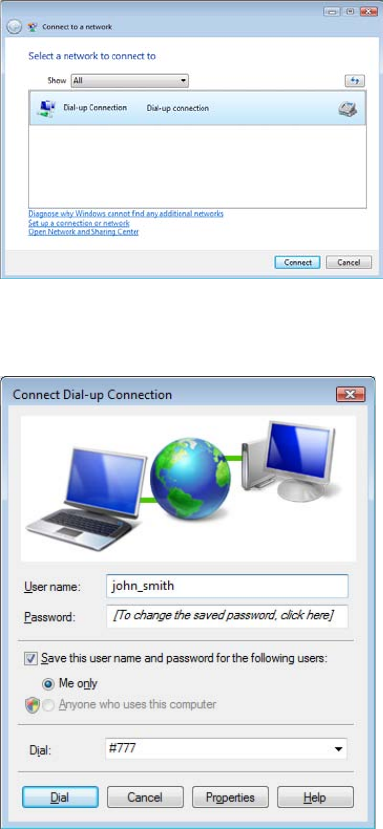
2. On a Windows Vista notebook, click
Start > Connect to, select the name of the dial-up connection,
then tap Connect.
3. On a Windows XP notebook, click Start > Settings > Control Panel, double-click Network
Connections, then double-click the modem connection.
4. The Connect dialog box then opens. Click
Dial to dial up and connect to the Internet.
To end the modem session
On the Wireless Modem screen, tap Done or tap Menu > Stop.