
Instructions / Assembly


3
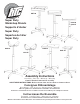
Assembly Instructions
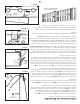
All units in the Heavy Duty Pedestal Family will start with the assembly of
the basic pedestal. Tools needed: (2) 8mm wrenches and a putty knife.
1. Unpack and make certain all parts and hardware are included and are not
damaged from shipment.
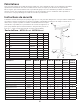
2. Attach each foot to the Main Tube, using (2) 6 x 65mm carriage bolts,
installed through the face of the part, then through the holes in the Main
Tube. Secure with (2) 6mm Shoulder lock nuts from the inside of the tube.
Be sure the threaded boss for the Leveling Glide will face down when the
unit is fully assembled, and the short leg of the foot is positioned as shown.
Repeat the procedure on the remaining 3 feet.
3. Install the Leveling Glides and adjust as needed.
4. Install the Crank Handle into the Main Tube.
5. Inset the Wedge into the Main Tube.
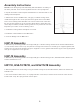
HGP-10 Assembly
1. Attach the top mounting plate to the wedge with (2) 6 x 65mm Carriage bolts from the bottom with flat wash-
er, lock washer, and hex nut on top. Pre-plan the carriage bolt locations for mounting user supplied grinder. Flat
washers (2), hex nuts (2) and jamb nuts (2) are supplied to secure grinder. Flat washers (2), hex nuts (2) and jamb
nuts (2) are supplied to secure grinder.
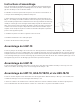
HGP-12 Assembly
1. Attach the top mounting plate to the wedge with (2) 8 x 35mm Carriage bolts, 8mm Flat washer, 8mm Lock
washer and 8mm Hex nut.
HRT-10, HSS-10/15/18, and HSV-15/18 Assembly
1. Attach Top Bracket to 5006 wedge using 8 x 35mm Carriage bolt, 8mm Flat washer, 8mm Lock washer and
8mm Hex nut.
2. For model numbers with rollers, use a putty knife like a shoehorn, insert the fixed end of the roller into the
bracket and “snap” the spring-loaded end into place.