
Operation Manual


Table Of Contents
- Chapter 1 Getting Started
- 1.1 Getting to Know Your Touch Phone and Accessories
- 1.2 Installing the SIM Card and Battery
- 1.3 Charging the battery
- 1.4 Using the Strap Holder
- 1.5 Starting Up
- 1.6 Navigating Your Device
- 1.7 Home Screen
- 1.8 Status Icons
- 1.9 Start Menu
- 1.10 Quick Menu
- 1.11 LED Alerts
- 1.12 Adjusting the Volume
- 1.13 Using your Device as a USB Drive
- Chapter 2 Using Phone Features
- Chapter 3 TouchFLO™ 3D
- Chapter 4 Entering Text
- Chapter 5 Synchronizing Information With Your Computer
- Chapter 6 Exchanging Messages
- Chapter 7 Working With Company E-mails and Meeting Appointments
- Chapter 8 Internet
- Chapter 9 Bluetooth
- Chapter 10 Navigating on the Road
- Chapter 11 Experiencing Multimedia
- Chapter 12 Programs
- Chapter 13 Managing Your Device
- Appendix
- Index
- 5.1 About Synchronization
- 5.2 Setting Up Windows Mobile® Device Center on Windows Vista®
- 5.3 Setting Up ActiveSync® on Windows XP®
- 5.4 Synchronizing With Your Computer
- 5.5 Synchronizing via Bluetooth
- 5.6 Synchronizing Music and Video
- 12.1 Programs on your Device
- 12.2 Adding and Removing Programs
- 12.3 Adobe® Reader® LE
- 12.4 Calendar
- 12.5 Contacts
- 12.6 Comm Manager
- 12.7 Microsoft® Office Mobile
- 12.8 Notes
- 12.9 Java
- 12.10 SIM Manager
- 12.11 Spb GPRS Monitor (Available by Country)
- 12.12 Sprite Backup
- 12.13 Tasks
- 12.14 Voice Recorder
- 12.15 Voice Speed Dial
- 12.16 ZIP
Programs 205
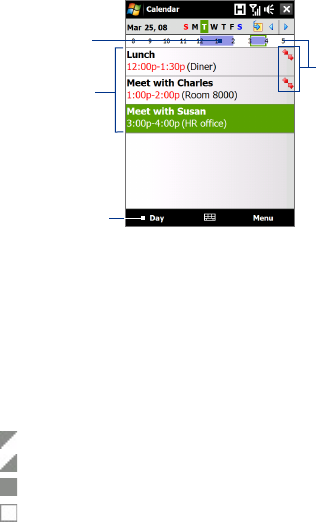
The highlighted hours
here indicate the time of
your appointments.
Tap to view appointment
details.
Agenda view
Tap to switch views.
The red box and
arrows indicate
that there are
conflicting
appointments.
• To see detailed appointment information in any view, tap the
appointment.
• To view appointments by category, tap Menu > Filter, then select the
desired category.
• To change the default view that Calendar uses to display
appointments, tap Menu > Tools > Options > General tab. Tap the
Start in box, then choose the calendar view.
• When in Month view, you will see the following indicators:
Morning appointment
Afternoon or evening appointment
Both morning and afternoon/evening appointments
All-day event
Send appointments
To send a meeting request
Use Calendar to schedule meetings via e-mail with contacts who use
Outlook or Outlook Mobile.
1. Open the Calendar screen.
2. Schedule a new appointment, or open an existing one and tap Menu
> Edit.