AP6010DN-AGN Wireless LAN Access Point Quick Start Guide HUAWEI TECHNOLOGIES CO., LTD.
Copyright © Huawei Technologies Co., Ltd. 2012. All rights reserved. No part of this document may be reproduced or transmitted in any form or by any means without prior written consent of Huawei Technologies Co., Ltd. Trademarks and Permissions and other Huawei trademarks are trademarks of Huawei Technologies Co., Ltd. All other trademarks and trade names mentioned in this document are the property of their respective holders.
Symbol Conventions The symbols that may be found in this document are defined as follows. Symbol CAUTION NOTE Description Indicates a potentially hazardous situation, which if not avoided, could result in equipment damage, data loss, performance degradation, or unexpected results. Provides additional information to emphasize or supplement important points of the main text. Change History Changes between document issues are cumulative.
AP6010DN-AGN Quick Start Guide Please download the detailed product documents from "http://support.huawei.com/support/". The dEtaIled path is as follows: Technical Support->Documentation->Access Network -> WLAN ->WLAN -> Product Documentation ->AP6010DN. Before performing Installation, confirm that the installation accessories and tools are available.
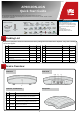
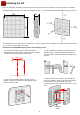
Installing the AP Select an appropriate installation position and leave 20 cm space above and around the device for cooling air circulation. AP6010DN dimensions (unit: mm) without a backplane support 50 180 180 Recommended AP6010DN installation space (unit: mm) The AP6010DN can be installed onto a workbench or mounted against a wall. In addition, the AP6010DN can be mounted to a T-rail and mounted against the ceiling. Wall-mount the AP6010DN using the plastic wall-mounting bracket: 1.
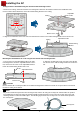
Installing the AP Ceiling-mount the AP6010DN using the sheetmetal wall-mounting bracket: 1. Remove the ceiling, determine locations of mounting holes based on the distance between two installation holes, use the hammer drill to drill holes, and fix the wall-mounting bracket to the ceiling. Ceiling Adjustable buckle 35mm M4*30 screw 2. Align the cucurbit holes at the rear side of the AP with four screws on the wall-mounting bracket and secure the AP.
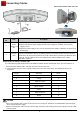
Connecting Cables Connect the network cable to the AP No. 1 2 Description Item ● The AP6010DN supports PoE power supply and DC power supply. Power ● When both the PoE power supply and DC power supply are available, the DC power adapter 12 V supply is used. DC ● When DC power supply is used, use the specified power adapter; otherwise, the device may be damaged. Network cable If the AP needs to connect to the Ethernet, ensure that the Ethernet cable is working properly.
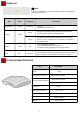
Power-on NOTE Power on the AP6010DN and check the indicator status to determine the System running status. Type Default status Color Frequency Green Steady on UBOOT: The AP is just powered on. The system is running properly, the Ethernet connection is 0.5 Hz Running Description correct,and STAs are associated with the AP. Green The system is running properly, the Ethernet connection is 0.2 Hz correct, no user is connected, and the system is in low power consumption state. Alarm Green 1.
Logging In to the Router After an AP is powered on, you can log in to the AP using the following methods. 1. Logging In to the AP Through the Console Port This section describes how to log in to the AP through the console port. After logging in to the AP, you can configure the AP using commands. 2. Logging In to the AP Using Telnet This section describes how to log in to the AP using Telnet. After logging in to the AP, you can configure the AP using commands. 1.
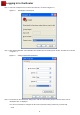
Logging In to the Router Step 3 Select the serial port used on the PC and click OK, as shown in Figure 1-3. Figure 1-3 Selecting the connected port Step 4 Click Restore Defaults, select 9600 bit/s from the Bits per second drop-down list box, and click OK, as shown in Figure 1-4. Figure 1-4 Setting communication parameters Step 5 Press Enter on the subsequent dialog boxes until the command line prompt of the user view, such as , is displayed. You can run commands to configure the AP.
Logging In to the Router 2. Logging In to the AP Using Telnet This section describes how to log in to the AP using Telnet. After logging in to the AP, you can configure the AP using Commands. Procedure Step 1 Connect a PC to the uplink port of the AP with a network cable. Figure 1-5 shows the location of the AP's uplink port. Figure 1-1 Location of the AP's uplink port 1 No Port 1 ETH/PoE Step 2 Configure a static IP address for the PC. The IP address must be on the network segment 192.168.0.
AP Local Configuration WLAN services parameters of an AP are configured on the AC that is connected To the AP, and then delivered to the AP. The following parameters are configured on the AP through Telnet or the console port. 1. Configuring the AP Access Mode This section describes how to configure the mode in which an AP goes online. 2. Configuring VLANs on Wired Interfaces of an AP This section describes how to configure VLANs on wired interfaces of an AP. 3.
AP Local Configuration ● Configuring the AP to go online in PPPoE mode 1. Use Telnet to log in to the AP from a PC. login: admin Password: // The default password is admin. ~ # 2. Configure the AP to go online in PPPoE mode. ~ # cli Enterprise AP# configure interface ethernet // Enter the AP interface view. Enter Ethernet configuration commands, one per line. Enterprise AP (if-ethernet) # ip mode pppoe // Set the mode in which the AP goes online.
AP Local Configuration 3. Configuring WDS This section describes how to configure WDS parameters on an AP. ● Introduction to WDS WDS enables multiple AP6010DNs to establish wireless links to connect two or more wired or wireless LANs. WDSenabled AP6010DNs can switch data packets between the LANs. WDS facilitates network deployment, and device installation, and allows flexible networking. ● Configuring WDS Most WDS parameters are configured on the AC. For details, see the AC configuration guides.
Declaration on Hazardous Substances in Electronic Information Products Hazardous Substances Part Pb Hg Cd Cr6+ PBB PBDE Mechanical part O O O O O O Board/circuit module O O O O O O Signal cable O O O O O O Cable connector O O O O O O Power adapter O O O O O O Auxiliary equipment O O O O O O O: Indicates that the concentration of the hazardous substance contained in all the homogeneous materials of this part is below the limit requirement of the SJ/T 11363-200
Warranty Card Thank you for choosing HUAWEI Technologies Co., Ltd-a leading telecom solution provider. To get better services, please read this warranty card carefully, fill in the required information and preserve this card in good condition. Your Name Address/Postal Code Telephone Product Type Product Serial Number Purchase Date Invoice Number Dealer Name Dealer´s Address/Telephone Preserve well. No reissue Dealer´s Seal: Limited Warranty Subject to the exclusions contained below, Huawei Technologies CO.
HUAWEI TECHNOLOGIES CO., LTD. Huawei Industrial Base Bantian, Longgang Shenzhen 518129 People's Republic of China www.huawei.