
User's Manual
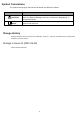
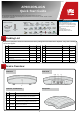
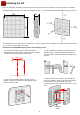
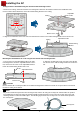
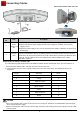
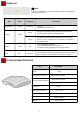

Table Of Contents

Installing the AP
Select an appropriate installation position and leave 20 cm space above and around the device for cooling air circulation.
AP6010DN dimensions (unit: mm) without a backplane support Recommended AP6010DN installation space (unit: mm)
The AP6010DN can be installed onto a workbench or mounted against a wall. In addition, the AP6010DN can be mounted
to a T-rail and mounted against the ceiling.
Wall-mount the AP6010DN using the plastic wall-mounting bracket:
180
180
50
Field
strength
场强示意
Field
strength
场强示意
1. Fix the wall-mounting bracket to the wall, adjust the
installation position, and use the marker to mark the drilling
positions where expansion bolts are installed.
2. Use #6 drill bit to drill 25-30 mm deep holes in the
drilling positions. Hammer the expansion tubes into
the holes until the expansion tubes are embedded into
the wall.
3. Fix the wall-mounting bracket to the wall, use the
Phillips screwdriver to fasten three self-tapping screws
into the expansion tube.
4. Align the holes at the rear side of the AP with the
hooks on the bracket and hang the AP on the bracket.
Hold the AP with one hand and press the AP
downwards with another hand to secure the AP on the
wall.
59mm
85mm
Underfloor
cabling
4