
User's Manual


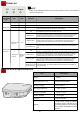
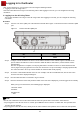
Table Of Contents

Logging In to the Router
11
After an AP is powered on, you can log in to the AP using the following methods.
1. Logging In to the AP Using Telnet
This section describes how to log in to the AP using Telnet. After logging in to the AP, you can configure the AP using
commands.
1. Logging In to the AP Using Telnet
This section describes how to log in to the AP using Telnet. After logging in to the AP, you can configure the AP using
commands.
Procedure
Step 1 Connect a PC to the uplink port of the AP with a network cable. Figure 1-1 shows the location of the AP's uplink
port.
Figure 1-1 Location of the AP's uplink port
Step 2 Configure a static IP address for the PC. The IP address must be on the network segment 192.168.0.1/24
(The IP address should not be same as the AP's default IP address 192.168.0.1.) and the subnet mask is
255.255.255.0.
After the configuration is complete, run the ping 192.168.0.1 command on the PC to check whether the PC
can be pinged. If the ping operation succeeds, the connection is set up successfully. If the ping operation fails,
The connection fails to be set up. Check whether the network cable works properly.
Step 3 Access the command line window on the PC. For example, if the PC runs Windows XP, choose Start > Run
and enter cmd in the displayed dialog box.
Step 4 Run the telnet 192.168.0.1 command to log in to the AP.
Step 5 Enter the default user name and password admin. If the user view is displayed, you have logged in successfully.
When you log in for the first time, the following page is displayed:
Username: admin
Password:
Enterprise AP:
----End
No. Port
1
ETH
1
NOTE
Run the exit command to exit from the Telnet window. When the system fails to exit from the Telnet window:
● If you logged in to the AP from an AC or a switch, press Ctrl+T to return to the AC or switch view. This operation does
not affect the AP operation.
● If you logged in to the AP from a PC, directly close the Telnet window. This operation does not affect the AP operation.