
Huawei-AP8030DN-AP8130DN-Hardware-Installation-and-Maintenance-Guide-02
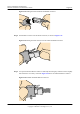
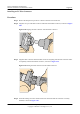
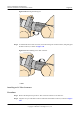
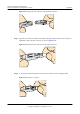
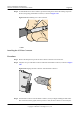

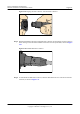
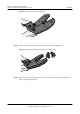
Table Of Contents
- About This Document
- Contents
- 1 AP8130DN & AP8030DN Overview
- 2 AP Installation
- 3 Logging In to the AP
- 4 Hardware Failures
- 5 Appendix

Figure 5-73 Pliers jaw opening automatically
Step 3 Remove the mould from the COAX crimping tools, as shown in Figure 5-74.
Figure 5-74 Removing the mould from the COAX crimping tools
Step 4 Place the mould to be installed into the jaw of the COAX crimping tools and align the screw
holes, as shown in Figure 5-75.
Huawei AP8030DN & AP8130DN
Hardware Installation and Maintenance Guide 5 Appendix
Issue 02 (2014-12-05) Huawei Proprietary and Confidential
Copyright © Huawei Technologies Co., Ltd.
84