
B310s LTE CPE Quick Start-User Manual

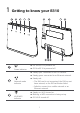
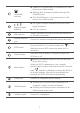
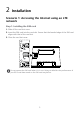


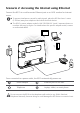
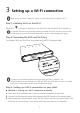
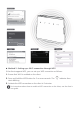
Table Of Contents
- 1 Getting to know your B310
- 2 Installation
- Scenario 1: Accessing the Internet using an LTE network
- Step 1: Installing the SIM card
- Step 2: Connecting cables
- Optional: Installing the external antenna
- 1. Power off the B310 and disconnect it from the power outlet.
- 2. Remove the cover from the antenna port. (Keep it in a safe place.)
- 3. Install one or two external antennas as you need. Make sure the external antennas are securely connected to the antenna ports.
- If you are using only one external antenna, connect it to port 1.
- Scenario 2: Accessing the Internet using Ethernet
- Scenario 1: Accessing the Internet using an LTE network
- 3 Setting up a Wi-Fi connection
- Step 1: Enabling Wi-Fi on the B310
- Step 2: Recording the SSID and Wi-Fi key
- Step 3: Setting up a Wi-Fi connection on your client
- 1. From your Wi-Fi enabled client, scan for wireless networks in your area.
- 2. Connect to the network name that matches the SSID found on the device label.
- 3. When prompted for password, enter the Wi-Fi Key found on the device label. (The Wi-Fi key is case sensitive.) Your client will notify you when it is connected.
- 1. Ensure that Wi-Fi is enabled on the client.
- 2. Press and hold the WPS button for 2 or more seconds. The indicator then starts blinking.
- 3. Activate the WPS connection on the client in 2 minutes.
- 4 Configuring your B310
- 1. After a client is connected to the B310 through Wi-Fi or LAN port, launch a browser on the client and visit http://192.168.8.1.
- 2. Enter the user name and password to log in to the web management page. The default user name and password are printed on the B310's bottom label.
- 3. Follow the quick setup wizard to check or set network connection parameters step by step. For details, see the help information on the web management page.
- 5 For more help
- 6 Safety information
- 7 Legal Notice