
B310s LTE CPE Quick Start-User Manual

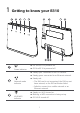
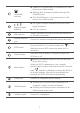
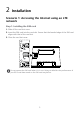


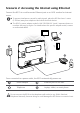
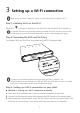
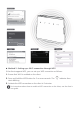
Table Of Contents
- 1 Getting to know your B310
- 2 Installation
- Scenario 1: Accessing the Internet using an LTE network
- Step 1: Installing the SIM card
- Step 2: Connecting cables
- Optional: Installing the external antenna
- 1. Power off the B310 and disconnect it from the power outlet.
- 2. Remove the cover from the antenna port. (Keep it in a safe place.)
- 3. Install one or two external antennas as you need. Make sure the external antennas are securely connected to the antenna ports.
- If you are using only one external antenna, connect it to port 1.
- Scenario 2: Accessing the Internet using Ethernet
- Scenario 1: Accessing the Internet using an LTE network
- 3 Setting up a Wi-Fi connection
- Step 1: Enabling Wi-Fi on the B310
- Step 2: Recording the SSID and Wi-Fi key
- Step 3: Setting up a Wi-Fi connection on your client
- 1. From your Wi-Fi enabled client, scan for wireless networks in your area.
- 2. Connect to the network name that matches the SSID found on the device label.
- 3. When prompted for password, enter the Wi-Fi Key found on the device label. (The Wi-Fi key is case sensitive.) Your client will notify you when it is connected.
- 1. Ensure that Wi-Fi is enabled on the client.
- 2. Press and hold the WPS button for 2 or more seconds. The indicator then starts blinking.
- 3. Activate the WPS connection on the client in 2 minutes.
- 4 Configuring your B310
- 1. After a client is connected to the B310 through Wi-Fi or LAN port, launch a browser on the client and visit http://192.168.8.1.
- 2. Enter the user name and password to log in to the web management page. The default user name and password are printed on the B310's bottom label.
- 3. Follow the quick setup wizard to check or set network connection parameters step by step. For details, see the help information on the web management page.
- 5 For more help
- 6 Safety information
- 7 Legal Notice

7
3 Setting up a Wi-Fi connection
Step 1: Enabling Wi-Fi on the B310
When the indicator is steady on, the Wi-Fi function of the B310 is turned on.
Step 2: Recording the SSID and Wi-Fi key
The default SSID and Wi-Fi key are printed on the B310's bottom label.
Step 3: Setting up a Wi-Fi connection on your client
Method 1: Setting up a Wi-Fi connection manually
1. From your Wi-Fi enabled client, scan for wireless networks in your area.
2. Connect to the network name that matches the SSID found on the device label.
3. When prompted for password, enter the Wi-Fi Key found on the device label. (The
Wi-Fi key is case sensitive.) Your client will notify you when it is connected.
Make sure your client
(computer, tablet, or smart phone) also supports Wi-Fi.
For details about how to manually enable or disable the Wi
-Fi function, refer to the
WLAN settings section of the help information on the web management page.
To prevent unauthorized parties from accessing your Wi
-Fi network, it is
recommended that you change the SSID and Wi
-Fi key from time to time. For details,
see the help information on the web management page.