User Guide
Contents Essentials Basic Gestures System Navigation Phone Clone Lock and Unlock Your Screen Get Familiar with the Home Screen Notification and Status Icons Shortcut Switches Home Screen Widgets Set Your Wallpaper Screenshots&Screen Recording View and Clear Notifications Adjust Sound Settings Enter Text Split-screen Mode and Floating Window Power On and Off or Restart Your Device Charging 1 3 4 5 6 6 7 8 8 9 10 10 11 12 13 14 Smart Features HiTouch Easy Projection Multi-screen Collaboration Huawei Share S
Contents Manage Gallery Smart Photo Categorisation Huawei Vlog Editor 31 35 36 Apps Contacts Phone Messaging Calendar Clock Notepad Recorder Email Calculator Torch Compass App Twin Quickly Access Frequently Used App Features Tablet Manager Phone Clone HiSuite Tips 37 38 41 46 48 49 51 52 53 56 57 57 57 58 58 61 61 61 Search for Items in Settings Wi-Fi Bluetooth Mobile Data More Connections Home Screen&Wallpaper Display&Brightness Sounds&Vibration Notifications Biometrics&Password Apps Battery Storage S
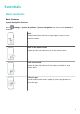
Essentials Basic Gestures Basic Gestures System Navigation Gestures Go to Settings > System & updates > System navigation and ensure that Gestures is selected. Back Swipe inward from the left or right edge to return to the previous screen. Back to the home screen Swipe up from the bottom to go to the home screen. View recent tasks Swipe up from the bottom of the screen and hold to view recent tasks. Close an app On the recent tasks screen, swipe up on an app preview to close the app.
Essentials More Gestures Access Home screen editing mode Pinch two fingers together on the home screen. Display the shortcut panel on the lock screen Swipe up from the bottom of the lock screen. Display the search bar Swipe down on the home screen. Open the notification panel Swipe down from the status bar. Button Shortcuts Power off and restart Press and hold the Power button until the Power off and Restart options appear. Increase the volume Press the Volume up button.
Essentials Decrease the volume Press the Volume down button. Take a screenshot Press the Volume down and Power buttons simultaneously. System Navigation Change the Navigation Mode Go to Settings > System & updates > System navigation to select a navigation mode according to your preferences. Navigate with Gestures Settings > System & updates > System navigation and enable or disable Go to Gestures.
Essentials : Notification key to open the notification panel. • Customise the Navigation Key Combination Go to Three-key navigation > Settings. You can: • Select a navigation key combination. • Enable Hide navigation keys to allow you to hide the navigation bar when not in use. Navigation Dock Go to Settings > System & updates > System navigation > More, and enable Navigation Dock. After the Navigation dock button appears, you can: • Drag the button to your desired position.
Essentials 2 Follow the onscreen instructions to download and install Phone Clone on your old device. 3 On your old device, open Phone Clone and touch This is the old phone. Follow the onscreen instructions to connect your old device with your new device by scanning a code or connecting manually. 4 On your old device, select the data you want to clone, then follow the onscreen instructions to complete the data cloning. Phone Clone is only available on devices running iOS 8.0 or later.
Essentials Display Your Signature on the Lock Screen Go to Settings > Home screen & wallpaper, touch Lock screen signature, then type text to display on the lock screen. To remove the signature, touch Lock screen signature and delete the text. Access Apps from the Lock Screen You can access commonly used apps such as Camera, Recorder, and Calculator from the lock screen. • Turn on the screen, touch and hold , then swipe up to open Camera.
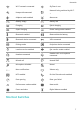
Essentials Wi-Fi network connected Hotspot disconnected SkyTone in use Network being switched by Wi-Fi + Airplane mode enabled Alarms set Battery empty Battery low Charging Quick charging Super charging Power saving mode enabled Bluetooth enabled Bluetooth device battery Bluetooth device connected VPN connected Driving mode Projection device connected Location service enabled Eye comfort mode enabled Headset connected Headset with a microphone connected Missed call Unread SMS Micropho
Essentials Shortcut Switches Turn on a Shortcut Switch Swipe down from the status bar to open the notification panel, then swipe down on it again to show all shortcuts. • Touch a shortcut switch to enable or disable the corresponding feature. • Touch and hold a shortcut switch to enter the settings screen for that feature. • Touch to open Settings. Customise Shortcut Switches Touch , touch and hold an icon, then drag it to the desired position.
Essentials 4 • Blur: applies a blur effect, which can be adjusted by dragging the slider. • Scrollable: enables the wallpaper to be scrollable on the home screen. , then determine whether you'd like to set the image as Lock screen, Home Touch screen, or both. Set an Image from Gallery as Your Wallpaper 1 Open 2 Go to setting. Gallery, and open the image you want to set as your wallpaper.
Essentials Use a Shortcut to Start Screen Recording 1 Swipe down from the status bar to open the notification panel, then swipe down on it again to show all shortcuts. 2 Touch Screen Recorder to start screen recording. 3 To stop the recording, touch the timer at the top of the screen. 4 The recording will be saved to Gallery. Record Your Voice During Screen Recording You can enable the microphone to record your voice while recording the screen.
Essentials Adjust Sound Settings Press a Volume Button to Adjust the Volume Press the Volume up or down button to adjust the volume. Press the Power Button to Mute Your Device When It Rings When your device rings for an incoming call or alarm, you can press the Power button to mute it. Flip to Mute or Raise to Reduce Ringing Volume When you receive an incoming call, you can flip your device to mute it, or raise it to reduce the ringing volume.
Essentials In some apps, what happens after you touch and hold the text may differ. For example, if you touch and hold a sent or received message, an option menu will be displayed, and will appear only after you touch Select text. 2 Drag 3 Touch Copy or Cut as needed. 4 Touch and hold the space where you want to paste the text until Paste appears, then touch Paste. and to select the text you need, or touch Select all to select all text.
Essentials • Close the floating window: Touch on the floating window to close it. The size of the floating window cannot be adjusted. Switch Between Split-screen and Floating Window • Switch from Split-screen mode to floating window: Touch and hold a split-screen pane, then drag it to the left or right when in Portrait mode, or drag it downwards in Landscape mode.
Essentials Force Restart Your Device If your device isn't working or won't turn off normally, you can force restart it. Just press and hold the Power button for 10 seconds or longer. Charging Charge Your Device Your device will alert you when it is running out of power. Please make sure to charge your device in time to prevent it from turning off automatically when the power runs out. Precautions for Charging • Charge your device using the standard adapter and USB cable that came with your device.
Essentials Overview of Battery Icons You can check the battery level from the battery icon on the device screen. Battery Icon Battery Level Less than 4% battery remaining Charging, less than 10% battery remaining Charging, 10% to 90% battery remaining Charging, at least 90% battery remaining If 100% is displayed next to the battery icon, or a charging complete message is displayed on the lock screen, the battery is fully charged.
Smart Features HiTouch Convenient Shopping When you see an item you wish to buy on your device screen, touch and hold it with two fingers to search for it online, and touch the displayed links to view more details. 1 Go to 2 Touch and hold the item you wish to purchase with two fingers spread slightly apart. 3 After the subject is identified, links to the item on different shopping platforms will then display.
Smart Features Multi-screen Collaboration Between Your Tablet and Phone Once your tablet is connected with a Huawei or Honor phone using Multi-Screen Collaboration, your tablet will display what's on the phone to facilitate collaboration between the two devices. You can access phone apps and files on your tablet and drag to transfer files between your tablet and phone. Connect Your Tablet and Phone Multi-Screen Collaboration is supported by Huawei and Honor phones running EMUI 10.0 or later.
Smart Features For example, you can view notifications from your phone on the notification panel of your tablet, or answer or end a call in the small window displayed on the top of the tablet screen. When your phone screen is unlocked, you can perform the following operations in the phone window on your tablet: • Open Phone to make a call by dialling a number. • Open Messaging to view and reply to SMS messages. • Open WeChat to view and handle WeChat messages.
Smart Features Huawei Share Huawei Share is a wireless sharing technology that allows you to quickly transfer images, videos, documents, and other types of files between devices. This technology relies on Bluetooth to discover nearby devices, and uses Wi-Fi Direct to transfer files without using mobile data.
Smart Features • macOS: Finder > Go > Network. Currently, this feature is only available on Macs running macOS 10.8 to 10.14. 5 On your computer, double-click the name of your device and enter the user name and password that you made a note of earlier. 6 Open a shared folder of your device such as the Internal storage or Album folder, then view, edit, or copy files to the computer, or copy files from the computer to the shared folder to store them in your device.
Smart Features Select the device you want to switch the audio to.
Camera and Gallery Launch Camera Launch Camera There are multiple ways to open the Camera app. From the Home Screen From the home screen, open Camera. From the Lock Screen When the screen is locked, turn on the screen, then swipe up on the camera icon in the lower right corner to open the camera. Take Photos Take Photos 1 Open 2 You can then: • Camera. Focus: Touch the location you want to focus on.
Camera and Gallery 1 Open 2 Touch and hold or press and hold one of the Volume buttons to take a burst photo. When shooting, you'll see a counter, which indicates how many photos you've taken so far. 3 Lift your finger to stop shooting. Camera and select Photo mode. Once you have finished, select photos you want to keep from the burst.
Camera and Gallery 2 Touch 3 Frame the subject in the viewfinder. Once Master AI identifies what you are shooting, it will automatically recommend a mode (such as portrait, greenery, or text). 4 To disable the recommended mode, touch disable Master AI. to ensure that Master AI is enabled. next to the mode text or touch to Zoom to Take Photos Take Photos with Various Zoom Settings The zoom capabilities of your device's camera allow you to capture more of a scene, or distant vistas.
Camera and Gallery Light Painting Light painting helps you capture light trails by allowing the shutter to stay open for a longer time. No manual aperture and shutter adjustment is involved. Just choose from the available options depending on the subjects and light conditions. To reduce camera shake, a tripod is recommended to steady your device. Capture Car Light Trails in Traffic Trails Mode Traffic trails mode lets you create artistic photos of car tail lights at night.
Camera and Gallery 2 For best results, choose a clear night in a location free of light pollution and with an unobstructed view of the sky. 3 Touch to start shooting. Observe the shot in the viewfinder. When the exposure is just right, touch to finish shooting. Take HDR Photos Take HDR Photos When shooting photos with backlighting or a high light contrast, High Dynamic Range (HDR) mode can help you improve light and shadow effects in your photos, giving your photos sharper details.
Camera and Gallery Go to Gallery > Albums > Camera, touch and hold to select the moving pictures you want to share, then touch to share them. If you share moving pictures to third-party apps or incompatible devices, moving pictures will be displayed as static images. Add Stickers to Photos Add Stickers to Photos Add a watermark, such as time, location, weather, or mood, to spice up your photo. 1 Go to Camera > More > Stickers. If this mode is not there, touch and then download Stickers.
Camera and Gallery Metering Mode Concentrates on the light in a small area of the Spot • Description screen, such as the subject's eyes. Adjust the ISO sensitivity: Touch ISO and drag the slider. In low-light conditions, increase the ISO sensitivity. In well-lit environments, lower the ISO sensitivity to avoid image noise. • Adjust the shutter speed: Touch S and drag the slider. When you are shooting stationary scenes or portraits, lower the shutter speed.
Camera and Gallery • Turn the flash on or off: Touch , then touch to keep the flash on, or to turn it off. and drag the slider to adjust beauty settings. • Adjust the beauty effect: Touch • Adjust the video resolution and frame rate: Go to > Video resolution and select the desired resolution. A higher resolution will result in a higher quality video with a larger file size. Touch Frame rate to select a frame rate.
Camera and Gallery 2 Touch or and select a filter. Some devices do not have the 3 icon. Touch the shutter button to shoot a photo or video. Edit Camera Modes Edit Camera Modes Your device allows you to download, update, and delete camera modes to better suit your needs. Download Camera Modes 1 Go to Camera > More. 2 Touch , then touch ADD next to the mode you want to download. When the download is complete, the new mode will be displayed in More.
Camera and Gallery This feature is not available in some modes. Enable Location Tag Enable Location tag to tag your location in photos and videos. Swipe up on a photo or video in Gallery to view its shooting location. Use the Assistive Grid to Compose Your Photos Use the assistive grid to help you line up the perfect shot. 1 Go to 2 Enable Assistive grid. 3 Grid lines will appear in the viewfinder. Place the subject of your photo at one of the intersecting points, then touch the shutter button.
Camera and Gallery View Details About Photos and Videos 1 Touch a photo or video to view it in Full screen mode. Touch the screen again to hide the menu. 2 In Full screen mode, you can check the following: • Basic information: Swipe up on the photo or video to view basic information. • Shooting details: Touch and view shooting details in the popup box, including the storage path, resolution, and size. Search for Photos Quickly locate a photo by searching with keywords in Gallery.
Camera and Gallery Add Stickers to Photos 1 Touch a photo, then go to Edit > 2 Select a type of sticker, such as Time, Location, Weather, or Mood. 3 Select a sticker and drag it to change its position. You can also edit the text of some types of stickers. 4 Touch > Stickers. to save your edits and touch to save the photo. Pixelate Photos 1 Touch a photo, then go to Edit > 2 Select a mosaic style and size to cover parts of the photo.
Camera and Gallery • Edit the intro and outro: Touch to select an intro and outro. After the preview is complete, touch the screen to edit the text content and style of the intro. 3 to export the video. When you are finished, touch The edited videos are saved in the Video Editor album, and the original video is left unchanged. Share Photos and Videos There are several ways to share photos and videos from Gallery. 1 Open 2 Use either of the following methods: Gallery.
Camera and Gallery To permanently delete a photo or video manually, touch and hold its thumbnail in the Recently deleted album, then go to > Delete. Recover Deleted Photos and Videos In the Recently deleted album, touch and hold to select the items you want to recover, then touch to restore them to their original albums. If the original album has been deleted, a new one will be created. Add Photos and Videos to Favorites Open a photo or video, then touch .
Camera and Gallery Group photo albums require a specific number of photos that contain 2 to 10 faces that have already been named in People albums. 1 Go to 2 Touch an album, go to as Baby or Mom). Gallery > Discover and view the generated People albums. > Edit > Add name, then set the name and relationship (such Once you have finished, you can find a People album by entering the name or relationship in the search bar.
Apps Apps Apps Locate an Installed App Swipe down from the middle of the home screen to show the search bar, and enter the app name. When the app is found, touch next to its name. Uninstall an App You can uninstall an app using either of the following methods: • Touch and hold the app icon you want to uninstall until your device vibrates, touch Uninstall, then follow the onscreen instructions to uninstall the app.
Apps Go to Settings > Apps > Apps, select the app for which you want to clear the cache, then go to Storage > Clear cache. Contacts Create and Edit Contact Information You can create contacts in multiple ways, as well as view and manage your contacts list. Create Contacts 1 Open Phone, select the Contacts tab at the bottom of the screen, then touch . If you are creating a contact for the first time, touch Create new contact to start adding a contact.
Apps Export Contacts 1 On the Contacts screen, go to 2 Touch Export to storage and follow the onscreen instructions to export contacts. > Settings > Import/Export. The exported .vcf files are saved in the root directory of your device's internal storage by default. You can open Files to view the exported files in the internal storage. Delete Contacts Delete contacts using either of the following methods: • Touch and hold the entry you want to delete, then touch Delete.
Apps 2 Touch for Remove members, Group ringtone, Delete group, or Rename. Send Group Messages or Emails SMS messaging services are not supported on Wi-Fi only tablets. On the Groups screen, open a group, then touch to send a message or touch to send an email. Delete Contact Groups On the Groups screen, touch and hold the group to be deleted, then touch Delete. Create Personal Information You can create a business card containing your personal information to share with others.
Apps Phone Make a Call Voice calls are not supported on Wi-Fi only tablets. Dial a Number or Select a Contact to Call Use either of the following methods to make a call: • Open Phone, enter part of a phone number, the first letter of a contact's name, or the contact's initials to find a contact. • On the Phone screen, touch the Contacts tab at the bottom, then select a contact to make a call. Touch to end a call.
Apps For numbers that are not in the contacts list, on the Phone screen, touch and hold the 0 number key to display +, enter the country code and phone number, then touch make an international call. to Manage Call Logs Voice calls are not supported on Wi-Fi only tablets. You can merge the call logs of the same contact or number for a tidier and more concise interface, or delete call logs as required.
Apps Set a Ringtone for a Contact 1 Open Phone, touch the Contacts tab at the bottom of the screen, then select the contact you want to set a ringtone for. 2 On the contact details screen, touch Ringtone and select a ringtone. Manage Incoming Calls Voice calls are not supported on Wi-Fi only tablets. You can use the call waiting feature to answer incoming calls when you are already engaged in a previous call.
Apps Answer a New Incoming Call During a Call 1 2 When you receive an incoming call when you are already engaged in a previous call, touch to answer it. Touch or touch a held call in the call list to switch between the two calls. Enable Call Forwarding After the Call forwarding feature is enabled, calls that meet set conditions will be automatically transferred to a specified phone number. This feature requires the support of your mobile carrier. For details, contact your carrier.
Apps Set Whether to Receive Notifications for Blocked Calls Go to Phone > > Blocked > > Receive notifications and set whether to receive notifications for blocked calls. Emergency SOS and Calls This feature is not supported on Wi-Fi only tablets. Use Emergency SOS If you encounter an emergency, you can quickly and secretly send an SOS message to your emergency contacts. 1 Enable GPS and allow the Emergency SOS feature to access your location.
Apps If two SIM cards have been inserted into your device, touch More under SIM 1 or SIM 2. 2 Go to Voicemail > Voicemail number, enter the voicemail number obtained from your carrier, and touch OK. Listen to a Voicemail Message Touch and hold the 1 key on the dialler and then enter your voicemail number. Messaging Send and Manage Messages SMS messaging services are not supported on Wi-Fi only tablets. You can send and receive messages that include text, emojis, pictures, audio files, and more.
Apps Mark Messages as Read You can use any of the following methods to mark messages as read: • New messages will be displayed in the notification panel in the form of a banner and you can mark them as read there. • On the Messaging screen, swipe left on the message that you want to mark as read, then touch • . On the Messaging screen, go to > Mark all as read. Delete a Message You can delete messages using either of the following methods: .
Apps Set Whether to Receive Notifications for Blocked Messages Go to Messaging > > Blocked > > Receive notifications and set whether to receive notifications when messages are blocked. Calendar Add and Manage Events Events help you plan and manage activities in your daily life and work, such as attending company meetings, arranging social get-togethers, and making credit card repayments. You can add events and set reminders to help you arrange your schedule in advance.
Apps Set a Calendar Notification Set the calendar notification type according to your requirements. You can set status bar notifications, banner notifications, sound notifications, and more. You can also change the default reminder time to control when your device will send you a reminder. 1 Go to 2 In the reminder settings, set Default reminder time and Reminder time for all-day events. 3 Touch Notifications and enable Allow notifications.
Apps 3 4 Set the following options according to your preferences: • Repeat • Vibrate • Ring duration • Snooze duration • Label When you are finished, touch . Modify or Delete an Alarm Touch an existing alarm to modify or delete it. Snooze an Alarm If you don't want to get up when an alarm rings, simply touch the snooze button or press the Power button. The snooze length is set when creating the alarm.
Apps Go to Settings > System & updates > Date & time, enable Dual clocks, and set a Home city. The time of your home city and current location will now both display on the lock screen. Only one clock will display on the lock screen if your current location is in the same time zone as your home city. Notepad Create Notes You can create notes to record your thoughts and inspirations. 1 Go to 2 Enter the title and content of the note. 3 Touch to insert a picture into the note as required.
Apps On the All notes or All to-dos screen, touch the item to be shared, touch , then follow the onscreen instructions to share it. Delete Notepad Items You can delete notepad items using either of the following method: • On the All notes or All to-dos screen, swipe left on a note or to-do, then touch to delete it. • Touch and hold a note or to-do you want to delete, select or drag over the check boxes of any other notes or to-dos you want to delete as well, then touch .
Apps 3 Drag the start and end bars to adjust the clip length. Pinch your fingers on the waveform to zoom in or out to adjust the clip length more precisely. 4 Touch and select Keep selected part or Delete selected part. Share Recordings 1 On the 2 Go to 3 Select your preferred sharing method and follow the onscreen instructions to share the recording. Recorder home screen, touch the recording you want to share to play it. > Share.
Apps Send an Email 1 Open 2 Enter the recipient's email address, or touch Email, then touch . to select a contact or group, then touch . 3 Add the addresses of any recipients to whom you wish to CC or BCC the email. If you have more than one email account, you will also need to select the email address you wish to send the email from. 4 Write the email and enter the subject, then touch .
Apps Organise Emails by Subject On the Inbox screen, go to > Settings > General, then enable Organise by subject. Sync Emails After automatic email syncing is enabled, the emails on your device will be automatically synced with those on the email server. 1 On the Inbox screen, go to 2 Touch the account you wish to sync emails for, then turn on the Sync Email switch. 3 Touch Sync frequency to set the automatic syncing period. > Settings.
Apps Add a VIP Contact You can add VIP contacts using either of the following methods: • Go to Email > > Settings > VIP contacts. On the VIP list screen, go to Add > Create or touch Add from contacts, then follow the onscreen instructions. • Open an email, touch the account name of the sender or receiver, then touch Add to VIP list. Delete a VIP Contact 1 Go to 2 On the VIP list screen, touch 3 Select the VIP contact to be deleted, then touch Email > > Settings > VIP contacts. . .
Apps Torch Torch You can turn on the torch using either of the following methods: • Swipe down from the status bar to open the notification panel, and touch to turn the torch on or off. • Swipe up from the bottom edge of the lock screen to display the shortcut panel, and touch to turn the torch on or off. When turned on, a notification indicating that the torch has been turned on will be displayed on the lock screen. Touch to turn off the torch.
Apps Quickly Access Frequently Used App Features Quickly Access Frequently Used App Features You can access frequently used features of certain apps from app icons on the home screen, and even add shortcuts for these features to the home screen. Quickly Access Frequently Used App Features Touch and hold an app icon until a pop-up menu is displayed. Then touch a frequently used feature to access it. For example, touch and hold the icon, then touch a shooting mode from the pop-up menu to access it.
Apps View and Manage High Data Consumption Apps 1 You can find out how much data your apps are using in comparison to each other by going to Data usage this month on the Data usage screen. 2 Touch a high data consumption app to set mobile data, roaming data, or background data usage limits for it.
Apps • Go to Phone > > Blocked > > Blocklist, touch , then add the phone numbers you want to block. • On the Phone screen, touch the Contacts tab at the bottom, touch the contact you want to block, then go to > Block contact. Set Whether to Receive Notifications for Blocked Calls Go to Phone > > Blocked > > Receive notifications and set whether to receive notifications for blocked calls. Filter and Block Spam Messages This feature is not supported on Wi-Fi only tablets.
Apps Phone Clone Phone Clone Phone Clone lets you quickly and seamlessly move all the basic data (including contacts, calendar, images, and videos) from your old device to your new device. Clone Data from an Android Device 1 On your new device, open Phone Clone . Alternatively, go to Settings > System & updates > Phone Clone, touch This is the new phone, then touch Huawei or Other Android. 2 Follow the onscreen instructions to download and install Phone Clone on your old device.
Apps Tips Tips provides you with an abundance of information so you can quickly familiarise yourself with your device and make the best use of it. In Tips, you can also find a full set of user guides for more detailed instructions. • Vividly depicted cards: Browse through the easy-to-read cards with a short clip or image to quickly get to grips with all the most useful features on your device. The cards are categorised so you can jump directly to a category you are interested in.
Settings Search for Items in Settings Search for Items in Settings Tired of trudging through layers of settings? Just search for them using the search box. • Swipe down from the middle of the screen to display the search box. Enter the name of a setting to obtain search results. • Open Settings, and enter the name of a setting in the search box at the top of the screen, to obtain search results.
Settings These steps may be different if you are sharing files directly from an app. 4 Touch the icon of the receiving device to establish a connection, then share the files. 5 On the receiving device, accept the Wi-Fi Direct transfer request. To view the received files, open Files, then go to Internal storage > Wi-Fi Direct on the Categories tab.
Settings 3 From the list of Available devices, select the one you want to pair your device with, and follow the onscreen instructions to complete pairing. On the Bluetooth settings screen, touch to view tips for connecting various Bluetooth devices. Transfer Files via Bluetooth You can use Bluetooth to transfer videos, pictures, contacts, and more to another device provided that both devices are within the effective Bluetooth range. 1 Pair the sending and recipient devices via Bluetooth.
Settings Share Your Network Connection via Personal Hotspot 1 Go to 2 Set Device name and Password. 3 Enable Personal hotspot and your device will share your mobile data or the Wi-Fi network you are currently connected to with other devices. 4 In the case of a Wi-Fi network, you can set the AP frequency band of the Wi-Fi hotspot. Go to More > AP band and touch 2.4 GHz or 5 GHz. 5 In the case of mobile data, you can set a mobile data limit for a single session.
Settings Enable or Disable Smart Data Saver Enable Smart data saver to prevent apps from using mobile data in the background. 1 On the Data usage screen, touch Smart Data Saver, then enable it. The then display on the status bar. 2 If you want to allow unrestricted access to data for some apps even when they are running in the background, toggle on the switches for these apps.
Settings • Go to Settings > Mobile network, and enable or disable Airplane mode. When Airplane mode is enabled, Wi-Fi and Bluetooth will automatically be disabled. You can re-enable them if allowed to do so by the airline. Wireless Projection You can connect your device to an external display (for example, a TV) wirelessly. 1 Based on the model and functions of your external display, do the following: • If the external display supports Miracast, enable wireless projection on it.
Settings Quickly Share Files Between Your Devices Using Huawei Share You can use Huawei Share to quickly share files between Huawei devices. The recipient can preview the files before they are sent, then view the full content of the files once they have been received. For example, the recipient can view received pictures or videos in Gallery. 1 On the recipient device, enable Huawei Share. 2 On the sending device, touch and hold a file, select the files you want to share, then touch .
Settings • Wi-Fi capable printers: The printer must be powered on and connected to the same network as your device. • Wi-Fi Direct capable printers: The printer must be powered on and have Wi-Fi Direct enabled. • Bluetooth capable printers: The printer must be powered on and discoverable. 2 On your device, preview the file to be printed, then go to Share > Huawei Share. 3 Once the printer has been discovered, touch its name on your device, and adjust settings on the preview screen.
Settings Transfer Data Using a USB Cable 1 Use a USB cable to connect your device to the computer. After the driver program is automatically installed, a drive named for your device will display on the computer. 2 Select an appropriate USB connection mode on your device to transfer data: • Select Transfer photos in the new drive displayed on the computer to view and copy photos from your device to the computer.
Settings 2 Go to Settings > More connections > VPN > Add VPN network, enter the VPN server name, set the server type to L2TP/IPSec PSK, then enter the server address, L2TP key, IPsec identifier, and IPsec pre-shared key. 3 If the VPN server does not have a DNS address, touch Show advanced options and enter the DNS domain, DNS server address, and forwarding route. 4 Touch Save. 5 Touch the VPN you have just set up, enter your VPN user name and password, then touch Connect.
Settings • Deselect one or more apps, and touch OK to remove them from the folder. If you deselect all apps, the folder will be deleted. Relocate a Screen Page 1 Pinch together two fingers on the home screen to access the Home screen editor. 2 Touch and hold the screen page you wish to relocate, then drag it to the desired position. App Drawer You can put your apps in a drawer and display only frequently used apps on your home screen to streamline your home screen.
Settings • Go to Settings > Display & brightness > eBook mode, and enable or disable eBook mode. • If eBook mode is enabled together with Eye comfort mode, eBook mode will take effect to turn the screen of your tablet black and white. • If eBook mode is enabled together with Dark mode, the background of the screen will be black and text will be white. Brightness, Colour, and Colour Temperature You can set the screen brightness, colour mode, and colour temperature according to your preferences.
Settings When the ambient lighting is of a warm colour temperature, the screen will take on a yellowish tint; when the ambient lighting is of a cold colour temperature, the screen will take on a whitish tint. Go to Settings > Display & brightness > Colour, and enable or disable Natural Tone. Eye Comfort Mode Eye comfort mode can effectively reduce blue light and adjust the screen to show warmer colours, relieving eye fatigue and protecting your eyesight.
Settings Adjust Text Style Settings You can adjust the system text size and app display size, as well as the text style. Enlarge or Reduce Text Size Go to Settings > Display & brightness > Text and display size, and drag the slider for Text size. Enlarge or Reduce Display Size Display size determines the size of content (including text and images) displayed within apps. Go to Settings > Display & brightness > Text and display size, and drag the slider for Display size.
Settings This feature may vary by device. Do Not Disturb Do Not Disturb helps you prevent interruptions when you need to focus. When this mode is enabled, calls and messages will be muted and banner notifications will not be displayed. Enable or Disable Do Not Disturb You can enable or disable Do not disturb using either of the following methods: • Swipe down from the status bar to open the notification panel, then swipe down again to display all shortcuts. Touch • to enable or disable Do Not Disturb.
Settings Set a Ringtone for Incoming Calls Voice calls are not supported on Wi-Fi only tablets. You can set your favorite music or a video as the ringtone for incoming calls. If two SIM cards have been inserted into your device, configure the ringtone separately for SIM 1 and SIM 2. Set a Music Ringtone 1 Go to Phone > Tablet ringtone. 2 Select a system ringtone, or touch Music on device to select a local song as the ringtone.
Settings Huawei Histen Sound Effects Huawei Histen sound effects, with 3D surround sound support, deliver vibrant and crisp sound to create an immersive audio experience. Huawei Histen sound effects are only available when a headset is plugged in. Go to Settings > Sounds & vibration > Huawei Histen sound effects and select an option: • Auto: Automatically identifies what you are playing and intelligently applies sound effects to optimise your experience. • 3D audio: Delivers 3D spatial sounds.
Settings More Notification Settings Notifications Turn on Screen Go to Settings > Notifications > More notification settings and enable Wake screen. Your device will automatically turn on the screen when it receives a notification. Pulse Notification Light upon Receiving Notifications Go to Settings > Notifications > More notification settings and enable Flash notification light. The indicator on your device will blink when a notification is received.
Settings This feature may vary by device. Manage Notifications for Multiple Apps Go to Settings > Notifications > Manage all and enable or disable All. Biometrics&Password Lock Screen Password You can set a numeric, pattern, or hybrid password as your lock screen password. Set the Lock Screen Password You can set a numeric, pattern, or hybrid password. 1 Go to 2 Enter a password containing 6 digits.
Settings If you need to re-enable Lockdown mode, press and hold the Power button and touch the Lockdown option again. Apps App Twin App Twin enables you to log in to two Facebook accounts simultaneously without the hassle of having to constantly switch between them, allowing you to keep your work and private lives separate. App Twin will only work with certain apps. 1 Go to Settings > Apps > App Twin, and turn on the switch for the app you want to create a twin of.
Settings Enable Power Saving Mode Tablet Manager provides two power saving modes: • Power Saving mode reduces power consumption by limiting background app activity, visual effects, and sounds. • Ultra Power Saving mode strictly controls background apps to ensure that your device can stay on for as long as possible. In this mode, you will only be able to use selected apps, and all system switches, except for Wi-Fi and mobile data, will be turned off.
Settings Stay Connected while Your Device is Sleeping If you would like your device to continue to receive messages or download data while it is in sleep mode, set to keep your device connected when it sleeps. Please note that this may increase power consumption. On the Battery screen, touch More battery settings, then enable or disable Stay connected when device sleeps as required.
Settings Cancel or Disable App Lock On the App Lock settings screen, do the following: • Cancel App Lock: On the locked app list, toggle off the switches beside the apps for which you want to cancel the lock. • Reset App Lock: Go to > Disable App Lock > DISABLE. This will cancel all locks, and clear all app lock settings. Smart Unlock Smart Unlock enables you to unlock your device with a Bluetooth device, like a smart band.
Settings Pin a Screen You can pin the screen of an app so you can stay focused on it. Try this feature when playing games, watching videos, and more. Go to Settings > Security > More settings > Screen pinning, and enable Screen pinning. • When using gesture navigation, swipe up from the bottom of the screen and hold to access the recent tasks screen, then touch on an app preview. To unpin, swipe up twice from the bottom of the screen.
Settings Location Services Some apps need to obtain your location information to provide better services. You can enable or disable location services, and grant or deny the permission to access location information for particular apps as required. Enable or Disable Location Services You can enable or disable location services in either of the following ways: • Swipe down from the status bar to open the notification panel and swipe down further to display all shortcut switches.
Settings 2 Set the power on and off times, as well as the repeat cycle. Your device will power on and off automatically at the specified times. To stop using this feature, disable Scheduled power on/off. System&Updates Language and Region 1 Go to Settings > System & updates > Language & input > Language and region, then select the language you want to use. 2 If the language is not listed, touch Add language, then locate and touch it to add it to the list.
Settings Phone Clone Phone Clone lets you quickly and seamlessly move all the basic data (including contacts, calendar, images, and videos) from your old device to your new device. Clone Data from an Android Device 1 On your new device, open Phone Clone . Alternatively, go to Settings > System & updates > Phone Clone, touch This is the new phone, then touch Huawei or Other Android. 2 Follow the onscreen instructions to download and install Phone Clone on your old device.
Settings To reset the password, go to the Memory card backup screen, then password. The new password is only valid for backups created thereafter. 4 > Reset After the backup is complete, you can find your data backup in the Huawei folder in Files > Categories > Memory card. You can go to the Memory card backup screen and enable Auto-backup. Your device will then automatically back up your data every seven days when it is being charged, the screen is turned off, and the battery level is at least 75%.
Settings 2 On your device, scan for available NAS devices using your Wi-Fi network, then touch an applicable one to access and add its shared folders. 3 Touch BACK UP, select the data you want to back up, then touch Back up. 4 Follow the onscreen instructions to set the password and password hint. The data will be encrypted and backed up. The password will be required if you want to restore your data backup. To reset the password, go to the Shared folder backup screen, then password.
Settings Update the System Online When an update is available, your device will prompt you to download and install the update package. • Before updating, make sure your device is running an official system version. Otherwise, the update may fail and your device may experience unknown issues. • Back up your user data before the update. • After an update, third-party apps that aren't compatible with the new system version may become unavailable.
This guide is for your reference only. The actual product, including but not limited to the colour, size, and screen layout, may vary. All statements, information, and recommendations in this guide do not constitute a warranty of any kind, express or implied. Please visit http://consumer.huawei.com/en/support/hotline for up to date support hotline and email address information for your country or region. Model: BAH3-L09 BAH3-W09 BAH3-W19 EMUI 10.