User Guide
Contents Exciting Features Tips Smart Life Camera Tips More Features 1 2 6 8 New Device Appearance Insert the Cards New Device Configuration SmartCharge: Charge Your Device Faster and Safer Getting Help 12 13 13 14 15 Gestures and Operation Operate Your Phone with Your Knuckles Screenshots and Screen Recording 20 21 Home Screen Navigation Bar Quick Switch Notification and Status Bar Use Shortcuts to Access Frequently Used Features Screen Lock and Unlock Go Back to Basics with Simple Mode Home Screen M
Contents Wide Aperture Panorama 3D Panorama Pro Mode Beautification Slow Motion Recording Light Painting Mode Use Time-lapse to Condense Hours into Minutes Discover New Possibilities with Customized Shooting Modes 58 60 61 64 68 70 71 76 77 Highlights Photo Management 78 80 Gallery Phone Manager Use One-touch Optimization Manage Your Mobile Data Optimize Power Consumption Use Virus Scan to Keep Your Phone Safe 84 84 85 86 Email 87 Calendar 89 Use the Clock 92 Notepad 94 Smart Remote Use Reco
Contents Security and Privacy Fingerprint Location Information Protection PrivateSpace: Keep Your Private Information Hidden Use App Lock to Lock Important Apps More Security Settings 117 119 120 121 122 Backup and Restoration Backup and Restoration 124 Wi-Fi and Network Wi-Fi Manage Dual-SIMs Mobile Network Share Your Mobile Network with Other Devices 126 128 129 129 Apps and Notifications App Twin: Log in to Two Social Media Accounts at Once Customize App Permissions to Use Your Phone Your Way 132
Exciting Features Tips Use Shortcuts to Access Frequently Used Features Touch and hold an app icon to display a menu of frequently used features for quick access. You can also touch and hold a feature and drag it to your home screen to create a shortcut. If you touch and hold an app icon and a shortcut is not created, the app does not support home screen shortcuts.
Exciting Features Transfer Files Using Huawei Share You can use Huawei Share to quickly transfer photos, videos and other files between Huawei devices. Huawei Share uses Bluetooth to detect nearby Huawei devices and Wi-Fi to quickly transfer files without using mobile data. Huawei Share uses Wi-Fi and Bluetooth to transfer data. When Huawei Share is enabled, Wi-Fi and Bluetooth are automatically enabled. Huawei Share Use Huawei Share to send files: Select the file you want to share and touch Share.
Exciting Features l The Smart Remote can be used with home electronics that have accompanying infrared remotes. It does not work with devices that use Bluetooth or other non-infrared remote controls. l The remote control will not work when you are in a video call, when there is a phone call in the background, when there is a third-party app sending a voice message, or while the earpiece speaker is in use. l There is no unified industry standard for infrared codes.
Exciting Features Phone with two user accounts, such as one for work and one for personal use, and quickly switch between them with a single touch. You can create three different types of users: l Owner: The Phone's owner. Log in as the owner when you are using your device. As the owner, you have access to all actions, such as adding or deleting users and guests, and giving users permission to make calls and send text messages. l User: Add family members and close friends as users.
Exciting Features Some carriers may not support this feature. App Twin: Log in to Two Social Media Accounts at Once Have you ever wished you could log in to two WeChat and Facebook accounts on your Phone without the hassle of constantly switching between them? App twin lets you log in to two WeChat and Facebook accounts at the same time, allowing you to keep your work and private life separate. The App twin feature only works with WeChat, QQ, LINE, Facebook, Snapchat, WhatsApp, and Messenger.
Exciting Features Camera Tips Highlights: Turn Your Photos into a Personalized Video Having to sort through a sea of photos to relive and share past moments can be a pain. Highlights intelligently selects photos and videos by location to generate short video clips, so you can easily look back on your wonderful memories. You can choose different animation effects and background music for the videos and share them with friends and family.
Exciting Features If you take a selfie at night or in low light conditions, your Phone will detect the low ambient light and automatically enable Night mode to improve the quality of selfies. This mode does not have a switch and is automatically enabled when your device detects low ambient light. Your device will prompt you when it enables this mode. l Portrait mode: Enable Portrait mode to automatically apply beautification effects to everyone in the frame.
Exciting Features Monochrome: Explore the Beauty of Light and Shadow The world is an amazingly colorful place. But sometimes too much color can be distracting. Monochrome mode filters out color, helping to bring out light and shadows and give photos more mood and atmosphere. Open Camera and swipe right on the screen. Touch Monochrome, and then touch to take photos in black and white.
Exciting Features Wi-Fi+: Your Smart Connectivity Assistant Wi-Fi+ intelligently connects to Wi-Fi networks to save mobile data consumption. When your device detects a known or free Wi-Fi network, it will automatically turn on Wi-Fi and connect to the network. Your device will also automatically select the optimal network in the area for the best Internet connection.
Exciting Features Once you have enabled Wi-Fi+, your device will: l Automatically select and connect to the optimal network: Automatically select and connect to Wi-Fi networks you've previously connected to, free networks, or your mobile data network, depending on the signal strength at your current location. l Automatically turn Wi-Fi on and off: Depending on the Wi-Fi networks you have connected to previously, Wi-Fi will be automatically enabled or disabled in specific locations.
Exciting Features Deep clean: Scan for redundant files including WeChat files, large files, videos, images, app residual files, music files, unnecessary installation packages, unused files, and files that take up a lot of space, and obtain cleaning suggestions based on the scan results. This helps you free up storage space without accidentally deleting important files.
New Device Appearance l To power on your device, press and hold the power button until the screen turns on. l To power off your device, press and hold the power button, and then touch l To force your device to restart, press and hold the power button until your device vibrates. .
New Device Insert the Cards l Do not insert or remove the SIM card when your device is powered on. l Ensure that the card is correctly aligned and that the card tray is level when you insert it into your device. l Be careful not to scratch your device or hurt yourself when using the eject pin. Store the eject pin out of the reach of children to prevent accidental swallowing or injury.
New Device When you don't need to access the Internet, disable mobile data to save battery power and reduce data usage. Manage Dual-SIMs You can enable or disable a SIM card based on your usage needs. You can also set a default SIM card for accessing the Internet and making calls. Open > Settings > Wireless & networks and touch Dual SIM settings or International roaming. Configure the two SIM cards based on your needs.
New Device Getting Help Security Features List Huawei Phone offers a range of security measures that allow you to use your Phone with peace of mind. Screen lock mode and password Set a lock screen password, lock the screen, and protect your privacy. Your fingerprint replaces the password, making your Phone more Fingerprint unlocking secure, and also making a range of security operations more convenient, from unlocking the screen to accessing Safe and locked apps, to making secure payments.
New Device The SIM card lock function uses a PIN code to lock the SIM card. Every SIM card lock time your Phone is powered on or replaced, the system requires the correct PIN code to unlock. This prevents any lost Phone from being used to tamper with bank accounts or for identity theft purposes.
New Device l Use the device when the card tray is not properly inserted. If the device has already soaked in liquid, do as follows: l Avoid drying the device using external heat sources (such as, hairdryers and microwave ovens). Avoid placing objects such as cotton swabs and tissues into the charging port or speaker holes. l Thoroughly wipe the device dry, then place it in a dry and ventilated environment. Place the device in front of the fan.
New Device is a registered trademark of Sony Corporation. Other trademarks, product, service and company names mentioned may be the property of their respective owners. Notice Some features of the product and its accessories described herein rely on the software installed, capacities and settings of local network, and therefore may not be activated or may be limited by local network operators or network service providers.
New Device AND FITNESS FOR A PARTICULAR PURPOSE, ARE MADE IN RELATION TO THE ACCURACY, RELIABILITY OR CONTENTS OF THIS MANUAL. TO THE MAXIMUM EXTENT PERMITTED BY APPLICABLE LAW, IN NO EVENT SHALL HUAWEI BE LIABLE FOR ANY SPECIAL, INCIDENTAL, INDIRECT, OR CONSEQUENTIAL DAMAGES, OR LOSS OF PROFITS, BUSINESS, REVENUE, DATA, GOODWILL SAVINGS OR ANTICIPATED SAVINGS REGARDLESS OF WHETHER SUCH LOSSES ARE FORSEEABLE OR NOT.
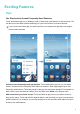
Gestures and Operation Operate Your Phone with Your Knuckles Knuckle gestures give you a quick way to take screenshots, open apps, and enter split-screen mode. Capture a standard screenshot: Knock twice on your screen with a knuckle to capture a standard screenshot. Capture a partial screenshot: Knock and hold your screen with a knuckle, wait for a blue dot to appear on your screen, and then drag your knuckle to draw the outline of your screenshot.
Gestures and Operation Enter split-screen mode: Knock on the screen with a knuckle then slide it horizontally across the center of the screen to enable split-screen mode.
Gestures and Operation After taking the screenshot, touch or to edit or share the screenshot. The screenshot will be saved in Gallery by default. Record Exciting Moments on Your Screen The screen recording feature comes in handy when you are making tutorial videos or want to record exciting gaming moments on your Phone. Screen recording will end if you make or answer a call.
Gestures and Operation Use combo key to start recording: Simultaneously press the Power button and the Volume up button to begin recording. To end the recording, simultaneously press the Power button and the Volume up button again.
Gestures and Operation Use knuckle to start recording: Use two of your knuckles to gently double-tap the screen in quick succession to start recording. To end the recording, double-tap the screen in quick succession with two of your knuckles again. You can view screen recordings in Gallery. Take a Screenshot of Your Entire Screen Use combo key to take screenshot: Simultaneously press and hold the Power button and the Volume down button to take a screenshot of the full screen.
Gestures and Operation After taking the screenshot, touch or to edit or share the screenshot. The screenshot will be saved in Gallery by default. Take a Partial Screenshot Knock the screen with a knuckle and draw an outline around the part of the screen that you want to capture, making sure that your knuckle does not leave the screen. The screen will display the movement trajectory of your knuckle and take a screenshot of the selected area.
Gestures and Operation After taking the screenshot, touch or to edit or share the screenshot. The screenshot will be saved in Gallery by default.
Home Screen Navigation Bar Configure Your Navigation Bar Layout Using the navigation bar, you can conveniently access the home screen, return to the previous page, exit an app, or view recent apps used. To configure your navigation bar layout, go to Settings, then go to Smart assistance > System navigation > Navigation bar, and select the navigation key combination and enable or disable Virtual navigation bar based on your usage habits. Back key: Touch to return to the previous page or exit an app.
Home Screen l View recently used apps: Recently used apps will be displayed on the screen and you can check them by swiping up or down. l Switch to a recently used app: Swipe up or down on the screen to find the app you want to use, and touch the app tab. l Close an app: Swipe left or right on the app tab or touch in the upper right corner of the app tab to close the corresponding app. l Close all apps: Touch to close all apps.
Home Screen Delete shortcut switches: Drag a shortcut switch from the displayed area of the panel to the hidden area, then touch BACK. Notification and Status Bar Understanding Status Bar Icons Use the status bar to view connection information, check the remaining battery level, and check for new notifications. Status icons: Status icons tell you about your Phone's status, including network connections, signal strength, battery level, and time. Status icons may vary according to your region or carrier.
Home Screen Connected over 2G Connected over LTE Connected over HSPA NFC enabled VoLTE enabled Airplane mode enabled Roaming Connected over Wi-Fi Bluetooth enabled Receiving location data from GPS Wi-Fi network available Silent mode enabled Vibration mode enabled Charging Alarms activated Battery low Battery full No SIM card found Headset plugged in Notification icons: Notification icons are displayed on the left-hand side of the status bar when you receive a new message, notification, or
Home Screen l Access notification and status bar settings when the screen is unlocked: Go to Settings and then go to Apps & notifications > Notifications & status bar. Disable Disruptive App Notifications Find it annoying to receive so many different types of app notifications? You can set and disable app notifications to prevent this from happening. Go to Settings, then go to Apps & notifications > Notifications management. From here, you can disable all app notifications.
Home Screen Customize Notifications to Your Liking Not a fan of the default notification reminders? You can customize notification reminders so that you get notifications the way you want them. Go to l Settings, then go to Apps & notifications > Notifications & status bar. You can: Enable notifications turn on screen: Enable Notifications turn on screen. When your Phone screen is off, it will turn on when a notification is received.
Home Screen Use Shortcuts to Access Frequently Used Features Touch and hold an app icon to display a menu of frequently used features for quick access. You can also touch and hold a feature and drag it to your home screen to create a shortcut. If you touch and hold an app icon and a shortcut is not created, the app does not support home screen shortcuts.
Home Screen Quickly access frequently used app features: Touch and hold an app icon on your home screen, and then touch a frequently used feature to access it. Each app supports up to four frequently used features. These are preset by the app and cannot be changed. For example, to take a selfie, touch and hold the camera icon, and then touch Selfie in the pop-up menu. Add shortcuts to your home screen: Touch and hold an app icon on your home screen to bring up the menu.
Home Screen Auto-update covers: Open Settings, go to Security & privacy > Screen lock & passwords > Magazine unlock, and then enable Magazine unlock images update. An Internet connection is required to update your covers. To avoid excessive data usage, enable Auto-update over Wi-Fi to only update covers over Wi-Fi. Set a Lock Screen Password to Protect Your Privacy Personal photos, contact information, and banking apps, your Phone stores a lot of sensitive information.
Home Screen Lock the Screen to Quickly Secure Your Phone If you don't use your Phone for a set period of time, the screen will turn off and lock. As long as the screen stays on, you can use your Phone without needing to unlock the screen. Lock your screen when you are not using your Phone to protect your privacy and prevent mistaken inputs. Set a lock screen password to help protect your privacy.
Home Screen In Simple mode, you can: l Edit home screen icons: Touch and hold any of the icons to enter home screen editing mode, then you can add or remove app icons accordingly. l Exit Simple mode: To exit Simple mode, touch Standard mode.
Home Screen Delete a folder: Open the folder, touch , deselect all the apps, then touch OK. The folder will be deleted automatically and all the apps in the folder will be moved to your home screen. Rename a folder: Open the folder, touch the folder name and enter a new name. Add or delete app icons from a folder: Open the folder, touch , select or deselect apps as required and then touch OK.
Home Screen Home screen pages with app icons or widgets on them cannot be deleted. l Modify home screen page order: Touch and hold the home screen page you want to shift, then drag it to the position of your choice. l Set a default home screen page: Touch in the upper part of the home screen to set the selected home screen page as your default home screen page.
Home Screen Check that there is enough empty space on the home screen to put the widget. If there is not enough space, add another home screen page or free up some space on the current home screen page. Delete widgets: Touch and hold a widget on the home screen until your Phone vibrates. Drag the widget to Remove at the top of the screen. Move widgets: Touch and hold a widget on the main screen until your Phone vibrates, then drag the widget to any position on the main screen.
Contacts Managing Business Cards Business Card Management: Add and Share Business Cards with Ease Find it laborious to enter the content of paper business cards into your Phone contacts? Want an easier way to share your Phone contacts with friends? Business card management allows you to conveniently add and share business cards.
Contacts Scan Business Cards to Add them to Contacts Go to l Contacts, touch Scan, and you can: Scan a single business card: Place the business card on a flat surface, adjust the camera's focus so that the card information is clearly displayed in the viewfinder, and then touch l . Scan multiple business cards: Switch to Burst mode and follow the onscreen instructions to capture multiple business cards.
Contacts Share contacts: Open Contacts, select the contact you want to share, and touch the QR code icon in the upper right corner to share the contact using the QR code. You can also touch Share contacts, select a sharing method, and follow the onscreen instructions to complete the sharing process. If the other party's device supports QR code analysis, they can directly take pictures of or scan QR codes to add contacts.
Contacts If an error occurs while you're searching for a contact, on the contacts list screen, go to > Organize contacts, and then touch Rebuild index data. Managing Contacts Import and Export Contacts When you switch to a new phone, you'll need to transfer your existing contacts. Open Contacts, go to > Import/Export, and then select one of the following: l Import contacts: Select Import from storage or Import from SIM and follow the instructions.
Contacts Manage Contact Groups Want to send a message to a group of colleagues or host a get-together? Smart groups automatically groups your contacts by company, city, and most recent contact time, so you can quickly send a group email or message. Create a contact group: From the groups list, touch , enter the group name (such as Family or Friends), and then touch OK. Follow the onscreen instructions to add contacts, and then touch .
Contacts Associate Contact Information with Your Social Account What does each contact in your phone do? What are their emails? What are their job titles? You can use third-party social media apps (such as LinkedIn) to find out more information about your contacts. Associate LinkedIn account: Open Contacts, go to > Settings > Associate LinkedIn account and follow the onscreen instructions to log in to your LinkedIn account.
Dialing Basic Calling Functions Make Calls On the dialer screen, enter part of the phone number or the first letter or pinyin initials of the contact's name. Your Phone will automatically search for the relevant contacts. Open Dialer. From the dialer screen, enter the phone number or the first letter or pinyin initials of the contact's name (for example, enter hwkf for Huawei customer service). Your device will automatically search Contacts, call logs, and the yellow pages.
Dialing Enable Call Forwarding and Never Miss a Call If you are unavailable to answer calls, you can set your device to forward calls to another number. Some carriers may not support this feature. Open Dialer, and go to > Settings > Call forwarding. If you have a dual-SIM device, in the SIM 1 or SIM 2 section, touch Call forwarding and select a forwarding method. Enter the number you want to forward your calls to, then confirm.
Dialing Voicemail requires carrier support. Please check that you have enabled this service. Contact your carrier to learn more about your voicemail number, service details, and fee information. Enable voicemail: Open Dialer, go to > Settings touch Additional settings (for dual- SIM phones, in the SIM 1 or SIM 2 section, touch Additional settings), then go to Voicemail > Voicemail number and enter the voicemail number provided by your carrier.
Dialing Some carriers may not support this feature. Enable VoLTE to Enjoy HD Calls Only dual-SIM phones support both SIM card slots enabling 4G, VoLTE, and VoWiFi. Open Settings, and go to Wireless & networks > Mobile network. In the settings section for SIM 1 or 2 (if supported by your carrier network), you can: l Enable 4G: Turn on Enable 4G. Due to carrier customization, there may not be a 4G switch on your phone. This indicates 4G is already enabled and does not need to be turned on manually.
Dialing Open Dialer, go to > Settings > Wi-Fi calling, enable Wi-Fi calling, and then touch Turn on. Touch Mode and follow the onscreen instructions to set the preferred network.
Message Basic Messaging Functions Send Messages Text messages give you a quick and easy way to communicate with friends, family and colleagues. In addition to text, you can also add emojis or insert pictures and audio files to enrich your messages. Open Messaging. From the list of messages, go to groups. Enter your message content, touch > to add other types of content, and touch send the message.
Message Pin to top: Want to pin an important message to the top of the list? From the list of messages, touch and hold a message to select it, then touch . Pinned messages will be displayed below notification messages. To pin unread messages to the top, go to > Settings > Pin unread messages. Mark as read: Receive many notification messages or group messages every day? To mark messages as read, from the list of messages, go to > Mark all as read or swipe a message to the left and touch Read.
Camera Basic Camera Functions Use Your Camera's Basic Functions Understand your camera's basic functions to help you take better pictures. 5VSO GMBTI PO PGG &OBCMF 8JEF BQFSUVSF NPEF 4XJUDI CFUXFFO GSPOU SFBS DBNFSB $IBOHF DPMPS NPEF &OBCMF .PWJOH QJDUVSF NPEF &OBCMF 1PSUSBJU NPEF 7JFX SFDPSEFE QIPUPT BOE WJEFPT 4XJQF VQ UP FOBCMF 1SP NPEF 4XJUDI UP WJEFP NPEF 5BLF B QIPUP Basic photo mode: Open Camera and in the viewfinder, touch to take a picture.
Camera decreasing the exposure will make pictures appear darker. You can adjust the exposure manually from the viewfinder by touching the screen and dragging the icon up or down. Enable or disable flash: Flash is used to provide extra lighting for taking photos in low light conditions. From the viewfinder, touch l to select one of the following flash modes: Auto: The camera automatically enables or disables flash depending on the ambient light level. l Off: Disable flash. l On: Enable flash.
Camera Record a video: Open Camera and touch to switch to video mode. Touch to start recording a video. Take a picture while recording a video: You can touch when recording a video to take a picture. Zoom your camera in or out: From the viewfinder, touch the screen with two fingers and pinch them together to zoom in or move them apart to zoom out. If you zoom in beyond your camera's optical zoom limit, the image quality will decrease.
Camera The rule of thirds: Select the Grid or Phi grid grid. The four points where grid lines intersect are the focal points of the photo. Position the subject under one of these points to create an interesting composition. The golden spiral: Select the Fibonacci spiral (left) or Fibonacci spiral (right) grid. The center of the spiral is the focal point of the photo. Position the subject here to lead the viewer around the image in a natural flow.
Camera Wide Aperture Wide Aperture Mode: Emphasize Your Subject Want to showcase a peony in a sea of flowers, highlight your subject in a crowd, or increase the brightness in a low light environment? Enable Wide aperture mode to blur the background and highlight your subject to take crisp photos even in low light.
Camera Wide Aperture Mode: Make Your Subject Stand Out Wide aperture mode produces photographs with a shallow depth of field. This creates a blurred background that lends greater emphasis to the photo's subject. Take a wide aperture photo: Open enable Wide aperture mode. Touch the Camera. Touch the icon at the top of the screen to icon again to exit Wide aperture mode. If the icon isn't visible, swipe right on the screen and select Photo.
Camera Panorama Use Panorama to Take Panoramic Selfies Want to fit more friends or scenery in a selfie? Use Panorama to take selfies with a wider field of view. 1 To take a panoramic selfie, open 2 Swipe right on the screen and touch Panorama. 3 Hold your Phone steady and touch 4 Follow the onscreen instructions and turn your Phone in one direction until the blue frame overlaps with the square screen frame. The camera will automatically take another picture.
Camera 3D Panorama 3D Panorama: Capture 3D Photos in Motion Do you ever feel let down by the feeling of flatness in your panoramas? 3D panorama gives you a great way to liven your panoramas up. You can tilt your Phone or drag your photos to create a 3D effect. 3D panorama is a pre-installed camera mode in your Phone. You can use 3D panorama to create moving panoramic shots of objects, people, and landscapes.
Camera Use 3D Panorama to Take 360-degree Photos Tired of looking at the single perspective offered by a standard photo? Try the 3D panorama function to capture a 360-degree view of a scene or person. There are three shooting modes for the 3D panorama function: l Shooting objects: Open Camera, swipe right and touch 3D panorama. Touch and hold , then follow the onscreen prompts to slowly move your Phone around your subject in one direction. Release to stop shooting.
Camera l Taking seflies: Open Camera, touch and touch 3D panorama. Touch and hold to switch to the front camera, then swipe right , then follow the onscreen prompts to move the Phone slowly around you in one direction. Release to stop shooting. After shooting, touch the camera thumbnail, and then touch 3D above the photo you took to generate a 3D panoramic photo.
Camera Enable Beauty mode: In 3D panorama, touch to enable Beauty mode, then touch and drag the slider left or right to select the beautification level you want. After a 3D panorama has been generated, you can tilt your Phone or drag the photo to view the 3D effect. Pro Mode Pro Camera: Use Light to Tell Your Story Pro camera lets you adjust exposure, shutter speed, and a range of other settings, putting you in charge of your camera. Pro camera is a pre-installed camera mode in your Phone.
Camera 1SP NPEF JOGP 4FMFDU NFUFSJOH NPEF "EKVTU *40 "EKVTU TIVUUFS TQFFE 4MJEF EPXO UP EJTBCMF 1SP NPEF "EKVTU FYQPTVSF WBMVF 4FMFDU XIJUF CBMBODF NPEF 4FMFDU GPDVT NPEF Use Pro Camera Mode to Take Landscape Shots Use Pro camera mode to customize camera settings and capture landscape shots that stand out. Open Camera and swipe up on in the viewfinder to enable Pro camera mode. Metering mode: In Pro camera mode, touch . Select the appropriate metering mode for the scene.
Camera For static scenes (such as mountains), a shutter speed between 1/80 and 1/125 is recommended; for moving scenes (such as waves), it is recommended that you mount your phone on a tripod and set a slower shutter speed (less than one second). l Exposure compensation: In Pro camera mode, touch &7 and drag the EV slider until your preferred value is highlighted. White balance: In Pro camera mode, touch "8# and drag the AWB slider until your preferred value is highlighted.
Camera Use Pro Camera Mode to Take Portrait Shots Use Pro camera mode to customize camera settings and create your own unique portrait style. Open Camera and swipe up on in the viewfinder to enable Pro camera mode. Metering mode: For portrait shots, select or and position the subject in the center of the photo. Brightness settings l ISO: For portrait shots, a low ISO setting is recommended to prevent excessive noise.
Camera White balance: Choose a white balance mode that suits your scene. If shooting in direct sunlight, select ; if conditions are dark or overcast, select . Focus: For portrait shots, it is recommended that you select Manual Focus (MF) mode. Touch the part of the photo that you want to isolate with the focus (such as a face) and then capture your shot. l In Pro camera mode, when one setting is changed, other settings may also change automatically. l The above settings are guidelines only.
Camera l Portrait mode: Enable Portrait mode to automatically apply beautification effects to everyone in the frame. l Perfect selfie: Enable Perfect selfie and your Phone will create a custom beauty plan for you. The higher the beautification level, the more pronounced the effects. Use Beauty Mode to Take Stunning Portraits Want to make your selfies or group shots even more beautiful? Beauty mode provides you with customized options to make every photo beautiful and forever-lasting.
Camera l Re-entering personal information: In Camera settings screen, go to Perfect selfie > Edit personal info, then follow the onscreen prompts to re-take photos of yourself looking to the front, sides, and downwards. This will reset the beauty parameters. l Adjusting beauty parameters: In Camera settings screen, go to Perfect selfie > Set beauty effects to adjust parameters such as skin smoothness and tone.
Camera Monochrome: Explore the Beauty of Light and Shadow The world is an amazingly colorful place. But sometimes too much color can be distracting. Monochrome mode filters out color, helping to bring out light and shadows and give photos more mood and atmosphere. Open Camera and swipe right on the screen. Touch Monochrome, and then touch to take photos in black and white.
Camera Tail Light Trails: Capture the Lights of the City Tail light trails lets you create artistic photos of car tail lights at night. l Shoot from a distance and slightly above your subject for best results. Ensure that car headlights do not point directly at the camera, as this can overexpose the image. l Open Position your device on a tripod so that it does not move during the exposure. Camera. Swipe right on the screen and then go to Light painting > Tail light trails.
Camera Light Graffiti: Paint a Photo with Light Light graffiti lets you create patterns or write words by moving a light source in front of the camera. l Find a dark location away from other light sources and ensure that the subject's silhouette is not visible. Choose a suitably bright light source of an appropriate color, such as a small torch or glow stick. l Open Position your device on a tripod so that it does not move during the exposure. Camera.
Camera Silky Water: Capture Silky-smooth Streams and Waterfalls Silky water lets you capture silky smooth photographs of waterfalls and rivers. l For better results, find a stream or waterfall with lots of water. l Position your device on a tripod so that it does not move during the exposure. Open Camera. Swipe right on the screen and then go to Light painting > Silky water. Hold your Phone steady, and then touch the viewfinder. Touch to start shooting.
Camera Star Track: Capture the Beauty of the Stars Star track lets you use your camera to capture the movement of stars in the night sky. l For best results, choose a location free of light pollution with an unobstructed view of the sky, and on a clear night. l Open Position your device on a tripod so that it does not move during the exposure. Camera. Swipe right on the screen and then go to Light painting > Star track. Hold your Phone steady, and then touch the viewfinder. Touch to start shooting.
Camera Use Time-lapse to Condense Hours into Minutes You can use time-lapse to capture images over a long period of time and condense them into a short video, allowing you to view flowers blooming, the ebb and flow of city traffic, and the formation of clouds during the day and the movement of stars in the night sky. l Avoid recording time-lapse for too long as it will use up your battery power and storage space. l Use a sturdy tripod to reduce device movement during time-lapse recording.
Camera Discover New Possibilities with Customized Shooting Modes Want to discover new ways of using your camera besides the preset functions? You can download or delete shooting modes based on your needs. Downloading more shooting modes: Open then touch Camera, swipe right to go to the Modes page, to view downloads. Select the shooting modes you want, and touch ADD. After downloading, you can see the downloaded shooting modes under Modes.
Gallery Highlights Highlights: Turn Your Photos into a Personalized Video Having to sort through a sea of photos to relive and share past moments can be a pain. Highlights intelligently selects photos and videos by location to generate short video clips, so you can easily look back on your wonderful memories. You can choose different animation effects and background music for the videos and share them with friends and family.
Gallery Edit the Highlights Album Want to change the background music or video template for Highlights? You can edit a Highlights video and personalize it with the background music and template you like. l Highlights automatically creates videos based on the geographical information in your photos. To use this feature, open Camera, go to Settings, and check that GPS tag is enabled. l Check that your Phone is connected to the Internet.
Gallery l Sharing or removing photos: Touch and hold any photo in the Highlights album, then touch and select a sharing method. Touch , and then touch Move to remove photos from the Highlights album. Photo Management Edit Videos Crop a video: Open Gallery, select the video you want to edit, and touch to enter the video editing screen. You can drag the slider in the crop area to select the segment you want to keep, and touch to finish cropping the video.
Gallery l Blur a photo: Touch , select the blur mode you desire, and drag the slider to adjust the degree of the blur. l Adjust photo effects: Touch to adjust the photo's brightness, contrast, saturation, and other parameters according to your preferences. l Beautify a portrait photo: When the system detects a portrait photo, it will automatically provide you with the Beauty feature.
Gallery View by shooting time: You can view the shooting time of your photos and videos in the Photos tab. Go to > Settings, and enable Show time to display the shooting date when viewing photos in full screen mode. From the Photos tab, you can separate or close two fingers to zoom out or in on the screen, and switch between day and month display for photos and videos.
Gallery Hide albums: Hide private albums that you don't want others to see. From the Albums tab, go to > Hide albums and toggle on the switches for albums that you want to hide. You cannot hide the Camera, or Screenshots albums. Delete photos or videos: Touch and hold a photo or video until or videos to be deleted, and then touch appears, select the photos > Delete.
Phone Manager Use One-touch Optimization Have you noticed that your Phone has slowed down recently? Do you worry that it might be vulnerable to malware and other security threats? Use one-touch optimization to make your Phone run smoother and protect it from security threats. Go to Phone Manager and touch OPTIMIZE. Your Phone will increase its running speed, check for security risks, optimize power consumption, and monitor and intercept unknown phone numbers and harassing calls.
Phone Manager Optimize Power Consumption Running out of battery at an inopportune time can cause many inconveniences. Power saving features can help to prolong the battery life of your Phone, allowing you to play games or enjoy other features for longer. Open l Phone Manager and touch remaining to perform the following: View power consumption details: Touch Battery usage to view power consumption details.
Phone Manager l Enable Power saving mode or Ultra power saving mode: Enable Power saving mode or Ultra power saving mode. Choose the appropriate power saving mode based on your Phone's battery level to extend battery life. l Adjust screen resolution to save power: Enable Screen resolution and select Smart resolution. Your device will automatically lower the screen resolution to save power. You can also manually set the screen resolution to save power when high resolution is unnecessary.
Email Email Add Email Accounts Add your email account to your phone for convenient email access at any time. If you have questions about specific settings while configuring your email, please consult your email account provider. Add a personal email account: Open , select an email service provider or touch Others, enter your email address and password, then touch Sign in and follow the onscreen instructions to configure your account.
Email l Configure email accounts: On the account screen, go to > Settings, select an account to set the Account name, Default account, or Remove account. Manage VIP Email Contacts Worried about missing an important contact's email among a sea of emails? You can add important contacts to the VIP list. Your device will automatically move emails from VIP contacts to the VIP mailbox. Open Email and go to > Settings > VIP contacts. From the VIP list screen, go to Add > Create or Add from contacts.
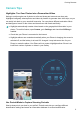
Calendar Calendar Calendar: Your Event Management Center Too many events to keep track of? Calendar provides you with comprehensive event management, making your professional and personal lives easier. Calendar provides the following functions: l Meeting reminders: Worried about missing an important work meeting? Add your work email (Exchange account) in Calendar to check meeting reminders and receive a reminder from your Phone before the meeting begins.
Calendar Search events Go to today Events for the day Today Currently displayed day Week number Events for the currently displayed day Switch between month, week, day and schedule view Add new event Create an event: Open Calendar, touch , enter your event information including title, location, and start and end times. Go to More > Remind to add a reminder for your event, then touch . Search events: On the Calendar page, touch and enter the event keywords, such as title or location.
Calendar Make sure to add the birthdays of your friends and family in Contacts first. Share an event: Touch an event on the calendar or under Schedule, then touch and follow the onscreen prompts to share the event using any of the multiple methods. View Global Holidays Traveling overseas for work or holiday? Download your destination country's holiday information ahead of time to better plan your work and schedule.
Clock Use the Clock With many powerful features and lots of information, the humble Clock has a lot to offer. The Clock can be used as an alarm, a world clock, stopwatch, or a timer. View the time all over the world: Go to Clock, touch on the World clock tab and enter the name of a city or select a city from the list of cities. Touch Display the time in two different regions: Go to Clock, then go to to set the date and time. > Date & time in the World clock tab.
Clock Time and date in your selected city Network-provided date and time If the time in your current region is the same as that of your home city, the lock screen will only display one time.
Notepad Notepad Manage Your Notes to Keep Your Records in Order Want to share important notes or add something to favorites? Manage your notes to keep your records in order. Share a note: Want to send your meeting notes to your colleague? On the list page of Notepad, open the note you want to share, then touch to select a sharing method and follow the onscreen prompts.
Notepad Add tags to notes: Want to easily view the categories of your notes? On the editing page of Notepad, touch , and use different colored tags to categorize different content for a clearer view of your notes.
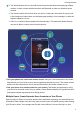
Utilities Smart Remote Smart Remote: Control Your Home Electronics with Your Phone Smart Remote allows you to control your household appliances using your phone. You only need one device to easily take control of a wide variety of electronics (such as TVs, air conditioners, set-top boxes, DVD players, cameras, projectors, and streaming boxes). l The Smart Remote can be used with home electronics that have accompanying infrared remotes.
Utilities l Turn your phone into a universal remote control: Add your home electronics to the Smart Remote and you won't have to worry about misplacing remotes any more. The remote control buttons can be customized to fit your own preferences so the remote is easier to use. l Use your phone as a remote control for your camera: Take better group photos by using your phone as a remote control for your camera. Smart Remote helps you to get the best shot and capture natural expressions when taking photos.
Utilities After the recording is completed, you can: l Play recording from tag: Touch Recordings, then touch a recording to switch to the play interface. Swipe left on the play interface to switch to the tag page. Here you can choose a tag and play the recording from that point. l Manage recordings: Touch Recordings to access options such as sorting and sharing recordings.
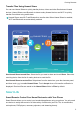
Utilities Import Data from a Huawei Device What's the best way to export data from an existing Huawei device to your new device? Use Phone Clone or Cloud Backup to quickly and conveniently transfer data from an existing device to your new one. Open Settings and go to System > Data transfer > From Huawei device.
Utilities Import Data from Other Android Devices Want to import data from a non-Huawei Android device to your new Phone? You can use Phone Clone to transfer data quickly without needing a data cable or using mobile data. Open Settings and go to System > Data transfer > From other Android device. Follow the onscreen instructions to install Phone Clone on your existing Android device.
Huawei ID and Multiple Users Multiple Users Multiple Users: Create Separate User Accounts on Your Phone Want to lend your Phone to someone else but don't want them accessing your private files and information? Add multiple users and user types to protect your information privacy when lending your Phone to others. Your settings and files will not be affected.
Huawei ID and Multiple Users set a lock screen password for the device, you will be prompted to enter the password when switching back to the owner from another user. l Change a user account name or profile picture: From the Users screen, switch to the relevant user and touch . Follow the onscreen instructions to change the user's name or profile picture. l Allow a user to make calls and share call records: Log in with the owner account.
Device Connection Bluetooth Connect Your Phone to Bluetooth Devices Use Bluetooth to connect your Phone to Bluetooth headsets and in-car Bluetooth to navigate or listen to music while you drive. You can also connect your Phone to Bluetooth wearables to record and manage fitness data. Connecting Bluetooth devices to your phone does not increase power consumption significantly.
Device Connection HID Operate Bluetooth keyboards and mouses PAN Tethering BLE Connect to Bluetooth Low Energy (BLE) devices Enable or disable Bluetooth: From the home screen, swipe down from the status bar, open the shortcuts panel, and then touch to enable or disable Bluetooth. Touch and hold to open the Bluetooth settings screen. Pair a Bluetooth device: Enable Bluetooth from the Bluetooth device's settings screen. Check that the Bluetooth device is set to visible.
Device Connection l Export contacts: Touch Share contacts, select the contacts that you want to share, touch and select Bluetooth. Follow the onscreen instructions to establish a Bluetooth connection with the other device. Those contacts selected will be exported from your Phone to the other device automatically. Near Field Communication (NFC) NFC: Transfer Data Over Short Distances NFC (Near Field Communication) is a technology that enables short-distance wireless communication.
Device Connection NFC Use NFC to send data: Open Settings, touch Device connection and enable NFC and Huawei Beam. Select the files you want to send and touch Share > Huawei Beam to enable NFC. Keep your phone unlock and light on. Place the NFC detection areas of both devices close together. Once a connection is established, the sending device will play an audio prompt and the sharing screen will minimize. Touch the sending device's screen to begin sending files.
Device Connection NFC Using Bluetooth pairing as an example, enable NFC, Huawei Beam, and Bluetooth on both devices. Open the Bluetooth pairing screen on both devices and place the NFC detection areas of devices close together. When the sending device plays an audio prompt and content on the screen shrinks, follow the onscreen instructions and touch the screen on the sending device to establish a Bluetooth connection. If there is a Read and write/P2P switch on the NFC screen, ensure it is also enabled.
Device Connection l Desktop experience: Enjoy a desktop experience with Android apps. Open multiple windows, manage files, search your phone, or change the desktop wallpaper. You can also connect a mouse, keyboard, and other peripherals. Connecting your Phone to an External Display Use a dongle-type adapter to connect your phone to an external display, or a dock-type adapter to connect your phone to a display, keyboard, and mouse simultaneously.
Device Connection Type-C l DP MiniDP HDMI VGA DVI To ensure full compatibility, visit Vmall and buy an adapter that is designed to work with your device. l When your Phone is connected to an external display via an adapter, you can plug the adapter into a charger to charge your phone. The charger must meet Huawei's 5 V/4.5 A, 5 V/2 A, or 9 V/2 A charging specification. Devices with a power output of less than 5 V/2 A should not be used.
Device Connection l One finger touch - left-click Double touch - select text Two finger touch - right-click Two finger swipe browse page Enter text using a virtual keyboard when an external keyboard is not connected. The virtual keyboard is unavailable when an external keyboard is connected. Project Your Phone Screen onto an External Display Desktop layout: View content on your phone in a desktop layout.
Device Connection File management: Manage your files conveniently. You can save files to the desktop, create new files or folders, and rename or delete files. Quick search: Locate files in a flash. Search for documents, multimedia files, and start menu apps from the start menu search bar. Change your desktop wallpaper: An inspiring desktop can brighten your mood and boost your productivity. Right-click the mouse on the desktop to change the desktop wallpaper.
Device Connection Protocol Connection Type Instructions Connection Methods Image Sharing Method Miracast Mirror what is Directly connect Everything displayed on your device will Protocol over Wi-Fi and turn be shared to the display on the external shown on your device's screen on a on the screen device. When playing music and videos, separate device that sharing function only the image will be shown on your supports Miracast device; no audio will play.
Device Connection Enable the Miracast feature on the display device if necessary. See the device manual for instructions. To stop mirroring your screen, touch > Disconnect. Connecting USB Device Transfer Data Between Your Phone and Computer Use a USB cable to connect your phone to your computer and transfer data. Select USB connection mode 1 Use a USB cable to connect your phone to the computer or another device. An "Allow access to device data?" dialog box will appear on your phone.
Device Connection l Transfer MIDI data to your phone: MIDI (Musical Instrument Digital Interface) is an industry standard audio format for composers and electronic instrument manufacturers. Swipe down from the status bar to open the notification panel, and then set your USB connection method to MIDI. You will now be able to transfer MIDI data between your phone and other devices.
Device Connection 4 Once the transfer is complete, go to Settings > Storage > SD card > Eject. 5 Disconnect the USB OTG cable and USB cable from the two devices. Transfer data between your phone and a USB storage device You can use an OTG cable to access USB storage devices (including USB drives and card readers) directly from your phone. l This feature is only available on phones with USB OTG support.
Device Connection Huawei Share uses Wi-Fi and Bluetooth to transfer data. When Huawei Share is enabled, Wi-Fi and Bluetooth are automatically enabled. Huawei Share Use Huawei Share to send files: Select the file you want to share and touch Share. Select the receiving device from the list of nearby devices to send the file. Use Huawei Share to receive files: Swipe down from the status bar, open the shortcuts panel, and then touch to enable Huawei Share.
Security and Privacy Fingerprint Fingerprint Recognition: Enjoy Faster Navigation and Enhanced Security Fingerprint recognition not only allows you to unlock your Phone faster, it also provides added security to your personal information. Your fingerprint can be used to: l Unlock your screen with a single touch: Want to avoid the hassle of using PIN codes and patterns to unlock your screen? Use your fingerprint to quickly and securely unlock your screen with a single touch.
Security and Privacy Use Fingerprint Shortcuts for Faster Phone Operation Can't reach the shutter button to take a photo, or want a faster way to answer a call or turn off an alarm? You can use any of your fingertips to quickly take photos and answer calls with the fingerprint sensor. No fingerprint verification is required. Open Settings and go to Security & privacy > Fingerprint ID.
Security and Privacy 3 Enter the lock screen password and touch Next. 4 In the Fingerprint list section, you can: l Touch New fingerprint to enroll a new fingerprint. l Touch a previously enrolled fingerprint to rename or delete it. l Touch Fingerprint recognition to identify and highlight enrolled fingerprints.
Security and Privacy phone will stop all apps and services from collecting and using your location information. The system will ask you to enable location services when you attempt to use these apps. l Use Wi-Fi and mobile networks: Calculates your phone's location using carrier base station location information or nearby Wi-Fi router location information. The accuracy of the location information depends largely upon location information gathered from the base station or Wi-Fi network.
Security and Privacy Use App Lock to Lock Important Apps App lock allows you to set a password for your WeChat, Alipay, and other important apps. Once you restart your phone or unlock the phone screen, you will be asked to enter your App lock password when initially opening the apps. App lock enhances the protection of your private information and prevents unauthorized access to important apps on your device. Enable App lock: Open Settings.
Security and Privacy More Security Settings Enhanced Data Protection: Defend Your Privacy Worried that your photos, bank account information, or other private data might get leaked if your phone is lost or stolen? Huawei phones now feature security chips in addition to the combined protection provided by the trusted root key and lock screen password. Whether your data is stored in a microSD card or internal storage, it will receive the highest level of protection.
Security and Privacy and even the money in your bank account could be at risk. SIM lock requires a PIN to be entered each time your device is powered on or connected to another device. This prevents others from using your SIM card and gaining access to your finances or private information. Before performing the above operations, please obtain your SIM card PIN from your carrier. Use a PIN to lock your SIM card: Open Settings.
Backup and Restoration Backup and Restoration Data Backup: Prevent Data Loss Ever worry that your Phone will stop working and cause you to lose important data? Back up your data regularly to prevent data loss and increase your peace of mind. There are three ways to back up your Phone's data: l Device internal storage: You can back up smaller files to your device's internal storage.
Backup and Restoration not required for pictures, audio and video files, and documents but is required for other types of data. Follow the onscreen instructions to set a backup password and security question. You can view your backup files from the Huawei\Backup folder in Files. Back Up Your Data to a Computer Do you have important data, pictures, or large files stored on your Phone? You can back up your important data to a computer to prevent data loss and free up storage space on your Phone.
Wi-Fi and Network Wi-Fi Wi-Fi+: Your Smart Connectivity Assistant Wi-Fi+ intelligently connects to Wi-Fi networks to save mobile data consumption. When your device detects a known or free Wi-Fi network, it will automatically turn on Wi-Fi and connect to the network. Your device will also automatically select the optimal network in the area for the best Internet connection.
Wi-Fi and Network Connect to Wi-Fi Connect to a Wi-Fi network to conserve your mobile data. To prevent unauthorized access to your personal data and financial information, always exercise caution when connecting to public Wi-Fi networks. Connect to Wi-Fi: Open Settings, go to Wireless & networks > Wi-Fi and enable Wi-Fi. Select the network you want to connect to. Depending on the network settings, you may have to enter a password. Follow the onscreen instructions to complete authentication if required.
Wi-Fi and Network Send files with Wi-Fi Direct: Open Files, touch and hold a file you want to send, and go to More > Share > Wi-Fi Direct. When another device is detected, touch its name to establish the connection and begin file transfer. Receive files with Wi-Fi direct: Enable Wi-Fi. In the Wi-Fi settings screen, touch to enable detection. When you receive an incoming file prompt, touch Accept to begin the transfer. The received file will be saved under Files in the W-Fi Direct folder by default.
Wi-Fi and Network Open > Settings > Wireless & networks and touch Dual SIM settings or International roaming. Configure the two SIM cards based on your needs. The disabled SIM card cannot be used to make calls, send messages, or access the Internet. Enable call forwarding: Enable call forwarding between SIMs. While on a call using one SIM card, incoming calls on the other SIM card can be forwarded to the present SIM, so you can choose to answer or not.
Wi-Fi and Network 4G 4G USB You can use Wi-Fi hotspot, a USB cable, or Bluetooth to share your mobile data with other devices. Use Wi-Fi hotspot to share mobile data: Open Settings and go to Wireless & networks > Tethering & portable hotspot > Portable Wi-Fi hotspot > Configure Wi-Fi hotspot. Set the network name, encryption type, and password for the Wi-Fi hotspot, then touch Save and enable the hotspot to use it.
Wi-Fi and Network screen, touch next to the paired device, and enable Internet access to establish an Internet connection and share your mobile data.
Apps and Notifications App Twin: Log in to Two Social Media Accounts at Once Have you ever wished you could log in to two WeChat and Facebook accounts on your Phone without the hassle of constantly switching between them? App twin lets you log in to two WeChat and Facebook accounts at the same time, allowing you to keep your work and private life separate. The App twin feature only works with WeChat, QQ, LINE, Facebook, Snapchat, WhatsApp, and Messenger.
Sound and Display Configure Do Not Disturb Mode Do not disturb mode blocks calls from strangers and only notifies you when you receive calls and messages from chosen contacts. Open Settings and go to Sound > Do not disturb.
Sound and Display Switch between sound, vibration, and silent mode: Swipe down from the status bar and open the shortcuts panel. Touch to switch quickly between Sound, Silent and Vibration mode. Enable keypad and notification tones: Open Settings and go to Sound > More sound settings to enable or disable keypad and notification tones. Set your Phone to Silent mode: From the Sound screen, enable Silent mode. After you enable Silent mode, enable Vibrate in silent mode.
Sound and Display temperature as needed. After you have enabled Eye comfort, you can adjust the color temperature slider for a cooler or warmer screen color. Change the Display Settings Change the font size and adjust the screen brightness to suit your needs. Open l Settings and touch Display. From here you can: Change the image and text size: Touch View mode and select a display mode to suit your needs. l Change the text size: Touch Text size and select the desired size.
Sound and Display l Adjust the color temperature: Touch Color temperature. Select a preset option (Default, Warm, or Cold), and then touch OK to apply the settings. Alternatively, touch or drag the slider to manually adjust the color temperature. The color temperature cannot be changed when Eye comfort is enabled. l Automatically adjust the screen resolution: Touch Screen resolution and enable Smart resolution. The system will automatically adjust the screen resolution to reduce power consumption.
Storage Storage Cleaner Clean Up Memory for Faster Performance Does your Phone slow down over time? Do you want to clean up your system storage but are unsure which files to delete? Memory cleanup helps you quickly clear your cache, large and residual files, and unused app files to speed up system performance and keep your Phone in top shape. When your system performance slows down or remaining storage space is low, Phone Manager will remind you to clean up.
Storage Configure automatic cleanup and update View trash files details Clean up trash files Deep clean your storage 138
Smart Assistance Navigation Bar and Navigation Dock Navigation Dock: Control Your Phone at a Touch Every time you want to close an app or return to the home screen, you must use the navigation bar at the bottom of your Phone. Now, you can also use Navigation dock to perform the same functions, making your Phone even more user-friendly. Use the preset gestures to go back, return to the home screen, or switch between apps.
Smart Assistance Enable Smart cover mode: Open Settings, go to Smart assistance > Smart cover, and enable Smart cover. Based on the type of leather flip case you are using, select Window or No window. You can also enable or disable Show pedometer as required. Open or close leather flip case: Your Phone detects the chip magnet in the leather flip case using a Hall sensor. When the case cover closes, the Hall sensor detects the chip magnet and your Phone will automatically lock.
Smart Assistance Open Settings, touch Smart assistance, and then enable or disable Touch-disable mode.
System Language and Input Method Change the Input Method You can change the input method on your Phoneas desired. Open Settings. Go to System > Language & input > Default keyboard > Configure input methods and enable the desired input method. Return to Language & input, touch Default keyboard, select the input method. Use the Huawei SwiftKey Input Method The SwiftKey input method uses word prediction to predict the next letter or even the entire word you are likely to use as you are typing.
System 2 Enable TalkBack and touch OK. Your device will launch a tutorial when you enable TalkBack for the first time. If you need to listen to the tutorial again, touch settings screen, and then launch the tutorial. 3 , open the TalkBack and enable Explore by touch. When Explore by touch is enabled, your device Touch will read out content that you touch. Why does my Phone suddenly start reading out content on the screen? How do I disable this feature? You may have enabled TalkBack by accident.
System For example, if you want to open Settings, touch the Settings icon once using one finger, and then touch twice anywhere on the screen. Customize TalkBack Settings After enabling TalkBack, you can configure the speech volume, sound feedback, gestures, and other settings according to your preferences. Open Settings, go to System > Accessibility > TalkBack > and then configure speech volume, sound feedback, gestures, and other settings.
System Set Your System Time and Date If you travel abroad or change your SIM card, your Phone will automatically display the time and date provided by the local mobile network. You can also adjust the time and date manually, modify the time format, or set dual clocks on your lock screen. Open l Settings and go to System > Date & time. From here you can: Modify the time and date: Enable Automatic date & time to sync your Phone's time and date with your mobile network.
System l Mopria allows you to print directly from your Phone to a Mopria-certified printer. The printer connects to your Phone over Wi-Fi. l If your printer is not Mopria-certified, contact the printer manufacturer to obtain a plug-in for your model. 1 Connect your Phoneand printer to the same Wi-Fi network. l Connect to your printer's hotspot: If your printer has a wireless hotspot, follow the instructions in the printer manual to enable the hotspot and set a password.
System Set Scheduled Power Offs Want to power off your Phone during certain hours of the day to save battery life and avoid being disturbed? Use the automatic power on/off feature to power your device on and off at set times during the day. Open Settings, go to Smart assistance > Scheduled power on/off, enable Scheduled power off and Scheduled power on, and set power on and power off times as well as repetition settings. Your device will power on and off automatically at the selected times.
System Use Account Management to Manage and Update Your Accounts Want to sync multiple email accounts, app notifications and records from multiple Phones and computers? You can use your Phone to manage and update in real time multiple email and app accounts on a variety of other devices including Phones, computers, and others. l Third-party app accounts can only be created if the third-party app is installed on your device. l The type of information that can be synced depends on the account type.
System Use Smart Settings to Find a Setting Quickly Want to change the font style but can't find the setting? Smart settings can help you find a setting quickly. They can also recommend settings for you based on your device usage, allowing you to enable or disable a setting in a single step. Open Settings. Your Phone will recommend settings for you based on your device usage. You can also enter a keyword or synonym in the search bar and your Phone will display all related settings.
System Update Performing an Online Update Your phone will prompt you to download and install a system update when a new version is available. The online update feature allows you to update your phone quickly and securely. l Before performing an online update, ensure that your phone is connected to the Internet. Online updates require an Internet connection. Update your phone over a Wi-Fi network to avoid incurring unnecessary data charges.
This guide is for reference only. The actual product, including but not limited to the color, size, and screen layout, may vary. All statements, information, and recommendations in this guide do not constitute a warranty of any kind, express or implied. Note: Remember the Google account your phone last logged in to.