User Guide
Contents Essentials Basic Gestures Lock and Unlock Your Screen Get Familiar with the Home Screen Notification and Status Icons Control Panel Enter Text Multi-Window 1 3 4 5 6 10 12 Smart Features AI Voice AI Lens AI Touch Huawei Print Multi-Device Collaboration Media Controller 15 19 20 21 21 22 Camera and Gallery Take Photos Shoot in Portrait, Night, and Wide Aperture Modes AI Camera AR Lens Moving Pictures Pro Mode Record Videos Slow-Mo Recording Time-Lapse Photography Adjust Camera Settings Manage Ga
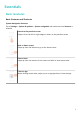
Essentials Basic Gestures Basic Gestures and Shortcuts System Navigation Gestures Go to Settings > System & updates > System navigation and make sure that Gestures is selected. Return to the previous screen Swipe in from the left or right edges to return to the previous screen. Back to home screen Swipe up from the bottom to go to the home screen. Recent tasks Swipe up from the bottom of the screen and hold to view recent tasks.
Essentials Switch between apps • Slide across the bottom edge of the screen to switch between apps. Before using this gesture, touch Settings on the System navigation screen, and ensure that Slide across bottom to switch apps is enabled. • Swipe across the bottom of the screen in an arc to switch between apps. If your device does not have the Slide across bottom to switch apps switch, it indicates that the corresponding feature is not supported.
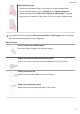
Essentials Turn on a shortcut switch Swipe down from the upper right edge of the screen to display Control Panel and touch to expand the shortcut switches panel (depending on your device model). Button Shortcuts Power off and restart Press and hold the Power button until your device displays the Power off and Restart menu. Turn up volume Press the Volume up button. Turn down volume Press the Volume down button. Take a screenshot Press the Volume down and Power buttons simultaneously.
Essentials • On the home screen, pinch two fingers together to enter screen editing mode. Touch Widgets, then drag the Screen Lock icon to the home screen. You can now touch the Screen Lock icon to lock the screen. Set the Screen Timeout Period Go to Settings > Display & brightness > Sleep and select a screen timeout period. Turn On the Screen You can turn on the screen in any of the following ways: • Press the Power button.
Essentials Operations in a Large Folder You can perform the following operations in large folders: • Open apps: In a large folder, touch an icon to access the app directly. • Enter and exit folders: Touch the lower right corner of a large folder to enter it. Touch a blank area in the folder to exit it. When there are more than nine apps within a large folder, a stacked icon will appear in the lower right corner of the folder. You can touch the stacked icon to view more apps within the folder.
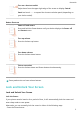
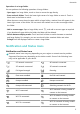
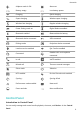
Essentials Airplane mode is ON Alarm set Battery empty Low battery power Charging Quick charging Super charging Wireless super charging Wireless fast charging Regular wireless charging Power Saving mode on Digital Balance enabled Bluetooth enabled Bluetooth device battery Bluetooth device connected VPN connected Driving mode Projection device connected Location service enabled Eye Comfort enabled Connected Headset with a microphone connected In call VoLTE enabled Missed call There
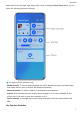
Essentials Swipe down from the upper right edge of the screen to display Control Panel where you can access the following features with ease: The figures are for reference only. • Media controls: To control media playback and switch between recently used media apps and media devices (such as Visions and Bluetooth headsets). • Shortcut controls: To enable, disable, or set frequently used features.
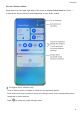
Essentials Turn on a Shortcut Switch Swipe down from the upper right edge of the screen to display Control Panel and touch to expand the shortcut switches panel(depending on your device model). The figures are for reference only. • Touch a shortcut switch to enable or disable the corresponding feature. • Touch and hold a shortcut switch to access the settings screen of the corresponding feature (supported by some features). • Touch to access the system settings screen.
Essentials Customise Shortcuts Swipe down from the upper right edge of the screen to display Control Panel, go to > Edit switches, then touch and hold a shotcut switch to drag it to your preferred position, and touch Done. Audio Control Panel Manage Audio Playback in Audio Control Panel When multiple audio apps (such as Music) are opened, you can manage music playback and switch between these apps in Audio Control Panel with ease.
Essentials Set Device+ Currently, Device+ supports linking phones with the following types of devices. To use this feature, make sure that devices to be connected support Device+. Before you get started, enable Bluetooth and Wi-Fi and log in to your HUAWEI ID on your phone. For other devices, perform the following settings: • Vision: Ensure that it is connected to the same LAN and logged in to the same HUAWEI ID as your device.
Essentials Text Input Keyboard input Celia Keyboard comes with a 26-key layout by default. As you type on the keyboard, a box will be displayed for you to select predicted words. Press and hold a letter key and then swipe up to enter a number, or swipe left or right to enter the letter. Voice input You can have your speech converted into text to improve your input efficiency. • Touch and hold to go to the voice input screen. • On the voice input screen, touch to select your preferred language.
Essentials • On the input keyboard, go to > Sound & vibration and adjust the Keypress volume and Vibration intensity. You can also touch Sound on keypress and select your desired audio effects. Set the mechanical keyboard > Mechanical keyboard and toggle on the Mechanical On the input keyboard, go to keyboard switch. To switch back to the normal keyboard, toggle off the Mechanical keyboard switch. Some devices do not support the mechanical keyboard.
Essentials Touch and hold or in the middle of the split screen line and drag it until either pane disappears. Support for split-screen mode varies by app. Drag and Drop Between Apps with Multi-Window Use the Multi-Window feature to easily drag and drop images, text, and documents between apps. • Drag and drop an image: When taking notes with Notepad, open Files, select the photo you want to add, and drag it into the Notepad editor.
Essentials Relocate the floating window: Drag the bar at the top of the floating window to move the window to the desired position. Resize the floating window: Drag the bottom edge, two sides, or bottom corners of the floating window to resize it. Display in full screen: Touch at the top of the floating window to display it in full screen. Minimise the floating window: Touch at the top of the floating window to minimise and shrink it into a floating bubble.
Smart Features AI Voice AI Voice AI Voice allows you to communicate verbally with your device. To operate hands-free on your device, wake up AI Voice and give a voice command. • This feature is only available in some countries and regions. • Please make sure your device has been updated to the latest system version. Countries and Regions that Support AI Voice AI Voice is only supported in certain countries and regions.
Smart Features Make Calls and Send SMS Messages with AI Voice AI Voice allows you to make calls or send messages hands-free. • This feature is only available in some countries and regions. • Please make sure your device has been updated to the latest system version. Make Calls with Voice Commands You can make a call on your device with AI Voice. Wake up AI Voice and give voice command, such as "Call Mom", "Call back", "Check call records", or "Redial".
Smart Features Speech Translation AI Voice allows you to translate your voice or text input so you can communicate with foreign friends easily. • This feature is only available in some countries and regions. • Please make sure your device has been updated to the latest system version. Speech Translation You can use AI Voice to translate your voice or text input into the target language you have set. 1 Wake up AI Voice and give the voice command "Translate".
Smart Features • This feature is only available in some countries and regions. • Please make sure your device has been updated to the latest system version. Scan and Shop with AI Voice 1 Wake up AI Voice and give voice commands such as "Look at how much is the refrigerator", or "Help me look at the same style of this juice machine". 2 Position the object within the viewfinder and wait for it to be identified.
Smart Features Shop with AI Voice 1 Go to Settings > HUAWEI Assistant > AI Touch and enable AI Touch. 2 When you see an item you wish to buy on your device, wake up AI Voice and ask questions or give commands such as "How much is the cosmetics in the screen", "I want to buy the electric fan in the screen", or "Help me find the same style skirt on the screen".
Smart Features Scan to Translate Using Camera 1 Go to Camera > Photo, touch model). 2 Select the source and target languages from the language list. 3 Position the text you want to translate within the viewfinder, and wait for it to be translated. , and then touch or (depending on your device Scan to Learn More AI Lens allows you to learn more about artworks or landmarks you see by scanning the objects with your camera. Scan to Learn More Using Camera 1 Go to Camera > Photo, touch model).
Smart Features Huawei Print Print Files Using Huawei Print Your device can easily detect nearby printers that support Huawei Print and allows you to print photos and documents stored on your device with just a touch. 1 Power on the target printer and ensure that it is connected to the same Wi-Fi network as your device or that Wi-Fi Direct is enabled. 2 You can print files stored in different locations on your device: .
Smart Features • Device+ does not support collaboration between phones. • If Device+ is hidden, access Control Panel and go to > Show Device+. Transfer MeeTime Calls and Audio or Video Being Streamed to Other Devices When you are making MeeTime calls on your device, watching videos (such as in HUAWEI Video, Youku, or other video streaming apps), or listening to music, you can transfer any of these ongoing tasks to another device via Device+ and pick up from where you left off on the new device.
Smart Features Control Panel (such as for transferring the current music playback from your device to a Bluetooth speaker). 1 Connect your device to an audio device via Bluetooth or other methods. After a Vision product is connected to your device via Bluetooth, you can also connect it to the same Wi-Fi network and log in to the same HUAWEI ID as your device to perform more operations.
Camera and Gallery Take Photos Take Photos The figures are for reference only. 1 Open Camera. 2 You can then: • Focus: Touch the location you want to focus on.
Camera and Gallery To adjust focus and metering separately, touch and hold the viewfinder and drag the respective frame or ring to the desired location. • Adjust brightness: Touch the viewfinder. When the symbol appears next to the focus frame, drag it up or down. • Zoom in or out: On the viewfinder, pinch in or out, or drag the zoom slider. • Select a camera mode: Swipe up, down, left, or right across the camera mode options.
Camera and Gallery When shooting, you'll see a number in the viewfinder, which indicates how many photos you've taken so far. 3 Release your finger to stop shooting. Select the Burst Photos You Want to Keep 1 Open Gallery. Touch a burst photo (which is tagged with 2 Swipe through the burst photos, select the ones you want to keep, then touch follow the onscreen instructions. ), then touch To delete the whole burst photo, touch and hold to select the photo, then touch . and .
Camera and Gallery Use the Front Camera to Take Night Portraits To take a selfie at night or when there is not sufficient light around you, you can use the front camera in Night mode. In a dim environment, you can turn on the flash to get an illuminated photo of your face. 1 Go to Camera or go to Camera > More (depending on your device model), and select Night mode.
Camera and Gallery Shoot Wide Aperture Videos Wide aperture mode allows you to shoot photos and videos with a blurred background while your subject remains in sharp focus. 1 Open Camera or go to Camera > More(depending on your device model) and select Aperture mode. 2 Touch 3 Touch where you want to focus. Touch in the viewfinder and drag the slider to adjust aperture settings. A smaller aperture value will create a more blurred background. 4 Touch the shutter button to start recording.
Camera and Gallery 4 Touch and hold 5 After the recording is complete, add text or directly save the emoji. The emoji will be saved to Gallery in GIF format. to start recording. Use 3D CuteMoji to Record Videos 1 Open Camera or go to Camera > More(depending on your device model), select AR lens mode, and touch 3D CuteMoji. 2 Select your preferred CuteMoji for it to track and imitate your facial expressions and movements.
Camera and Gallery Save a Moving Picture as a GIF File or Video To save a moving picture as a GIF file or video, touch the moving picture in the album, touch , then select Save as video or Save as GIF. Share Moving Pictures You can share moving pictures with Huawei or Honor devices using various methods, such as Wi-Fi Direct, Bluetooth, or Huawei Share. Go to Gallery > Albums > Camera, touch and hold to select the moving pictures you want to share, then touch to share them.
Camera and Gallery The figures are for reference only. 1 Open Camera or go to Camera > More (depending on your device model), and select Pro mode. 2 From there, you can: • Adjust the metring mode: Touch M and select a metring mode. Metring mode Overview Matrix Centre Measures light across the entire frame; ideal for shooting natural landscapes. Focuses on light near the centre of the screen; ideal for shooting portraits.
Camera and Gallery Metring mode Overview Focuses on light from a specific region, such as a subject's eyes. Spot Adjust the ISO sensitivity: Touch ISO and drag the slider. • In low-light settings, you'll generally want to increase the ISO sensitivity. In well-lit settings, you'll want to reduce it to avoid image noise. Adjust the shutter speed: Touch S and drag the slider. • The shutter speed determines the amount of light that is able to enter the camera lens.
Camera and Gallery Metring Mode Description Matrix Centre Measures the light in the whole frame. Applicable when shooting natural landscapes. Concentrates on the light at the centre of the screen. Applicable when shooting portraits. Concentrates on the light in a small area of the screen, such as the Spot subject's eyes. Adjust the ISO sensitivity: Touch ISO and drag the slider. • In low-light conditions, increase the ISO sensitivity.
Camera and Gallery Capture Video 1 Open Camera and select Video mode. 2 Adjust the following settings: • Zoom in or out: Pinch in or out on the viewfinder, or drag the zoom slider. • Focus: Touch the location you want to focus on. Touch and hold the viewfinder to lock the exposure and focus. • Turn the flash on or off: Touch and select (steady on) or (off). When using the front camera to record videos in low-light conditions, you can set the flash to (steady on).
Camera and Gallery Shoot Slow-Mo Videos Use Slow-mo mode to capture fleeting moments in detail. Adjust the slow motion speed based on how slow you want your footage to appear. With a higher speed you'll get slower playback. The available slow motion speeds vary by device. • 256x: suitable for recording shooting, explosion, or other extreme fast-paced action scenes. • 128x or 64x: suitable for recording balls being hit and racing.
Camera and Gallery Use Time-Lapse to Create a Short Video You can use Time-lapse to capture images slowly over several minutes or even hours, then condense them into a short video. This allows you to capture the beauty of change – blooming flowers, drifting clouds, and more. 1 Go to Camera > More and select Time-lapse mode. 2 Place your device in position. To reduce camera shake, use a tripod to steady your device. 3 Touch to start recording, then touch to end the recording.
Camera and Gallery 1 Enable Assistive grid. Grid lines will then appear in the viewfinder. 2 Place the subject of your photo at one of the intersecting points, then touch the shutter button. Use Mirror Reflection When using the front camera, touch , then enable or disable Mirror reflection. When Mirror reflection is enabled, the image will appear as you see yourself in the viewfinder, instead of flipped.
Camera and Gallery Manage Gallery View Photos and Videos In Gallery, you can view, edit, and share your photos and videos, as well as browse the clips automatically generated from them. The figures are for reference only. View by Shooting Time Open Gallery. On the Photos tab, pinch in on the screen to switch to the monthly view and pinch out to switch to the daily view.
Camera and Gallery You can also drag the track ball on the edge to view the time. View by Album You can view photos and videos by album on the Albums tab. Some photos and videos are stored in default albums. For example, videos recorded with the camera are saved in the Camera album. Screenshots and screen recordings are saved in the Screenshots album. View by Category Gallery intelligently sorts photos into categories, allowing you to quickly sift through large albums by category.
Camera and Gallery If your device cannot connect to the target device, connect them to the same router or personal hotspot, log in to the same HUAWEI ID, and enable Bluetooth on both devices. 3 Touch the Other devices tab to view connected devices. If the device you want to browse from is not connected, touch the device name and initiate a connection as prompted. You can then: • Browse images or videos: Touch a connected device to view the albums stored on that device.
Camera and Gallery Basic Editing 1 Open Gallery, touch the photo you want to edit, and then touch • . You can then: Crop and rotate: Touch Crop, select a frame, then drag the grid or its corners to select which part you want to keep. You can drag the photo in the frame, or use two fingers to zoom in or out to adjust the displayed part of the photo. To rotate the photo, touch Crop and drag the angle wheel to the desired orientation.
Camera and Gallery Collage You can use the collage feature in Gallery to quickly combine multiple photos into one for easier sharing. 1 You can access the collage feature in the following ways (depending on your device model): • On the Discover tab, touch Create collage, select some photos, then touch Create. • On the Photos or Albums tab, touch and hold to select some photos, then go to > Collage. 2 Select a template.
Camera and Gallery Change Album Covers 1 Go to Gallery > Albums and touch the album you want to set. 2 Go to cover. > Change album cover and select the image you want to set as the album Move Photos and Videos 1 Open an album, then touch and hold to select the photos and videos you want to move. 2 Touch 3 Once the items are moved, they will no longer be in their original album. > Move to album to select the desired album.
Camera and Gallery Highlights Introduction to Highlights Gallery automatically creates Highlights albums from your best photos and videos based on time, location, and theme information, and even generates a short video clip so you can walk down memory lane and instantly relive the good times. • To start using Highlights, go to Camera > • Highlights albums are created automatically when your device is charging and connected and enable Location tag.
Camera and Gallery 2 Go to > Delete and then touch Delete. After you delete a Highlights album, it cannot be restored, and the photos and videos in the Highlights album will remain in Gallery.
Apps MeeTime Use MeeTime to Make Calls Use MeeTime to make high-quality video or voice calls with contacts who have Huawei devices (such as phones and tablets), and share your screen during calls. Thanks to the GPU Turbo technology, the video call resolution will be optimised automatically when the network signal is weak. With intelligent algorithms, the other party can see your face clearly even when making a video call at night or in dark environments.
Apps • Touch to mute MeeTime. • Touch to use the speaker. • Touch to switch to a voice call. • Touch to share the screen. To view or manage your call logs, touch Calls. Share Your Device Screen During a MeeTime Call During a MeeTime video call, you can share your screen with the other party and doodle on the screen. The other party will then be able to view your screen and your doodles on it. 1 During a video call, touch the screen, go to instructions to share your screen.
Apps • Touch to add another phone number if only one phone number has been linked. • Touch to delete any numbers or add new ones if multiple phone numbers have been linked. • In the list of Outgoing number (this device), select one of the added phone numbers to set it as the default number.
Apps 1 Open Notepad and go to Notes > 2 Point the camera to the certificate or bank card you want to scan, and touch > it one by one or consecutively. Touch > Add card. to scan to preview the scanned copies. 3 (Optional) If you manually unskew the scanned copies, touch 4 To add a watermark to the scanned copies, touch Full-screen watermark or Single watermark. 5 Touch to insert the modified scanned copy into the note. 6 Touch to save the note. to preview them again.
Apps 2 Enter your to-do item. 3 Touch , set a reminder time, then touch OK. 4 Touch to mark the to-do item as important. 5 Touch Save to save your settings. Set Repeated Reminders for a To-do Item If you specify a time for a to-do item, you can select a repeat mode for it (for example, Never, Every day, Every week, Every month, or Every year), and your device will repeatedly prompt you to complete the to-do item at the specified time.
Apps • Touch and hold a note or to-do item, select the ones you want to classify under the same category, then touch to move them to the target category. Items in an Exchange account cannot be moved. Sync Notepad Items Sync Exchange email data: You can sync the data in your Exchange account to Notepad to record important events anytime and anywhere. 1 Log in to Exchange on your device. 2 Swipe down from the Exchange mail list to sync the notes and tasks from your Exchange account to Notepad.
Apps To restore a deleted Notepad item, touch All notes or All to-dos, select the item you want to restore in Recently deleted, then touch .
Settings Biometrics & Password Set Fingerprints You can enrol a fingerprint and then use it to unlock the screen and access your Safe, App lock, and more. Enrol a Fingerprint 1 Go to Settings > Biometrics & password > Fingerprint ID or Settings > Biometrics & password > Fingerprint ID > Fingerprint management(depending on your device model) and follow the instructions to set or enter the lock screen password. 2 Touch New fingerprint to begin enrolling your fingerprint.
Settings Please make sure your device has been updated to the latest system version. Use Your Fingerprint to Access a Locked App 1 Go to Settings > Biometrics & password > Fingerprint ID or Settings > Biometrics & password > Fingerprint ID > Fingerprint management(depending on your device model) and enter the lock screen password. 2 Turn on the Access App Lock switch and follow the onscreen instructions to link your fingerprint with App Lock.
Settings Link Your Face with Password Vault Access the Face Recognition screen and enable Autofill usernames and passwords. When logging in to an app, you can use Face Recognition to automatically fill in the account name and password saved in Password Vault. Face Recognition for Security Enhancement For greater security, enable Require trusted device when using Face unlock so your device will only be unlocked when it recognises your face and is connected to a trusted device.
This guide is for your reference only. The actual product, including but not limited to the colour, size, and screen layout, may vary. All statements, information, and recommendations in this guide do not constitute a warranty of any kind, express or implied. Please visit https://consumer.huawei.com/en/support/hotline for up to date support hotline and email address information for your country or region. Model: CDY-NX9A EMUI12.