Wonderful Communication, Mobile Life.
Contents 1 Reading Before Proceeding ................................................................................. 1 1.1 Safety Precautions .......................................................................................................... 1 1.2 Legal Notice .................................................................................................................... 2 2 Getting to Know Your Mobile Phone .................................................................... 4 2.1 2.2 2.3 2.
7.1 7.2 7.3 7.4 Turning on the Data Service.......................................................................................... 30 Wi-Fi .............................................................................................................................. 30 Browser ......................................................................................................................... 30 Bluetooth ...............................................................................................
1 Reading Before Proceeding 1.1 Safety Precautions Please read the safety precautions carefully to ensure the correct use of your mobile phone. Do not crash, throw, or puncture your mobile phone. Avoid the falling, squeezing, and bending of your mobile phone. Do not use your mobile phone in a moist environment, such as the bathroom. Prevent your mobile phone from being soaked or washed in liquid.
Use only approved batteries and chargers to avoid the risk of explosions. Observe any laws or regulations on the use of wireless devices. Respect others’ privacy and legal rights when using your wireless device. Strictly follow the relevant instructions of this manual while using the USB cable. Otherwise your mobile phone or PC may be damaged. 1.2 Legal Notice Copyright © Huawei Technologies Co., Ltd. 2010. All rights reserved.
AND FITNESS FOR A PARTICULAR PURPOSE, ARE MADE IN RELATION TO THE ACCURACY, RELIABILITY OR CONTENTS OF THIS MANUAL. TO THE MAXIMUM EXTENT PERMITTED BY APPLICABLE LAW, IN NO CASE SHALL HUAWEI TECHNOLOGIES CO., LTD. BE LIABLE FOR ANY SPECIAL, INCIDENTAL, INDIRECT, OR CONSEQUENTIAL DAMAGES, OR LOST PROFITS, BUSINESS, REVENUE, DATA, GOODWILL OR ANTICIPATED SAVINGS.
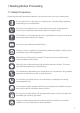
2 Getting to Know Your Mobile Phone 2.1 Mobile Phone View 2.1.1 Phone at a Glance Ƶ Note: All the pictures in this guide are for your reference only. The actual appearance and display depend on the mobile phone you purchase. Earpiece Connectors on the top Camera Power Volume key microSD card slot Capture End Send Microphone MENU Home/Back Trackball Speaker Charge/Data port Headset jack 2.1.2 Key Functions at Your Fingertips • Press to power on your mobile phone.
MENU Trackball • Press to open the menu on an active screen. • Press and hold to open the keyboard so you can perform quick searches. • Press to unlock the screen. • Roll to navigate selectable items on the screen. • Press to select a highlighted item or action. • Press to zoom in or out the Home screen. • Press to return to the previous screen. • Press to exit any application you are running. • Press to hang up a call. • Press to return to the Home screen. Ƶ Note: To customize the function of behavior.
1. Connect the USB cable to the charger, as shown in a. 2. Plug the charger into a power socket. 3. Connect the other end of the cable to your mobile phone, as shown in b. The phone begins charging. • If your mobile phone is charged when it is powered off, a charging icon is displayed on the screen. When the charging icon becomes static, it indicates that your mobile phone is fully charged.
• Turn Bluetooth off when you are not using it. Only make your phone visible to other Bluetooth devices when you need to establish a Bluetooth connection. • Switch off Wi-Fi when you are not using it. • Turn off your phone connection to GPS satellites when you are not using it. • Lower the volume. • Close power-draining programs, when you do not need them. • Turn off the data service. 2.3 Powering On or Off Your Mobile Phone 2.3.1 Powering On Your Mobile Phone Press .
2.5 Locking and Unlocking the Screen 2.5.1 Locking the Screen • When your mobile phone is on, press the you can still receive messages and calls. to lock the screen. When the screen is locked, • If you leave your mobile phone idle for a while, the screen will lock automatically. 2.5.2 Unlocking the Screen Press MENU , , or to wake up the screen. Then unlock it by doing any of the following: • Press the MENU key to unlock the screen. • Drag the lock icon from left to right to unlock the screen.
2.6 Home Screen 2.6.1 Home Screen View 1 10:23 AM 2 3 4 5 6 7 1 Notification bar: Displays the notifications and status icons of your mobile phone. Flick down to open the notification panel. 2 Display area: Shows the operation and display areas of your mobile phone. 3 Touch to open the Main Menu. 4 Touch to open the Dialer. 5 Touch to open the Contacts. 6 Touch to open the Messaging. 7 Zoom button: Touch to view thumbnails of the Home screen, which you can touch to open. 2.6.
Missed call Connected to a PC Error Memory is full Preparing mircoSD card Music is playing Downloading data Uploading data Roaming Signal strength No signal Airplane mode Synchronizing data Synchronization failed Bluetooth is on Connected to another Bluetooth device GPS connected Connected to a Wi-Fi network Sound off Speaker on Vibrate mode Microphone off Battery is full Battery is very low Battery is charging Alarm is set New calendar reminder New instant message New email New
• Touch a notification to open the related application. • Touch Clear to clear all notifications. Closing the Notification Panel Touch and hold the bottom of the panel. Then flick up to close it. 2.6.3 Customizing the Screen Adding an Item to the Home Screen 1. Touch and hold the blank area on the Home screen until the Add to Home screen menu is displayed. 2. Select an item to add it to the Home screen. Moving a Screen Item 1.
3. Release the item to remove it from the Home screen. 2.6.4 Adding a Widget A widget works as a shortcut to let you preview or use an application. You can stick widgets on your desktop as icons or preview windows. Besides the default widgets installed on your phone, you can also download more from Android Market. To add a widget to the Home screen: 1. Touch and hold the blank area on the Home screen. 2.
1. Connect your mobile phone to your PC with the USB cable. Your PC will detect the microSD card as a removable disk. You can now transfer files from your PC to your mobile phone’s microSD card. 2. Open the notification bar, and then touch USB connected. 3. Touch Mount in the dialog box that opens to confirm that you want to transfer files. ƾ Tip: You can also touch > Settings > General info & options, and then select the USB Mass Storage check box to use the microSD card as the USB mass storage.
3 Calling To place a phone call, you can dial a number or touch a number in your contacts list, on a Web page, or from a document that contains a phone number. When you are on a call, you can either answer incoming calls or send them to your voicemail box. You can also set up conference calls with several participants. 3.1 Making a Call To make a call, you can use the Dialer application, or select a number from Contacts or Call log.
Dialing Panel 1 987-654-3 2 Jack 1 3 4 7 8 987654321 GHI PQRS * 2 ABC 3 DEF 5 JKL 6 MNO 8 TUV 9 WXYZ 0+ # 4 7 6 5 1 Touch to switch between Dialer, Call log, Contacts, Favorites and Groups. 2 Displays the number you enter. 3 Touch to enter the number. 4 Touch to make a voicemail. 5 Touch to dial a number. 6 Touch to erase each subsequent digit of a number. Touch and hold to erase the entire number. 7 Touch and hold to enter +. 8 Touch to display all the matching contacts. 3.
3.1.3 Making a Call from Call log 1. Touch > Call log to display the call log. If you are already working with Contacts or Dialer, touch the Call log tab. 2. Touch to the right of the log entry to dial. ƾ Tip: If you touch and hold the log entry, the options menu will open. 3.2 Answering and Rejecting a Call 3.2.
3.3 Other Operations During a Call 3.3.1 Making a Conference Call You can set up a conference call with multiple callers. Ƶ Note: Contact your network operator to learn whether it supports conference calls and how many participants you can add. 1. To initiate a conference call, dial the number of the first person to be on the call. While you are on that call, press MENU , and then touch Add call. 2.
3.4 Using Call log The Call log contains a list of calls that you have dialed, received, or missed. You can use the call log to quickly find a recently called number or add an incoming number to your contact list. 3.4.1 Adding an entry to Contacts 1. Touch 2. Touch and hold the entry you want to add. > Call log to display the call log. 3. Touch Add to contacts in the options menu. 4. Touch Create new contact or scroll through the contact list and touch an existing contact name. 3.
3.7 Setting Hearing Aid Compatibility Touch > Settings > Call settings > Hearing aids to set your phone to be compatible with a hearing aid.
4 Contacts The Contacts application enables you to save and manage information such as phone numbers and addresses of your contacts. After you save the contact information on your mobile phone, it gives you an easy access to the people with whom you want to communicate. 4.1 Opening the Contacts Application If you have a new mobile phone and have not yet added any contacts,Contacts displays a message with hints on how to start adding contacts to your mobile phone. • Touch • Press > Contacts.
4.4 Editing a Contact You can always make changes to the information you have stored for a contact. 1. In the contacts list, touch and hold the contact whose details you want to edit, and then touch Edit contact in the options menu. You can also press MENU , and then touch Edit contact while viewing a contact’s details. 2. Touch a category of contact information, such as contact’s name, phone number or email address, to enter that kind of information about your contact. 3.
4.5 Communicating with Your Contacts From the Contacts tab, you can quickly call or send a text (SMS) or multimedia message (MMS) to a contact’s default phone number. You can also open details to view a list of all the ways you can communicate with that contact. This section describes how to communicate with a contact when you view your contacts list. 4.5.1 Connecting Through Quick Contact for Android 1.
4.7.3 Adding a Contact to Your Groups To add a contact to your groups, you can do any of the following: • Touch and hold the contact you want to add to Groups. Then touch Add to groups. • When editing a group, press MENU , and then touch Add Members to select the contacts you want to add to group.
5 Using the Onscreen Keyboard 5.1 Displaying the Keyboard Panel To enter text, use the onscreen keyboard. Some applications open the keyboard automatically. In others, touch a text field to open the keyboard. To open the keyboard, do one of the following: • • Press and hold MENU to display the keyboard. Touch the space where you want to write text to display the keyboard. Press to hide the keyboard. ƾ Tip: Touch and hold the space where you usually write your text to open the options menu. 5.1.
5 Touch to delete a character to the left of the cursor. Touch and hold to delete all characters to the left of the cursor. 5.1.3 Using the Landscape Keyboard If you find the keyboard inconvenient or difficult to use, turn your mobile phone sideways. The screen will display the keyboard in landscape orientation, providing you with a wider keyboard layout. 5.2 Customizing Keyboard Settings Touch > Settings > Language & keyboard to customize the keyboard settings.
6 Messaging The Messaging application allows you to exchange text messages (SMS) and multimedia messages (MMS) with anyone using an SMS-or-MMS-capable phone. With the Email application you can read and send emails. 6.1 SMS and MMS Text messages: One text message can contain up to 150 (English) / 130 (Spanish) characters. You can send a text message of any length.
4. Press MENU to display the options panel. • Touch Add subject to add the message subject. Your mobile phone is now in multimedia message mode. • Touch Attach to add a picture, music, or video file. 5. When the message is ready to be sent, touch Send. Adding a Slideshow If you want to attach more than one file to your message, use the Slideshow option. 1. On the message editing screen, press MENU to display the options panel. 2. Touch Attach > Slideshow, and then select a slide to start editing it.
2. To customize your email settings, answer the onscreen prompts, and then touch Next. Or touch Manual setup if you want to set the mail server yourself. Ƶ Note: If you touch Manual setup, contact your email service provider for the parameters required for your account if you don't know what they are. 3. Enter the name for your account and the name you want other people to see when they receive an email from you. 4. Touch Done.
6.2.5 Deleting an Email Account 1. On the accounts screen, touch and hold the email account you want to delete. 2. Touch Remove account. 3. Touch OK. 6.2.6 Changing Email Account Settings You can change a number of settings for an account, including how often you check for emails, how you are notified of a new mail, and details about the servers the account uses to send and receive mails.
7 Getting Connected 7.1 Turning on the Data Service 1. Touch 2. Touch Wireless & networks > Mobile networks. > Settings. 3. Select the Data Service check box to turn on the data connection. 7.2 Wi-Fi Wi-Fi gives you wireless access to broadband Internet access. To use Wi-Fi on your mobile phone, you need to have an access to wireless access points (hotspots). Obstacles that block the Wi-Fi signal will reduce its strength. 7.2.1 Turning On Wi-Fi 1. Touch 2.
• • • • Windows: Touch to go to the web preview screen. You can switch to another web page or open a new web page on this screen. Refresh: Touch to refresh the current page. Forward: Touch to browse the next web page. More: Touch to open other menus and perform operations such as searching, selecting text, downloading, or setting options. 7.3.2 Opening a Web Page 1. In a browser window, touch the URL field at the top of the screen. 2. Use the keyboard to enter the web page address. 3.
7.4 Bluetooth Your mobile phone has Bluetooth, which allows you to create a wireless connection with other Bluetooth devices so you can share files with your friends, talk hands-free with a Bluetooth headset. If you are using Bluetooth, remember to stay within 10 meters (33 feet) of other Bluetooth devices. Be aware that obstacles like walls or other electronic equipment may interfere with your Bluetooth connection. 7.4.1 Turning On Bluetooth 1. Touch 2.
7.4.4 Disconnecting or Unpairing a Bluetooth Device 1. Touch 2. Navigate to the Bluetooth devices section, and then touch and hold the connected device. > Settings > Wireless & networks > Bluetooth settings. You can also just touch a connected device to disconnect it. 3. Touch Disconnect or Unpair to disconnect the device.
8 Entertainment In addition to being a communication device and personal assistant, your mobile phone also provides you with a multitude of entertainment possibilities. You can take photos, create videos and audio clips, and download and listen to music. 8.1 Taking Photos and Recording Videos The camera is a combination of camera and camcorder that you can use to shoot and share pictures and videos. 8.1.1 Opening Your Camera • Touch > Camera to open the camera.
5 Touch to take a photo or shoot a video. On the capture screen, press MENU key to show the capture panel. 8.1.2 Taking a Photo 1. Open your camera and switch to the camera mode. 2. If necessary, open the settings panel to change the camera settings. The preview changes as you change the settings. 3. Compose your photo within the photo capture screen. 4. Touch and hold 5. Release . When the frame turns green, the image is in focus. to take your photo.
• Touch PLAY to play the video. On the video playing screen, touch the controls to skip forward or back or to play or pause the video. Press MENU to view details of the video. 3. If you want to view more videos, touch the screen, and then touch or . 8.2 Using the Gallery Your Gallery application can automatically search for pictures and videos on your mobile phone and microSD card.
2. Use the cropping tool to select the portion of the picture to crop. • Drag from the inside of the cropping tool to move it. • Drag an edge of the cropping tool to resize the image. • Drag a corner of the cropping tool to resize the image without changing the length to width ratio. 3. Touch Save to save the cropped picture. Touch Rotate to rotate the cropped picture. Touch Discard to discard the changes. 8.
Music Player Screen 3 4 5 1 2 1 Touch and hold to search for information. 2 Touch to control the music. 3 Touch to set the repeat mode. 4 Touch to turn the shuffle on or off. 5 Touch to open the current playlist. 8.3.4 Adding Music to a Playlist 1. Touch a category on the music library screen. 2. In the list that appears, use the Navigator key to select the song you want to add to the playlist. 3. Touch and hold the song, and then touch Add to playlist in the options menu.
9 Google Services When you turn on your mobile phone for the first time, touch a Google services such as Talk, Gmail, or Market, and you will be prompted to sign in to your Google account. Ƶ Note: Ensure that your mobile phone has an active data connection before you sign in to your Google account. If you already have a Google account, touch Sign in and enter your username and password. 9.1 Creating a Google Account If you do not have a Google account, you can create one: 1.
9.2.3 Creating and Sending an Email 1. In the mail list, press MENU , and then touch Compose. 2. Enter the message recipient’s email address in the To field. If you are sending the email to several recipients, separate the email addresses with commas. You can add as many message recipients as you want. If you want to send a copy (Cc) or a blind copy (Bcc) of the email to other recipients, press MENU , 3. and then touch Add Cc/Bcc. Enter the email subject and write your message.
• Select ringtone: Touch to choose a ringtone for a new email message. A short sample of the ringtone will play when you select it. If you prefer no ringtone to play when you receive a new email message, touch Silent. Then touch OK to confirm your ringtone selection. • Vibrate: Select the check box if you want your mobile phone to vibrate when you receive a new email message. 9.3 Using Talk Talk is Google’s instant messaging service.
Select ringtone Touch to choose the ringtone used for a new instant message. You will hear a short sample of the ringtone when you select it. To turn the ringtone off, select Silent. Vibrate Select the check box to make your mobile phone vibrate when you receive a new instant message. 9.3.6 Signing Out of Talk In the friends list screen, press MENU , and then touch More > Sign out to quit Talk. 9.
6. When you finish viewing or following the directions, press MENU and touch More > Clear Map to reset the map. 9.5 Using YouTube YouTube is Google’s free online video streaming service for viewing, searching for, and uploading videos. 9.5.1 Opening YouTube Touch > YouTube. You will then see the YouTube screen. The videos will be grouped into categories, such as Most viewed, Most discussed, Top rated, and more. 9.5.2 Searching for a Video 1. On the YouTube screen, press MENU , and then touch Search.
• List of applications by category: Includes subcategories, which you can sort by popularity (most to least) or by date (newest to oldest). • List of games. • Search function. • Your downloads. 9.6.3 Installing an Application Ƶ Note: If you want to install a non-Market application, touch > Settings > Applications, and then select the Unknown sources check box to allow installation of the non-Market application. 1. In the Market, touch Apps. 2.
10 Synchronizing Information Some applications on your mobile phone give you access to the same personal information that you can add, view, and edit on your computer. If you add, change, or delete your information in any of these applications on the web, the updated information also appears on your mobile phone. This is made possible through over-the-air data synchronization. The process occurs in the background and does not interfere with use of your mobile phone.
2. Touch Remove account. 3. Confirm that you want to remove the account. 10.2 Customizing Your Account Synchronization You can configure background data use and synchronization options for all the applications on your phone. You can also configure what kind of data you synchronize for each account. Some applications, such as Contacts and Gmail, can synchronize data from multiple applications.
11 Using Other Applications 11.1 Using the Calendar Use Calendar to create and manage events, meetings, and appointments. Depending on your synchronization settings, the calendar on your phone stays in synchronization with your calendar on the web. 11.1.1 Opening the Calendar Touch > Calendar to open the application. ƾ Tip: To access Google calendar, touch MENU , and then touch More > Launch Google Calendar.
11.1.4 Customizing the Calendar Settings On any calendar view, touch MENU . Then touch More > Settings. • Hide declined events: Select to hide events for which you have declined invitations. • Set alerts & notifications: Touch to set event reminders to alert you, send you a notification, or turn off event notifications on your mobile phone. • Select ringtone: Touch to select the ringtone to sound when you receive an event reminder.
11.3 Using Sound Recorder Sound Recorder is useful for quickly recording thoughts. You can also record your voice and set it as a ringtone. 11.3.1 Starting a Recording 1. Touch > Sound Recorder to open the application. 2. Touch to start recording. 3. Record your desired message. 4. Touch 5. Touch MENU , and then touch Recordings to view the voice clip. to stop recording. 11.3.2 Setting a Voice Clip as a Ringtone 1. On the sound recorder screen, touch MENU , and then touch Recordings. 2.
3. Touch MENU to open the options panel, and then touch Done to cut or copy the file. 4. Now select the path to where you want the file to be copied or moved. Touch MENU to open the options panel, and then touch Paste to move or copy the file to the selected path. 11.4.4 Doing a Quick Search for a File 1. On the File Manager screen, touch a folder to access the directory where the file you want is located. 2. Touch MENU to open the options panel, and then touch Search. 3.
12 Managing Your Mobile Phone To configure your mobile phone, touch > Settings. 12.1 Setting the Date and Time By default, your mobile phone automatically uses the date, time zone, and time provided by the network. Ƶ Note: When the time provided by the network is automatically used, you cannot set the date, time, and time zone. In this case, you can touch Settings > Date & time to set only date and time formats. 12.2 Setting the Display 12.2.1 Adjusting the Screen Brightness 1.
12.3.3 Adjusting the Media Volume When playing music or watching videos, press the Volume keys to adjust the sound. You can also adjust the sound on the settings screen. 1. On the Settings screen, touch Sound & display > Media volume. 2. Drag the slider left to make the volume softer, or right to make it louder. 3. Touch OK to save the adjustment. 12.3.4 Changing the Phone Ringtone 1. On the Settings screen, touch Sound & display > Phone ringtone. 2.
phone will not check new emails or synchronize data in the background. The mobile phone will automatically enable data services only after you have waken up your screen. On the Settings screen, touch Wireless & networks > Mobile networks. Select Enable alwayson mobile data to enable this function. 12.5 Protecting Your Mobile Phone 12.5.
12.7 Resetting Your Mobile Phone 12.7.1 Backing Up My Settings You can back up your mobile phone’s settings to Google servers, with your Google account. If you replace your mobile phone, the settings you have backed up are stored on the new mobile phone the first time you sign in with your Google account. 1. On the Settings screen, touch Privacy. 2. Select the Back up my settings check box. 12.7.
2. Before the upgrade, the system of your mobile phone automatically checks the battery level and the upgrade version. If the version you have downloaded does not meet the upgrade requirements, the upgrade will not work. 3. When the next message appears, touch Confirm. 4. Touch Upgrade. 5. Your mobile phone restarts and the upgrade screen is displayed. 6. After the upgrade is complete, your mobile phone automatically restarts and will switch on again. 7.
13 Appendix 13.1 Warnings and Precautions This section contains important information pertaining to the operating instructions of your device. It also contains information about how to use the device safely. Read this information carefully before using your device. Electronic Device Power off your device if using the device is prohibited. Do not use the device when using the device causes danger or interference with electronic devices.
• • • RF signals may affect electronic systems of motor vehicles. For more information, consult the vehicle manufacturer. In a motor vehicle, do not place the device over the air bag or in the air bag deployment area. Otherwise, the device may hurt you owing to the strong force when the air bag inflates. Do not use your device while flying in an aircraft. Power off your device before boarding an aircraft.
• • • • • • • • • • • • Do not connect two poles of the battery with conductors, such as metal materials, keys, or jewelries. Otherwise, the battery may be short-circuited and may cause injuries and burns on your body. If battery electrolyte leaks out, ensure that the electrolyte does not touch your skin and eyes. When the electrolyte touches your skin or splashes into your eyes, wash your eyes with clean water immediately and consult a doctor.
• • • Do not use any chemical detergent, powder, or other chemical agents (such as alcohol and benzene) to clean the device and the charger. Otherwise, parts of the device may be damaged or a fire can be caused. You can clean the device and the charger with a piece of damp and soft antistatic cloth. Do not dismantle the device or accessories. Otherwise, the warranty on the device and accessories is invalid and the manufacturer is not liable to pay for the damage.
--Consult the dealer or an experienced radio/TV technician for help. This device complies with Part 15 of the FCC Rules. Operation is subject to the following two conditions: (1) this device may not cause harmful interference, and (2) this device must accept any interference received, including interference that may cause undesired operation. Caution Changes or modifications made to this device not expressly approved by Huawei Technologies Co., Ltd. may void the FCC authorization to operate this device.
Comunicación sobresaliente, vida móvil.
Contenido 1 Lectura previa a las operaciones ......................................................................... 1 1.1 Precauciones de seguridad............................................................................................. 1 1.2 Aviso sobre derechos de autor........................................................................................ 2 2 Información del teléfono móvil ............................................................................. 4 2.1 2.2 2.3 2.4 2.5 2.6 2.
7.1 7.2 7.3 7.4 Activación del servicio de datos .................................................................................... 30 Wi-Fi .............................................................................................................................. 30 Explorador ..................................................................................................................... 30 Bluetooth ................................................................................................
1 Lectura previa a las operaciones 1.1 Precauciones de seguridad Lea las precauciones de seguridad cuidadosamente para garantizar el uso seguro y correcto del teléfono móvil. Para obtener más información, consulte la sección . No aplaste el teléfono móvil contra otros objetos, no lo arroje ni lo perfore. Evite que el teléfono móvil se caiga ni lo doble no ejerza presión sobre éste. No utilice el teléfono móvil en ambientes húmedos, por ejemplo en un cuarto de baño.
Mantenga el teléfono móvil y sus accesorios fuera del alcance de los niños. No permita que los niños utilicen el teléfono sin supervisión de adultos. Sólo utilice baterías y cargadores aprobados para evitar el riesgo de una explosión. Obedezca las leyes y regulaciones aplicables al uso de dispositivos inalámbricos. Respete la privacidad y los derechos de terceros al utilizar el dispositivo inalámbrico. Cumpla estrictamente con las instrucciones de este manual al utilizar el cable USB.
protegidos por los respectivos derechos de autor. Toda responsabilidad por la instalación o uso de tales productos en este teléfono móvil recaerá sobre el usuario. AUSENCIA DE GARANTÍAS LOS CONTENIDOS DE ESTE MANUAL NO ESTÁN SUJETOS A GARANTÍA ALGUNA. A EXCEPCIÓN DE LOS CASOS EN QUE ASÍ LO REQUIERA LA LEY APLICABLE, NO SE CONSTITUYEN GARANTÍAS DE NINGUNA CLASE, NI EXPRESAS NI IMPLÍCITAS.
2 Información del teléfono móvil 2.1 Aspecto del teléfono móvil 2.1.1 Descripción rápida del teléfono Ƶ Nota: Las imágenes de este documento se presentan sólo a modo de referencia. El aspecto y la presentación reales dependen del teléfono móvil adquirido.
MENU Esfera de desplazamie nto • Presione esta tecla para acceder al menú en la pantalla activa. • Mantenga presionada esta tecla para acceder al teclado y realizar búsquedas rápidas. • Presione esta tecla para desbloquear la pantalla. • Gire esta tecla para navegar por los elementos seleccionables en la pantalla. • Presione para seleccionar una acción o un elemento resaltado. • Presione para acercar o alejar la Pantalla de inicio. • Presione esta tecla para volver a la pantalla anterior.
1. Conecte el cable USB al cargador, como se muestra en a. 2. Enchufe el cargador a un tomacorriente. 3. Conecte el otro extremo del cable al teléfono móvil, como se muestra en b. El teléfono comenzará a cargarse. • Si el teléfono móvil se está cargando apagado, el ícono indicador de la carga aparece en pantalla. Cuando el ícono indicador de la carga queda estático, esto significa que la batería está completamente cargada.
• Siempre que sea posible, enchufe el teléfono a una fuente de alimentación externa por medio del adaptador de corriente. • Desactive la función Bluetooth cuando no esté en uso. Sólo haga el teléfono visible a otros dispositivos Bluetooth cuando necesite establecer una conexión Bluetooth. • Detenga la conexión Wi-Fi cuando no esté en uso. • Detenga la conexión del teléfono a los satélites GPS cuando no esté en uso. • Baje el volumen.
2.4.2 Rotación de la pantalla del teléfono móvil La orientación de la mayoría de las pantallas rota junto con el teléfono cuando éste último pasa de posición vertical a posición horizontal y viceversa. 2.5 Bloqueo y desbloqueo de la pantalla 2.5.1 Bloqueo de la pantalla • Cuando el teléfono móvil está encendido, presione la opción para bloquear la pantalla. Aunque la pantalla esté bloqueada, se pueden recibir mensajes y llamadas.
2.6 Pantalla de inicio 2.6.1 Vista de la Pantalla de inicio 1 10:23 AM 2 3 4 5 6 7 1 Barra de notificaciones: muestra los íconos de estado y notificaciones del teléfono móvil. Deslice el dedo hacia abajo para acceder al panel de notificaciones. 2 Área de visualización: muestra las áreas de operación y visualización del teléfono móvil. 3 Presione para acceder al Menú principal. 4 Presione para acceder a Teléfono. 5 Presione para acceder a Contactos. 6 Presione para acceder a Mensajería.
2.6.
Panel de notificaciones Abra el panel de notificaciones para ver quién es el operador de redes inalámbricas o para ver un mensaje, un recordatorio o una notificación de eventos. Cómo acceder al panel de notificaciones 1. Cuando en la barra de notificaciones aparece un nuevo ícono de notificaciones, mantenga presionada dicha barra y luego deslice el dedo hacia abajo para acceder al panel de notificaciones. 2.
Eliminación de elementos de pantalla 1. Mantenga presionado un ícono de la Pantalla de inicio hasta que se agrande y el teléfono móvil vibre. 2. Sin levantar el dedo, arrastre el elemento hasta la papelera cambiarán a color rojo 3. . El elemento y la papelera , lo que significa que el elemento ya puede ser eliminado. Suelte el elemento para eliminarlo de la Pantalla de inicio. 2.6.
2. Inserte la tarjeta microSD en la ranura correspondiente como se muestra en el diagrama. Ƶ Nota: Al insertar la tarjeta microSD, asegúrese de que el contacto dorado esté orientado hacia abajo. 2.7.2 Uso de la tarjeta microSD como dispositivo de almacenamiento masivo USB Para transferir todos los archivos de música e imágenes favoritos de la PC a la tarjeta microSD del teléfono móvil, configure la tarjeta microSD como dispositivo de almacenamiento masivo USB. 1.
3 Cómo hacer llamadas Para hacer una llamada telefónica, se puede marcar un número o presionar un número de la lista de contactos, desde la página web o desde un documento que contenga un número de teléfono. Cuando la llamada esté en curso, será posible contestar llamadas entrantes o enviarlas al buzón de correo de voz. También es posible establecer llamadas en conferencia con varios participantes. 3.
Panel de marcación 1 987-654-3 2 Jack 1 3 4 7 8 987654321 GHI PQRS * 2 ABC 3 DEF 5 JKL 6 MNO 8 TUV 9 WXYZ 0+ # 4 7 6 5 1 Presionar para cambiar entre 7HOpIRQR, Registro de llamadas, Contactos, Favoritos and Grupos. 2 Muestra el número ingresado. 3 Presionar para ingresar el número. 4 Presionar para dejar un mensaje en el correo de voz. 5 Presionar para marcar un número. 6 Presionar para borrar uno tras otro los dígitos de un número.
3. Presione para marcar el número de teléfono. 3.1.3 Cómo hacer llamadas desde el Registro 1. Presione > Registro para mostrar el registro de llamadas. Si ya se encuentra dentro de las opciones Contactos o 7HOpIRQR, presione la pestaña Registro de llamadas. 2. Presione hacia la derecha de la entrada del registro para marcar. ƾ Recomendación: Si mantiene presionada la entrada del registro, se abrirá el menú de opciones. 3.2 Cómo contestar y rechazar llamadas 3.2.
3.3 Otras operaciones que se pueden realizar durante una llamada 3.3.1 Cómo hacer llamadas en conferencia Es posible establecer una llamada en conferencia con múltiples usuarios llamantes. Ƶ Nota: Comuníquese con el operador de red para saber si el equipo soporta la función llamada en conferencia y cuántos participantes se pueden agregar. 1. Para iniciar una llamada en conferencia, marque el número de la primera persona que participará de la llamada.
3.3.3 Utilización de los auriculares Por medio del botón central de los auriculares, es posible contestar, rechazar, finalizar o silenciar llamadas. • Para contestar una llamada entrante, presione el botón central. • Para rechazar una llamada entrante o finalizar una llamada en curso, mantenga presionado el botón central. • Para silenciar una llamada en curso, presione el botón central. Presione este botón nuevamente para activar la llamada en curso. 3.
3.6.2 Cómo configurar el modo TTY 1. Presione 2. Seleccione el modo TTY. > Configuración > Configuración de llamada > Modo TTY. • TTY apagado: modo de transmisión de voz y modo de escucha estándares. • TTY total: transmite y recibe caracteres TTY. • TTY HCO: transmite los caracteres TTY pero los recibe a través del auricular. • TTY VCO: recibe caracteres TTY pero los transmite mediante el micrófono. 3.
4 Contactos La aplicación Contactos permite guardar y administrar información, como los números de teléfono y las direcciones de los contactos. Después de guardar la información del contacto en el teléfono móvil, es fácil comunicarse con las personas con las que se desea contactarse. 4.1 Activación de la aplicación Contactos Si el teléfono móvil es nuevo y aún no se han agregado contactos, la aplicación Contactos mostrará un mensaje con sugerencias sobre cómo comenzar a agregar contactos al teléfono móvil.
ƾ Recomendación: En la lista de contactos, también es posible presionar buscar un contacto. 2. para Ingrese el nombre del contacto que desea buscar. A medida que se ingresan los datos, aparecerán los contactos con nombres coincidentes debajo del cuadro de búsqueda. 4.4 Edición de contactos La información de un contacto que se encuentra almacenada se puede modificar en todo momento. 1.
2 Presionar para abrir un menú con etiquetas preconfiguradas, como Celular y Trabajo para un número de teléfono. También se puede presionar Personalizado en el menú para crear una etiqueta propia. 3 Presionar para eliminar la entrada de esa categoría. 4 Presionar para agregar más de una entrada en esa categoría. 5 Presionar para desplegar más cuadros de texto con el fin de ingresar detalles, como segundo nombre y apellido. 4.
3. Ingrese el nombre y la imagen que desea almacenar para el grupo y luego asigne un tono de llamada al grupo. 4. Presione Agregar miembros para agregar miembros a la lista de grupos. 5. Seleccione los contactos que desee agregar al grupo y luego presione Aceptar 6. Cuando haya finalizado, presione Finalizado para guardar la información del grupo. 4.7.2 Cómo editar grupos La información de un grupo que se encuentra almacenada se puede modificar en todo momento. 1.
5 Uso del teclado en pantalla 5.1 Visualización del panel del teclado Para ingresar texto, utilice el teclado en pantalla. Algunas aplicaciones abren automáticamente el teclado. En otras, se debe presionar un campo de texto para acceder al teclado. Para acceder al teclado, se puede realizar cualquiera de las siguientes acciones: • • Mantener presionado MENU para visualizar el teclado en pantalla. Presionar el espacio donde se desea ingresar texto para que aparezca el teclado.
4 Presionar para ingresar un emoticón en el texto. 5 Presionar para borrar el carácter que se encuentra a la izquierda del cursor. Mantener presionado para borrar todos los caracteres que se encuentran a la izquierda del cursor. 5.1.3 Uso del teclado horizontal Si el teclado le resulta incómodo o difícil de usar, coloque el teléfono móvil en posición horizontal. La pantalla mostrará el teclado en sentido horizontal, lo cual permite que se vea un teclado más ancho. 5.
6 Mensajería La aplicación de Mensajería permite el intercambio de mensajes de texto (SMS) y de mensajes multimedia (MMS) con quienes utilizan teléfonos que soportan SMS y MMS. Con la aplicación Correo electrónico se pueden leer y recibir correos electrónicos. 6.1 SMS y MMS Mensajes de texto: Los mensajes de texto pueden contener hasta 150 caracteres (en inglés) o 130 caracteres (en español). Es posible enviar mensajes de texto de cualquier longitud.
2. Ingrese un número de teléfono en el campo Para o presione + para seleccionar un contacto de Contactos. También puede presionar MENU y luego presionar Agregar destinatario para agregar más destinatarios. 3. Presione el cuadro de texto de creación de mensajes para comenzar a ingresar el mensaje. 4. Presione MENU para visualizar el panel de opciones. • Presione Agregar asunto para agregar el asunto del mensaje. Al realizar estos pasos, el teléfono móvil entrará en modo de mensajes multimedia.
comúnmente utilizados. Este tipo de cuentas de correo electrónico se conocen como POP3, Exchange o IMAP. 6.2.1 Cómo agregar cuentas de correo electrónico Cuando se utiliza la aplicación Correo electrónico por primera vez, se debe configurar la cuenta de correo electrónico.
2. En la pantalla Bandeja de entrada, presione MENU y luego presione Redactar en el panel de opciones. 3. En el campo Para, ingrese el nombre o la dirección de correo electrónico. 4. Ingrese el asunto y el texto del correo electrónico. Para enviar un archivo adjunto al mensaje, presione MENU y luego presione Agregar archivo adjunto. 5. Cuando termine, presione Enviar. Si no ha terminado, presione Guardar como borrador o presione mensaje en borradores. para guardar el 6.2.
7 Cómo establecer una conexión 7.1 Activación del servicio de datos 1. Presione 2. Presione Redes inalám. y redes > Redes de celulares. > Configuración. 3. Seleccione la casilla de verificación Servicio de datos para activar la conexión de datos. 7.2 Wi-Fi La función Wi-Fi provee acceso inalámbrico a Internet por banda ancha. Para utilizar Wi-Fi en el teléfono móvil, se debe acceder a un punto de acceso inalámbrico (hotspot).
Abra el menú de opciones del explorador y realice una de las siguientes operaciones. Presione la opción MENU : • Ventana nueva: presione para abrir una ventana nueva. • Marcadores: presione para visualizar los marcadores. • Ventanas: presione para ir a la pantalla de vista previa web. Esta opción permite pasar a otra página web o abrir una nueva página web en la pantalla. • Actualizar: presione para actualizar la página actual. • Reenviar: presione para pasar a la página siguiente.
7.3.5 Personalización de las configuraciones del explorador Personalización del explorador a sus preferencias de navegación. Utilice Navegador para configurar las preferencias de contenidos, privacidad y seguridad. En la pantalla del explorador, presione MENU y luego Más > Configurac.. 7.
7.4.3 Envío de archivos a través de Bluetooth La función Bluetooth permite compartir archivos de imágenes, videos o música con su familia y amigos. Para enviar archivos a través de Bluetooth, realice lo siguiente: > Gestor de archivos para abrir el administrador de archivos. 1. Presione 2. Mantenga presionado el archivo que se desea enviar. El menú activo de opciones aparecerá en pantalla. 3. Presione Compartir y luego presione Bluetooth para seleccionar un dispositivo emparejado. 7.4.
8 Entretenimiento Además de ser un dispositivo de comunicación y un asistente personal, el teléfono móvil también provee una amplia gama de posibilidades de entretenimiento. Se pueden tomar fotografías, grabar clips de audio y video, y descargar y escuchar música. 8.1 Captura de fotografías y grabación de videos La cámara es una combinación de cámara fotográfica y grabadora de video, que se puede utilizar para capturar y compartir imágenes y videos. 8.1.
4 Arrastrar hacia arriba para grabar videos (modo grabadora de video) y hacia abajo para tomar fotografías (modo cámara). 5 Presionar esta opción para tomar una fotografía para o para grabar un video. En la pantalla de captura de imágenes, presionar la tecla MENU para visualizar el panel de captura. 8.1.2 Cómo tomar una fotografía 1. Active la cámara y seleccione el modo cámara. 2. De ser necesario, abra el panel de configuraciones para cambiar las configuraciones de la cámara.
8.1.5 Visualización de videos 1. 2. Después de grabar un video, aparecerá una miniatura del video que acaba de grabar en la esquina superior derecha de la pantalla de Captura. Presione la miniatura para visualizarla. Presione el botón de la pantalla para realizar cualquiera de las siguientes acciones: • Presionar ELIMINAR para eliminar el video. • Presionar COMPARTIR para enviar el video en un mensaje o publicarlo en línea. • Presionar REPRODUCIR para reproducir el video.
Cuando rota el teléfono móvil, la imagen se ajusta a la rotación. 8.2.3 Rotación de una imagen 1. En el modo de visualización de imágenes, presione MENU para visualizar el panel de operaciones. 2. Presione Rotar. 3. Seleccione Rotar hacia la izquierda o Rotar hacia la derecha. La imagen se guardará con la nueva orientación. 8.2.4 Cómo cortar una imagen 1. Cuando visualiza una imagen, presione MENU para visualizar el panel de más operaciones y luego presione Cortar. 2.
8.3.3 Cómo reproducir música 1. Presione una categoría en la pantalla biblioteca de música. 2. Presione el nombre de la canción que desea reproducir. ƾ Recomendación: Mientras escucha música, presione para utilizar otra aplicación. La reproducción no se detendrá. Para regresar a los controles de música, acceda al panel de notificaciones y presione la canción. Pantalla del reproductor de música 3 4 5 1 2 1 Mantener presionado para buscar información.
3. Mantenga presionada la canción y luego presione Agregar a lista de reproducción en el menú de opciones. • Presione Lista de reproducción actual para agregar la canción a la lista de reproducción existente. • Presione Nuevos para crear una lista de reproducción y agregar la canción a dicha lista. 8.3.5 Reproducción de una lista de reproducción 1. Presione la pestaña Listas de rep. en la pantalla de la biblioteca de música. 2. Mantenga presionada la lista de reproducción que desea reproducir. 3.
9 Servicios de Google Cuando encienda el teléfono móvil por primera vez, presione la opción correspondiente a los servicios de Google, como la aplicación Talk, Gmail o Market. El teléfono solicitará que se inicie sesión en la cuenta de Google. Ƶ Nota: Asegúrese de que el teléfono móvil cuente con una conexión de datos activa antes de iniciar sesión en la cuenta de Google. Si ya tiene una cuenta de Google, presione la opción Inicia sesión e ingrese el nombre de usuario y la contraseña. 9.
9.2.2 Cómo pasar de una cuenta a otra 1. En la lista de correos electrónicos, presione MENU y luego presione la opción Cuentas. 2. Presione la cuenta que contiene el correo electrónico que desea leer. 9.2.3 Creación y envío de correos electrónicos 1. En la lista de correos electrónicos, presione MENU y luego presione la opción Redactar. 2. Ingrese la dirección de correo electrónico del destinatario del mensaje en el campo Para.
• Confirmar eliminación: seleccione esta casilla de verificación para que aparezca en pantalla un mensaje de confirmación cada vez que elimine un correo electrónico. • Operaciones por lotes: seleccione esta casilla de verificación para acceder a la función de operaciones por lotes. Dicha función permite almacenar o eliminar múltiples correos electrónicos al mismo tiempo, o aplicar etiquetas a diferentes correos electrónicos simultáneamente.
9.3.4 Cómo iniciar una conversación por chat 1. En la lista de amigos, lleve a cabo una de las siguientes acciones: • Presione el nombre de un amigo de la lista de amigos. • Utilice la tecla de navegación para seleccionar el nombre de un amigo y luego presione Esfera de desplazamiento. 2. Utilice el teclado en pantalla para ingresar texto y chatear con su amigo. 3. Después de ingresar el mensaje, presione la opción Enviar. 9.3.
3. En la sección Mi ubicación, seleccione la casilla de verificación Utilizar redes inalám., la casilla de verificación Utilizar satélites de GPS o ambas. 9.4.2 Cómo acceder a la aplicación Maps Presione sobre > Maps para acceder a la aplicación. 9.4.3 Búsqueda de lugares 1. En el mapa, presione MENU y luego presione la opción Buscar. 2. Ingrese el lugar que desea encontrar en el cuadro de búsqueda y luego presione el ícono Buscar. 3. Los resultados de la búsqueda aparecerán en pantalla.
• En la lista de videos, mantenga presionada la entrada del video correspondiente y luego presione la opción Compartir en el menú de opciones. • Mientras se reproduce el video, presione MENU y luego presione la opción Compartir. 2. Redacte un mensaje si lo desea, ingrese la dirección de correo electrónico del destinatario y envíelo. 9.6 Uso de la aplicación Market Android Market ofrece acceso directo a las aplicaciones y los juegos que se pueden descargar e instalar en el teléfono.
4. Para instalar el elemento, presione Instalar (si el elemento no tiene costo) o Comprar, según la opción disponible. 5. Para verificar el progreso de la descarga, acceda al panel de notificaciones. La mayoría de las aplicaciones se instalan en cuestión de segundos. Para detener la descarga de un elemento, presione Cancelar la descarga 6. Después de que la aplicación se haya descargado e instalado en el teléfono móvil, aparecerá el ícono de descarga del contenido en la barra de notificaciones. 9.6.
10 Sincronización de información Algunas aplicaciones del teléfono móvil permiten acceder a la misma información personal que el usuario puede agregar, ver y editar en su computadora. Cuando el usuario agrega, modifica o borra información en cualquiera de estas aplicaciones desde la Web, la información actualizada también aparece en el teléfono móvil del usuario. Esto es posible a través de la sincronización de datos por aire.
embargo, algunas cuentas no pueden eliminarse, como por ejemplo, la primera cuenta a la que ingresó desde el teléfono móvil. Si intenta eliminar determinadas cuentas, se borrará también toda la información personal relacionada con dichas cuentas. 1. En la pantalla Configuración de cuentas y sincronización, presione la cuenta que desea borrar. 2. Presione Eliminar cuenta. 3. Confirme que desea eliminar la cuenta. 10.
11 Uso de otras aplicaciones 11.1 Utilización del Calendario El Calendario puede utilizarse para crear y administrar eventos, reuniones y citas. Según las configuraciones de sincronización, el calendario del teléfono estará sincronizado con el calendario de la Web. 11.1.1 Activación del Calendario Presione > Calendario para activar la aplicación. ƾ Recomendación: Para acceder al calendario de Google, presione MENU y luego presione Más > Lanzar calendario Google.
3. Presione la fecha y hora del recordatorio y luego presione el período de tiempo previo al evento para la activación del recordatorio. Cuando llegue el momento, recibirá la notificación del evento. 11.1.4 Personalización de las configuraciones del calendario En cualquier vista de calendario, presione MENU . Luego presione Más > Configuración. • Ocultar eventos rechaz.: seleccionar esta opción para ocultar los eventos a los que se haya rechazado la invitación. • Configurar alertas y notific.
• Alarma en modo silencio: seleccionar esta opción para reproducir alarmas sonoras aun cuando el teléfono está en modo silencioso. • Volumen de la alarma: presionar esta opción para acceder a un diálogo en el que se puede configurar el volumen de todas las alarmas. • Duración de recurrencia: presionar esta opción para abrir un diálogo en el cual se puede establecer el intervalo de tiempo que debe transcurrir para que la alarma suene nuevamente. • Comport.
3. Ingrese el nombre de la carpeta nueva en el cuadro de texto. 4. Presione Guardar. 11.4.3 Cómo mover o copiar archivos 1. En la pantalla Gestor de archivos, presione MENU para visualizar el panel de opciones y luego presione Cortar o Copiar. 2. Presione el archivo o la carpeta que desea mover o copiar. Cuando realice la selección, aparecerá una marca de verificación. Para seleccionar todos los archivos, presione MENU para acceder al panel de opciones.
11.5.1 Activación de la Calculadora Presione > Calculadora para activar la aplicación. 11.5.2 Selección de Panel avanzado En la pantalla Calculadora, deslice el dedo hacia la derecha o izquierda para seleccionar Panel avanzado o Panel básico. 11.6 Utilización del Notas El Notas es un procesador de texto simple, que incluye todas las notas en forma lineal. Permite agregar, editar y eliminar notas. 1. Presione > Notas para activar la aplicación. 2.
12 Administración del teléfono móvil Para configurar el teléfono móvil, presione la opción > Configuración. 12.1 Configuración de fecha y hora Por defecto, el teléfono móvil utiliza la fecha, la hora y el huso horario suministrados por la red. Ƶ Nota: Cuando se utiliza en forma automática la hora suministrada por la red, no se puede establecer la fecha, la hora ni el huso horario. En este caso, se puede presionar la opción Configuración > Fecha y hora para configurar sólo los formatos de fecha y hora.
2. Arrastre el deslizador hacia la izquierda para bajar el volumen o hacia la derecha para subirlo. 3. Presione la opción Aceptar para guardar el ajuste realizado. En la pantalla Volumen del timbre, si no se selecciona la opción Utilizar el volumen de las llamadas entrantes para las notificaciones, se pueden configurar Volumen de llamada entrante y Volumen de notificación por separado. 12.3.
Ƶ Nota: El acceso al servicio de roaming puede generar gastos adicionales. Consulte al proveedor de servicios inalámbricos sobre el costo del servicio de roaming de datos. 12.4.3 Desactivación del servicio de datos 1. En la pantalla Configuración, presione la opción Redes inalám. y redes > Redes de celulares. 2. Deseleccione la casilla de verificación Servicio de datos. 12.4.
12.6 Administración de aplicaciones 12.6.1 Cómo ver las aplicaciones instaladas 1. En la pantalla Configuración, presione la opción Aplicaciones > Administrar aplicaciones. 2. Desde la lista de aplicaciones, lleve a cabo una de las siguientes acciones: • Presione MENU y luego presione Ordenar por tamaño. Presione una aplicación para ver los detalles. • Presione MENU y luego presione Filtro. Seleccione las opciones Todos, En ejecución o Descargado del menú de opciones.
elimina las actualizaciones de software del sistema que se hayan descargado ni los archivos de la tarjeta microSD, como archivos de música o fotografías. 1. En la pantalla Configuración, presione la opción Privacidad > Restabl. datos de fábrica. 2. Cuando el teléfono lo indique, presione la opción Restablecer el teléfono y luego presione la opción Borrar todo. Las configuraciones originales de fábrica del teléfono móvil se restablecen. Luego, el dispositivo se reinicia. 12.
7. Presione la opción Acerca del teléfono > Crear número para ver la información de la versión. 12.8.2 Actualización en línea El teléfono móvil cuenta con la función de actualización en línea ya instalada. Cuando hay software nuevo disponible, la información de la versión aparece en pantalla y el teléfono le avisa que puede actualizar. Se puede presionar Configuración > Acerca del teléfono > Actualización en línea para verificar si el software nuevo está disponible. 1.
13 Apéndice 13.1 Advertencias y precauciones Esta sección contiene información importante referida a las instrucciones de operación del dispositivo. Contiene además información que describe cómo utilizar el dispositivo de manera segura. Lea esta información atentamente antes de utilizar el dispositivo. Dispositivos electrónicos Apague el dispositivo cuando su uso esté prohibido. No utilice el dispositivo cuando éste pueda generar riesgo o interferir con otros dispositivos electrónicos.
• • • • • No hable por teléfono al conducir. Utilice los accesorios de manos libres. Si debe realizar o contestar una llamada, primero estacione el vehículo a un lado de la carretera. Las señales de radiofrecuencia podrían afectar los sistemas electrónicos de los automotores. Para mayor información, consulte al fabricante del vehículo. En un automotor, no coloque el dispositivo sobre el airbag ni en el área de apertura de este último.
Batería y cargador • • • • • • • • • • • • • • • • Desenchufe el cargador del tomacorriente y del dispositivo cuando no esté siendo utilizado. La batería puede cargarse y descargarse cientos de veces antes de que finalice su vida útil. Cuando el tiempo de espera y el tiempo de conversación sean más cortos que lo normal, reemplace la batería. Utilice la fuente de alimentación de CA definida en las especificaciones del cargador.
• • • • • • • • cargador con las manos mojadas. De lo contrario, se podría producir un cortocircuito, el dispositivo podría sufrir desperfectos o el usuario podría sufrir una descarga eléctrica. No coloque el dispositivo, la batería, ni el cargador en lugares donde puedan resultar dañados a causa de una colisión. De lo contrario, podrían producirse pérdidas del líquido de la batería, el mal funcionamiento del dispositivo, un recalentamiento, un incendio, o incluso explosiones.
debe a que el dispositivo está diseñado para utilizar la potencia mínima requerida para alcanzar la red. El límite SAR adoptado por los EE. UU. y Canadá es un promedio de 1,6 vatios/kilogramo (W/kg) en un gramo de tejido. El valor SAR más alto indicado por la FCC y la IC para este tipo de dispositivo cuando se lo ha puesto a prueba para su uso sobre el oído es 1,19 W/kg., y de 1,22 W/ kg. cuando se lo utiliza de manera adecuada sobre el cuerpo.
La industria de los teléfonos inalámbricos ha desarrollado un sistema de clasificación de teléfonos inalámbricos que les permita a los usuarios de dispositivos para audición encontrar teléfonos compatibles con los dispositivos utilizados por ellos. No todos los teléfonos han sido objeto de clasificación. Los teléfonos que han sido clasificados cuentan con esta información en la caja o en una etiqueta adherida a ésta. La clasificación no ofrece garantías.