HUAWEI HG530 Home Gateway User Guide
Contents 1 Warnings and Precautions ........................................................ 1 2 Connecting the Cables and Getting Started ........................... 4 2.1 Connecting The Cables.............................................................. 4 2.2 Getting Started ........................................................................... 4 3 Setting the Network-Access Parameters................................. 6 3.
1 Warnings and Precautions To use the device properly and safely, read these warnings and precautions carefully and strictly observe them during operation. Unless otherwise specified, the term "device" refers to the device and its accessories. Basic Requirements During storage, transportation, and operation of the device, keep it dry and prevent it from colliding with other objects. Do not dismantle the device. In case of any fault, contact an authorized service center for assistance or repair.
device immediately, power it off, remove all the cables connected to it, and then contact an authorized service center. During thunderstorms, power off the device, and then remove all the cables connected to it to prevent it from getting damaged due to lightning strikes. Precautions for Using Wireless Devices When using the device, ensure that the antenna of the device is at least 20 cm away from all persons.
Ensure that the power adapter meets the requirements of Clause 2.5 in IEC60950-1/EN60950-1 and it is tested and approved according to national or local standards. Safety of Children Keep the device and its accessories out of the reach of children. Otherwise, they may damage the device and its accessories by mistake, or they may swallow the small components of the device, causing suffocation or other dangerous situations.
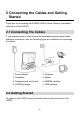
2 Connecting the Cables and Getting Started Thank you for purchasing the HUAWEI HG530 Home Gateway (hereinafter referred to as the HG530). 2.1 Connecting The Cables If your telephone line is used for both the broadband network access and a telephone connection, take the following figure as a reference for connecting the cables. 1. Power adapter 2. Computer 3. Telephone 4. Splitter 5. Telephone jack on the wall a. MODEM interface b. PHONE interface c. LINE interface 2.
After you power on the HG530, the ADSL indicator blinks (for less than three minutes), which indicates that the HG530 is being activated. After the ADSL indicator stops blinking, the Power and ADSL indicators turn solid on, which indicates that the HG530 is working properly.
3 Setting the Network-Access Parameters By configuring the HG530 and your computer, you can choose any of the following methods to surf the Internet: Accessing the Network Through the Embedded PPP Dial-Up Software on the HG530 Accessing the Network Through the PPP Dial-Up Software on Your Computer 3.
2) Select a PVC number, such as 1, from the PVC drop-down combo box. 3) Enter the VPI and VCI that are provided by the network operator in the VPI and VCI text boxes. 4) Select Yes from the Active drop-down combo box and select Routing from the Mode drop-down combo box. 5) Select PPPoE from the Encapsulation drop-down combo box. 6) Enter the user name and password that are provided by the network operator in the Username and Password text boxes, and keep the default settings of other parameters.
2. Install and configure the PPP dial-up software on your computer. The PPP dial-up software is pre-installed on certain computer operating systems. To create a dial-up connection, do as follows (taking the Windows XP operating system as an example): 1) Choose Start > All Programs > Accessories > Communications > Network Connections. 2) Click Create a new connection in Network Tasks to display the New Connection Wizard window, and then click Next. 3) Select Connect to the Internet, and then click Next.
4 Configuring the Wireless Network Connection If a wireless network adapter is installed on your computer, you can connect you computer to the HG530 through a wireless connection. The hardware installation methods and driver installation methods of wireless network adapters provided by different companies vary from each other. For details, see the installation guide provided by the wireless network adapter provider.
1) Right-click My Computer, and then choose Manage from the shortcut menu. 2) In the Computer Management window, choose Computer Management (Local) > Services and Applications > Services. 3) From the services listed in the right pane of the Computer Management window, right-click Wireless Zero Configuration, and then choose Properties from the shortcut menu. 4) In the Wireless Zero Configuration Properties (Local Computer) dialog box, check whether Service status is Started. If not, click the Start button.
5 Configuring the Device 5.1 Changing the Administrator Password Used for Logging In to the Web-Based Configuration Utility For safety reasons or to make the password easy to remember, you can change the administrator password for login after logging in to the Web-based configuration utility. To change the password, do as follows: 1. Log in to the Web-based configuration utility. 2. Choose Tools > System Management in the navigation tree to display the system management page. 3.
5.2 Enabling or Disabling the Wireless Network Function You can quickly enable or disable the wireless network function by pressing the WLAN button on the HG530. To enable the wireless network function, press and hold the WLAN button for over one second, and then release the button. You can disable the wireless network function in the same way. The WLAN indicator shows whether the wireless network function is enabled.
5.4 Changing the IP Address Used for Logging In to the Web-Based Configuration Utility To make the login IP address easy to remember, you can change the IP address after logging in to the Web-based configuration utility. To change the IP address, do as follows: 1. Log in to the Web-based configuration utility. 2. Choose Basic > LAN Setting in the navigation tree to display the LAN settings page. 3. Enter a new IP address as desired in the Main IP Address text box.
After the preceding operations, the current page jumps to the login page. You can log in to the Web-based configuration utility by entering the default user name and password.
6 FAQs Can I use the terminal as a DHCP server? Yes, you can. The terminal incorporates the DHCP server software. How can I quickly restore the default settings of the terminal? To restore the default settings of the terminal, power on the terminal, press and hold the Reset button for a minimum of over six seconds, and then release the Reset button.
1) In IP address, enter 192.168.1.100. Ensure that this IP address is unique and not used by other computers. 2) In Subnet mask, enter 255.255.255.0. 3) In Default gateway, enter 192.168.1.1. 6. Consult your network service provider about the IP address of the domain name server (DNS). In Preferred DNS server and Alternate DNS server, enter the IP address. If you configure the static IP address for the purposes of accessing the Web configuration page of the terminal, you can skip this step. 7.
3) Replace telephone lines. If the ADSL indicator still blinks, contact your network service provider. 3. Check whether the LAN indicator of the terminal is on. If the LAN indicator is off, perform further checks as follows: 1) Ensure that the network adapter of the computer is enabled. 2) Ensure that the network cable between the terminal and the computer is properly connected. 3) Remove and then insert the network cable or replace the network cable.
2) Restore the default settings of the terminal. If the problem persists, contact your network service provider. 7. Check whether the proxy server of the Web browser is correctly configured. Take the Internet Explorer installed on a computer that runs Windows XP as an example. To check whether the proxy server of the Web browser is correctly configured, do as follows: 1) Start the Internet Explorer. 2) Choose Tools > Internet Options. 3) In the Internet Options dialog box, click the Connections tab.
If the driver is improperly installed, install it properly. 5. Check whether the computer can receive the signals of a WLAN. Take a computer that runs Windows XP as an example. To check whether the computer can receive the signals of a WLAN, do as follows: 1) In the Control Panel window, double-click Network Connections to display the Network Connections window. 2) In the Network Connections window, right-click Wireless Network Connection and choose View Available Wireless Network.
If your computer is far from your terminal, the effects of the WLAN are affected. 4. Place your terminal and computer in another direction. 5. Do not use your terminal to access a WLAN during thunderstorms. What can I do if the WLAN of the terminal is not encrypted and the computer cannot access the WLAN? 1. Delete the settings of wireless network connections from your computer. Take a computer that runs Windows XP as an example.
5. If the problem persists, restore the default settings of the terminal. What can I do if Web pages often cannot be displayed during Web page browsing and can be displayed after the terminal is restarted? 1. Ensure that the terminal and other devices such as telephones or fax machines are connected to the telephone line through a splitter. For details about how to install a splitter, see the related description in the manual. 2. Ensure that telephone lines are properly connected.
7 Appendix 7.1 Indicators Indicator Status Description Power On The HG530 is powered on. Off The HG530 is powered off. ADSL Blinking The HG530 is being activated. On The HG530 is activated. Off The HG530 is powered off. Blinking Internet On Off WLAN Blinking On Off The HG530 works in routing mode. The WAN connection is set up. Data is being transmitted. The HG530 works in routing mode. The WAN connection is set up. No data is being transmitted.
Indicator Status Description LAN1 LAN4 Blinking Data is being transmitted through the Ethernet interface. On The Ethernet connection is set up. Off The Ethernet connection is not set up. 7.2 Interfaces and Buttons 1 2 3 4 5 6 7 8 9 Number Interface or Button Description 1 WLAN It is used to enable or disable wireless network function quickly. 2 ON/OFF It is the power switch and is used to power on or power off the HG530. 3 Power It is used to connect the power adapter.
Number Interface or Button Description 4 Reset You can press and hold the Reset button for over six seconds to restore the default settings of the HG530. NOTE After you restore the default settings, your customized data is lost. Therefore, use this function with caution. 5-8 LAN1 LAN4 It is used to connect to the Ethernet interface on the computer. 9 ADSL It is used to connect to the MODEM interface on the splitter. 7.3 Default Settings Parameter Setting Subnet mask of the LAN interface 192.
Item Specification Relative humidity for operation 5% to 95%, non-condensing Dimensions (L × W × H) 156.4 mm × 52 mm × 124.3 mm Weight About 245 g Standards ADSL standards DSL transmission rates ADSL2 standards ADSL2+ standard G.992.5 (G.dmt.bitplus) Annex A WLAN standards 802.11b, 802.11g and 802.11n (2.4 GHz) G.dmt T1.413 G.992.5 (ADSL2+) Wireless transmission rates G.992.1 (G.dmt) Annex A G.994.1 (G.hs) ANSI T1.413 Issue 2 G.992.3 (G.dmt.bis) Annex A G.992.3 (G.
Copyright © Huawei Technologies Co., Ltd. 2011. All rights reserved. No part of this document may be reproduced or transmitted in any form or by any means without prior written consent of Huawei Technologies Co., Ltd. The product described in this manual may include copyrighted software of Huawei Technologies Co., Ltd and possible licensors.
TO THE MAXIMUM EXTENT PERMITTED BY APPLICABLE LAW, IN NO CASE SHALL HUAWEI TECHNOLOGIES CO., LTD BE LIABLE FOR ANY SPECIAL, INCIDENTAL, INDIRECT, OR CONSEQUENTIAL DAMAGES, OR LOST PROFITS, BUSINESS, REVENUE, DATA, GOODWILL OR ANTICIPATED SAVINGS.