Contents 1 Please Read Before Proceeding.........................................1 1.1 Personal Information and Data Security ...................................... 1 1.2 Safety Precautions....................................................................... 2 1.3 Legal Notice................................................................................. 3 2 Getting to Know Your Mobile Phone .................................6 2.1 2.2 2.3 2.4 2.5 2.6 2.7 Mobile Phone Overview...........................
5.1 Displaying the Keyboard Panel.................................................. 22 5.2 Customising Keyboard Settings................................................. 24 6 Messaging ..........................................................................24 6.1 SMS and MMS........................................................................... 24 6.2 Email.......................................................................................... 26 7 Getting Connected................................
11.2 Using the Clock........................................................................ 49 11.3 Using the Calculator ................................................................ 50 11.4 Using the Notepad ................................................................... 50 12 Managing Your Mobile Phone ........................................51 12.1 12.2 12.3 12.4 12.5 12.6 12.7 12.8 Setting the Date and Time ....................................................... 51 Setting the Display.........
1 Please Read Before Proceeding 1.1 Personal Information and Data Security The use of some functions or third-party applications on your device could result in your personal information and data being lost or becoming accessible to others. Several measures are recommended to help you protect personal and confidential information. • Place your device in a safe area to prevent it from unauthorised use. • Set your device screen to lock and create a password or unlock pattern to open it.
• If you have concerns about the security of your personal information and data, please contact mobile@huawei.com. 1.2 Safety Precautions Please read the safety precautions carefully to ensure the correct use of your mobile phone. Do not crash, throw, or puncture your mobile phone. Avoid dropping, squeezing and bending your mobile phone. Do not use your mobile phone in a moist environment, such as the bathroom. Prevent your mobile phone from being soaked or washed in liquid.
Do not place your mobile phone or its accessories in containers with a strong electromagnetic field. Do not place magnetic storage media near your mobile phone. Radiation from the phone may erase the information stored on them. Do not put your mobile phone in a high-temperature place or use it in a place with flammable gas such as a gas station. Keep your mobile phone and its accessories away from children. Do not allow children to use your mobile phone without guidance.
Trademarks and Permissions , , and are trademarks or registered trademarks of Huawei Technologies Co., Ltd. Other trademarks, product, service and company names mentioned are the property of their respective owners. Notice Some features of the product and its accessories described herein rely on the software installed, capacities and settings of local network, and therefore may not be activated or may be limited by local network operators or network service providers.
This product uses the open-sourced Android operating system. Huawei Technologies Co., Ltd. has made necessary changes to the system. Therefore, this product may not support all the functions that are supported by the standard Android operating system or may be incompatible with third-party software. Huawei Technologies Co., Ltd. shall not be liable for any of such situation. DISCLAIMER OF WARRANTIES THE CONTENTS OF THIS MANUAL ARE PROVIDED “AS IS”.
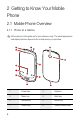
2 Getting to Know Your Mobile Phone 2.1 Mobile Phone Overview 2.1.1 Phone at a Glance All the pictures in this guide are for your reference only. The actual appearance and display features depend on the mobile phone you purchase.
9 Wrist strap hole 10 Headset jack 11 Camera 12 Speaker 13 Charging/Data interface 2.1.2 Key Functions at Your Fingertips • Press to power on your mobile phone. • Press and hold to open the Phone options menu. • Press to lock the screen when your mobile phone is active. • Press to return to the previous screen. • Press to exit any application you are running. • Press to hide the keyboard. Press to open the menu on an active screen.
2.2 Setting Up Your Mobile Phone 2.2.
2.2.2 Charging the Battery Before charging the battery, ensure that it has been properly inserted into your phone. 1. Connect the USB cable that came with your mobile phone to the charger. 2. Connect the USB cable to your mobile phone. Then, plug in the connector of the charger to an electrical outlet. The phone begins charging. If your mobile phone is charged when it is powered on, the battery icon on the Notification bar shows the charging status.
• When the battery is low on power, the phone plays an alert and displays a prompt. When battery power is almost exhausted, your phone will power off automatically. 2.2.4 Battery Saving Tips The longevity of battery power depends on the network that you connect to, and how you use your mobile phone. Try the following to conserve battery power: • When you do not need 3G services, set your phone to connect to a 2G network. • When your mobile phone is not in use, switch off the screen.
2.3.2 Set Up Wizard The first time you power on your mobile phone, the phone displays a setup wizard to help you set up the phone. The setup wizard helps you: • Learn about your mobile phone • Make some initial decisions about how you want to use your mobile phone 2.3.3 Powering Off Your Mobile Phone 1. Press and hold to open the Phone options menu. 2. Touch Power off. 3. Touch OK. 2.4 Using the Touchscreen 2.4.
2.5 Locking and Unlocking the Screen 2.5.1 Locking the Screen • When your phone is on, press to lock the screen. When the screen is locked, you can still receive messages and calls. • If your phone is idle for a while, the screen will lock automatically. 2.5.2 Unlocking the Screen 1. Press or to wake up the screen. 2. Drag the lock icon from left to right to unlock the screen. If you have set up a screen unlock pattern, you will be prompted to draw the pattern on the screen to unlock it.
2.6 Home Screen 10:23 Notifications bar: Displays the reminders and status icons of your phone. Flick down to open the notifications panel. Display area: Shows the operation and display areas of your phone. Touch to open the Contacts application. Touch to open the Dialer application. Touch to open the Messaging application. Touch to view all your applications. 2.6.
3G connected 3G in use HSDPA connected HSDPA in use 2.6.2 Notifications Panel Your mobile phone will notify you when you receive a new message or there is an upcoming event. The notifications panel also informs you of alarms and settings, for example, you will be notified when Call forwarding is activated. Open the notifications panel to see your network operator or to view a message, reminder, or event notification. Opening the Notifications Panel 1.
2.6.4 Customising the Home Screen Adding a New Screen Item 1. Touch and hold a blank area on the Home screen until the Add to Homescreen menu is displayed. 2. Select an item to add it to the Home screen. Moving a Screen Item 1. Touch and hold an item on the Home screen until the item expands in size and the mobile phone vibrates. 2. Without lifting your finger, drag the item to the desired position on the screen, and then release it. Removing a Screen Item 1.
1. Connect your mobile phone to your PC with the USB cable. Your PC will detect the microSD card as a removable disk. 2. Open the notification bar, and then touch USB connected. 3. Touch Turn on USB storage in the dialog box that opens to confirm that you want to transfer files. You can now transfer files from your PC to your mobile phone’s microSD card. When your microSD card acts as USB mass storage, your mobile phone will not use this memory space.
3.1.1 Making a Call with the Phone Application 1. Touch > Dialer to display the dialer. If you are already working with Contacts or Call log, touch the Dialer tab. 2. Touch the appropriate numeric keys to enter the phone number. 3. Touch to initiate the call. During a call, touch Dialpad to enter other numbers on the dialpad. 3.1.2 Making a Call from Contacts 1. Touch > Contacts to display the contact list. If you are already working with Dialer or Call log, touch the Contacts tab. 2.
3.2.2 Ending a Call During a call, touch End to hang up. 3.2.3 Rejecting an Incoming Call Drag the 18 to the left to reject the call.
3.3 Other Operations During a Call 3.3.1 Making a Conference Call If you receive a new call while you are already on a call, you can connect the second call to the call you are on. This feature is known as conference calling. You can also set up a conference call with multiple callers. Contact your network operator to learn if conference calls are supported and, if yes, how many can participate. 1. To initiate a conference call, dial the number of the first participant.
2. Touch and hold the entry you want to add. 3. Touch Add to contacts in the options menu. 4. Touch Create new contact or update an existing contact. 3.5 Using Airplane Mode Some locations may require you to turn off your phone’s wireless connections. Rather than powering off your phone, you can place it in Airplane mode. 1. Press and hold . 2. Touch Airplane mode in the options menu.
4.3 Adding a Contact 1. In the contact list, touch > Create contact. 2. If you have more than one account with contacts, touch the account to which you want to add the contact. 3. Enter the contact's name, and then add detailed information such as phone number or address. 4. When you are finished, touch Done to save the contact information. 4.3.1 Adding a Contact to Your Favorites • Touch and hold the contact you want to add to Favorites. Then touch Add to Favorites.
4.6 Communicating with Your Contacts From the Contacts or Favorites tab, you can quickly call or send a text (SMS) or multimedia message (MMS) to a contact’s default phone number. You can also open details to view a list of all the ways you can communicate with that contact. This section describes how to communicate with a contact when you view your contacts list. 4.6.1 Connecting Through Quick Contact for Android 1.
Touch to hide the keyboard. Touch and hold the space where you usually write your text to open the options menu. 5.1.1 Choosing an Input Method 1. Touch and hold the space where you enter your text until the Edit text menu is displayed. 2. Touch Input method. 3. Select the input method. The keyboard panel will be displayed automatically. 5.1.2 Using the Android Keyboard q w e r t y u i a s d f g h j o p k l z x c v b n m ?123 . DEL Next Touch to delete a character to the left of the cursor.
5.1.3 Using the Landscape Keyboard If you find the keyboard inconvenient or difficult to use, turn your mobile phone sideways. The screen will display the keyboard in landscape orientation, providing you with a wider keyboard layout. 5.2 Customising Keyboard Settings 1. Touch > Settings > Language & keyboard. 2. Select an input method to customise the keyboard settings.
6.1.3 Creating and Sending a Multimedia Message You can use multimedia messages to make everyday communications very special. You can record a message and send it as an audio file, sing 'Happy Birthday' and send it to friend, or send a slideshow of photographs of a special event. The possibilities are endless. 1. Touch > Messaging > New message. 2. Enter a phone number in the To field. 3. Touch the composition text box to start entering your message. If you want to enter a smiley face, touch 4.
2. Touch the text box to compose your message, and then touch Send. 6.1.6 Customising the Message Settings In the message list, touch settings. , and then touch Settings to customise the message 6.2 Email Your mobile phone also puts email at your fingertips. With your phone’s pop/imap application, you can use your email account with Yahoo!, AOL, or other popular email services on your phone. 6.2.
When adding an additional email account, you have the option to use the new account to send all outgoing messages. 6.2.2 Viewing an Email Message 1. On the accounts screen, touch the email account you want to use. 2. Access a folder, and then touch the message that you want to view. 6.2.3 Creating and Sending an Email Message 1. On the accounts screen, touch the email account you want to use. 2. On the Inbox screen, touch , and then touch Compose in the options panel. 3.
Your account’s incoming and outgoing settings depend on the kind of email service you are using. You can enter the necessary details manually, although you may need to contact your email service provider to obtain the correct information for the account. 1. Touch > pop/imap. 2. On the accounts screen, touch and hold the email account you want to change. 3. Touch Account settings. 4. Change General settings, Notification settings, or Server settings. 7 Getting Connected 7.
7.2 Wi-Fi Wi-Fi gives you wireless access to broadband Internet access. To use Wi-Fi on your mobile phone, you need to have an access to wireless access points (hotspots). Obstacles that block the Wi-Fi signal will reduce its strength. 7.2.1 Turning On Wi-Fi 1. Touch > Settings. 2. Touch Wireless & networks, and then select the Wi-Fi check box to turn on Wi-Fi. 7.2.2 Connecting to a Wireless Network 1. After turning on Wi-Fi, touch > Settings. 2. Touch Wireless & networks > Wi-Fi settings.
7.3.1 Sharing Your Phone’s Data Connection via USB To use USB tethering in different operating systems, you may need to prepare your computer to establish a network connection via USB. You can not share your mobile phone’s data connection and SD card via USB at the same time. 1. Touch > Settings. 2. Touch Wireless & networks > Tethering & portable hotspot. 3. Select the USB tethering check box to share your data connection. 7.3.2 Sharing Your Phone’s Data Connection as a Portable Wi-Fi Hotspot 1.
• Windows: Touch to go to the web preview screen. You can switch to another web page or open a new web page on this screen. • Refresh: Touch to refresh the current page. • Forward: Touch to browse the next web page. • More: Touch to open other menus and perform operations such as searching, selecting text, downloading, or setting options. 7.4.2 Opening a Web Page 1. In a browser window, touch the URL field at the top of the screen. 2. Use the keyboard to enter the web page address.
Opening a Bookmark 1. In a browser window, touch , and then touch Bookmarks. On the Bookmarks screen, touch the History tab to view the pages you have visited. Or touch the Most visited tab to view the pages you have visited most frequently. 2. Touch the bookmark of the website you want to open. 7.4.5 Customising the Browser Settings Customise the browser to suit your browsing style. Use Internet to set page content, privacy, and security preferences. In the browser screen, touch More > Settings.
• Object Push Profile (OPP): allows you to transfer files through Bluetooth. • Advanced Audio Distribution Profile (A2DP): allows you to use a stereo Bluetooth headset. • A/V Remote Control Profile (AVRCP): allows you to control what plays through the Bluetooth headset remotely. Before you use Bluetooth, you need to pair your mobile phone with another Bluetooth device as follows: 1. Ensure that the Bluetooth function on your mobile phone is enabled. 2.
8.1 Taking Photos and Recording Videos The camera is a combination of camera and camcorder that you can use to shoot and share pictures and videos. 8.1.1 Opening Your Camera • Touch > Camera to open the camera. The camera opens in landscape mode, ready to take a picture or record a video. • Touch to close the camera. Capture Screen Thumbnail of last 3 photo. Touch to preview the photos or videos. Drag up to record videos, drag down to take photos. Touch to take a 5 photo.
8.1.3 Viewing Your Photos 1. After taking a photo, a thumbnail of the photo you have just taken is shown in the upper right corner of the capture screen. Touch the thumbnail to view it. 2. Touch the onscreen button to do any of the following: • Touch Share to send the photo in a message or post it online. • Touch Delete to delete the photo. • Touch Set as to set a picture as contact icon or wallpaper. 8.1.4 Recording a Video 1. Open the camera, and then switch to camcorder mode. 2.
• Touch Capture video to open the camera and switch to the video capture mode. • Touch Settings to go to the gallery settings screen. There, you can set the size of a picture, arrange pictures, play a slideshow, and specify whether to prompt for confirmation when you delete a picture. 8.2.2 Viewing a Picture 1. In the Gallery, touch the folder that contains the pictures you want to view. 2. Touch the picture to view it in full-screen mode. 3. Touch the screen. Then the zoom panel appears.
Once you have done this, the player will search for music on the microSD card. After the search is complete, you will be able to view all available music files in the music library. 8.3.1 Copying Music to the microSD Card 1. Connect the phone to your computer with a USB cable and mount the microSD card. 2. On the PC, navigate to the USB drive and open it. 3. Create a folder in the root directory of the microSD card (for example, Music). 4. Copy the music from your computer to the folder you have created.
8.3.5 Playing a Playlist 1. Touch the Playlists tab on the music library screen. 2. Touch and hold the playlist you want to play. 3. Touch Play to play the playlist. 8.4 Listening to FM Radio FM Radio lets you listen to FM radio stations on your mobile phone. Since FM Radio uses the provided wired stereo headset as the antenna, connect the headset first to the audio jack of your phone before you open the application. 8.4.1 Opening the FM Radio 1. Touch > FM Radio to open the application. 2.
before you sign in to your Google account. If you already have a Google account, touch Sign in and enter your username and password. 9.1 Creating a Google Account If you do not have a Google account, you can create one: 1. After reading the setup information, touch Next. 2. Touch Create. 3. Enter a first name, last name, and user name for your Google account, and then touch Next. The mobile phone will connect to the Google server to check whether the username is available.
9.2.2 Switching Between Accounts 1. In the mail list, touch , and then touch Accounts. 2. Touch the account that contains the email you want to read. 9.2.3 Creating and Sending an Email 1. In the mail list, touch , and then touch Compose. 2. Enter the message recipient’s email address in the To field. If you are sending the email to several recipients, separate the email addresses with commas. You can add as many message recipients as you want.
9.2.6 Customising Your Gmail Settings In the mail list, touch Gmail. , and then touch More > Settings to customising your 9.3 Using Talk Talk is Google’s instant messaging service. You can use it to communicate in real time with other people using Talk on a phone or on the web. 9.3.1 Opening Talk Touch > Talk to open the application. Your Talk account is based on the Google account you set up with your mobile phone. 9.3.2 Adding a Friend 1. In the friends list, touch , and then touch Add friend. 2.
9.3.5 Setting Notifications for New Instant Messages Whenever you receive an instant message, your mobile phone can play a sound, vibrate, or display an icon. To set up one of these handy notifications, start in the friends list, and then touch following: . Then touch Settings. Now choose from one of the IM notifications Select the check box to receive a notification on the notification bar when you receive an instant message. Select ringtone Touch to choose the ringtone used for a new instant message.
9.4.2 Opening Maps Touch > Maps to open the application. 9.4.3 Searching for Places of Interest 1. On the map, touch , and then touch Search. 2. Enter the place you want to search for in the search box, and then touch the Search icon. 3. Your search results will then be displayed. 9.4.4 Getting Directions 1. While viewing a map, touch , and then touch Directions. 2. Enter the starting point in the first text box, and then enter your destination in the second text box. 3.
9.5.3 Sharing a Video On the YouTube screen, while viewing a list of videos, touch a video, and then touch Share on the options menu. 9.6 Using Market Android Market provides direct access to applications and games which you can download and install on your phone. 9.6.1 Opening Market 1. Touch > Market. 2. When you open Market for the first time, the Android Market Terms of Service window will appear. Touch Accept to continue. 9.6.
4. To install the item, touch FREE (if the item is free) or Buy, whichever is displayed. 5. To check the progress of a download, open the notification panel. Most applications are installed within seconds. To stop an item from downloading, touch Cancel. 6. After the application has been downloaded and installed on your mobile phone, the content download icon appears in the notification bar. 9.6.4 Uninstalling an Application 1. On the Market screen, touch My apps. 2.
10.1.1 Adding an Account When you add an account, Contacts compares contacts from the newly synchronised account with contacts from your existing mobile phone accounts and attempts to merge duplicates into a single entry in Contacts. While it is presented as a single contact entry, the contact data itself is not merged. 1. Touch > Settings > Accounts & sync. The screen displays your current synchronisation settings and a list of your current accounts.
10.2 Customising Your Account Synchronisation You can configure background data use and synchronisation options for all the applications on your phone. You can also configure what kind of data you synchronise for each account. For some accounts, synchronising is two-directional; changes that you make to the information on your mobile phone are made to the copy of that information on the web. Some accounts support only one-way synchronise; the information on your mobile phone is read-only. 10.2.
11 Using Other Applications 11.1 Using the Calendar Use Calendar to create and manage events, meetings, and appointments. Depending on your synchronisation settings, the calendar on your phone can be synchronised with the internet-based calendar you use. 11.1.1 Opening the Calendar Touch > Calendar to open the application. To access Google calendar, touch , and then touch More > Calendars. 11.1.2 Creating an Event 1. On any calendar view, touch details screen. .
11.1.3 Setting an Event Reminder 1. On any calendar view, touch an event to view its details or an event summary. 2. Touch the Add reminder button to add a reminder. Or touch the reminder’s “-” button to delete an existing reminder. 3. Touch the reminder time, and then touch the length of time before the event when you want to be reminded. When the time comes, you will receive a notification about the event. 11.1.4 Customising the Calendar Settings On any calendar view, touch . Then touch More > Settings.
Adding an Alarm 1. On the alarm list screen, touch Add alarm. 2. Set the alarm, and then touch Done. Setting an Alarm 1. On the alarm list screen, touch one of the alarms on the screen. 2. Touch Time to set the time of the alarm. 3. Touch Repeat to set the days when you want the alarm to sound. 4. Touch Ringtone to select a ringtone for the alarm. 5. Select the Vibrate check box to have the phone vibrate, in addition to playing the ringtone. 6. Touch Label to enter a name for the alarm. 7. Touch Done.
2. Touch , and then touch Add note to create a note. 3. Touch to save the note. 12 Managing Your Mobile Phone To configure your mobile phone, touch > Settings. 12.1 Setting the Date and Time By default, your mobile phone automatically uses the date, time zone, and time provided by the network. When your mobile phone is using date and time settings provided automatically by the network, you cannot manually set the date, time, and time zone. 1. On the Settings screen, touch Date & time. 2.
12.2.2 Adjusting the Time Before the Screen Turns Off If your mobile phone is idle for several minutes, it will turn off the screen to save battery power. To set a longer or shorter idle time, do the following: 1. On the Settings screen, touch Display > Screen timeout. 2. Select the duration you want the screen to be illuminated. 12.3 Setting Ring Tones 12.3.1 Turning On Silent Mode 1. On the Settings screen, touch Sound. 2.
12.4 Setting Phone Services 12.4.1 Customising Call Settings You mobile phone service provider offers different services such as call forwarding, call waiting, fixed dialing numbers, and voicemail. You can customise many of these services if they are part of your calling plan. On the Settings screen, touch Call settings to customise your call functions. 12.4.2 Turning on Data Roaming 1. On the Settings screen, touch Wireless & networks > Mobile networks. 2. Select the Data roaming check box.
12.5.2 Adjusting the Speech Rate 1. On the Settings screen, touch Voice input & output > Text-to-speech settings > Speech rate. 2. Select a speed at which the text is to be spoken. 12.6 Protecting Your Mobile Phone 12.6.1 Turning on Your SIM Card PIN 1. On the Settings screen, touch Location & security > Set up SIM card lock. 2. Select the Lock SIM card check box. 3. Use the keyboard to enter the SIM card PIN, and then touch OK. 4. To change the SIM card PIN at any time, touch Change SIM PIN.
12.7 Managing Applications 12.7.1 Viewing an Installed Application 1. On the Settings screen, touch Applications > Manage applications. 2. In the applications list, do any of the following: • Touch details. , and then touch Sort by size. Then touch an application to view its • Touch an application directly to view its details. 12.7.2 Removing an Installed Application 1. On the Settings screen, touch Applications > Manage applications. 2.
12.8.2 Restoring Factory Data If you reset your phone to the settings that were configured at the factory, all of your personal data stored on the phone, including information about your Google Account, any other accounts, your system and application settings, and any applications you have downloaded will be erased. Resetting the phone does not erase any system software updates you have downloaded or any files on your microSD card, such as music clips or photos. 1.
How do I return to the calling screen? While on a call, if you’re on another screen, you can touch the notification bar, and drag downwards to open the notifications panel. Then touch the current call notification to return to the calling screen. How do I create an application shortcut on the Home screen? Touch and hold an application icon on the main menu screen until the Home screen is displayed. Then drag the icon where you want it to go and release your finger.
to restrictions in areas where blasting operations are in progress. Before using the device, watch out for areas that have potentially explosive atmospheres that are often, but not always, clearly marked. Such locations include areas below the deck on boats, chemical transfer or storage facilities, and areas where the air contains chemicals or particles such as grain, dust, or metal powders.
• When you are on a call, do not touch the antenna. Touching the antenna affects the call quality and results in increase in power consumption. As a result, the talk time and the standby time are reduced. • While using the device, observe the local laws and regulations, and respect others' privacy and legal rights. • Keep the ambient temperature between -10°C and 45°C while the device is being charged. Keep the ambient temperature between -10°C to 55°C for using the device powered by a battery.
• If battery electrolyte leaks out, ensure that the electrolyte does not touch your skin and eyes. When the electrolyte touches your skin or splashes into your eyes, wash your eyes with clean water immediately and consult a doctor. • If there is a case of battery deformation, color change, or abnormal heating while you charge or store the battery, remove the battery immediately and stop using it. Otherwise, it may lead to battery leakage, overheating, explosion, or fire.
• Do not leave your device, battery, and charger in a place with an extreme high or low temperature. Otherwise, they may not function properly and may lead to a fire or an explosion. When the temperature is lower than 0°C, performance of the battery is affected. • Do not place sharp metal objects such as pins near the earpiece. The earpiece may attract these objects and hurt you when you are using the device. • Before you clean or maintain the device, power off the device and disconnect it from the charger.
is because the device is designed to use the minimum power required to reach the network. The SAR limit adopted by USA and Canada is 1.6 watts/kilogram (W/kg) averaged over one gram of tissue. The highest SAR value reported to the FCC and IC for this device type when tested for use at the ear is 1.340 W/kg, and when properly worn on the body is 0.505 W/kg, and when using Wi-Fi hotspot function is 1.210 W/Kg. The SAR limit also adopted by Europe is 2.0 W/kg averaged over 10 grams of tissue.
EU Regulatory Conformance Hereby, Huawei Technologies Co., Ltd. declares that this device is in compliance with the essential requirements and other relevant provisions of Directive 1999/5/EC. For the declaration of conformity, visit the Web site www.huaweidevice.com/ certification. Observe the national local regulations in the location where the device is to be used. This device may be restricted for use in some or all member states of the European Union (EU).