
user manual


Functions Introduction
9
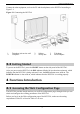
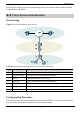
Connect the other equipment, such as the PC and the telephone, to the HG552a1 according to
Figure 3-1.
Figure 3-1 Connecting the HG552a1
1 Telephone jack on the wall 2 Splitter 3 Telephone
4 Computer 5 Set-top box 6 Power adapter
3.2
Getting Started
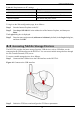
To power on the HG552a1, press the ON/OFF button on the side panel of the HG552a1.
After you power on the HG552a1, the DSL indicator blinks (for less than three minutes), which
indicates that the HG552a1 is being activated. Later, the DSL indicator turns solid on. The
POWER indicator is also solid on, which indicates that the HG552a1 is working properly.
4 Functions Introduction
4.1
Accessing the Web Configuration Page
The HG552a1 provides simple and easy-to-use Web configuration page, through which you can
check and configure the working parameters of the HG552a1.
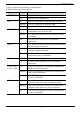
Before you log in to the Web configuration page of the HG552a1, make sure the setting
requirements of the PC as listed in
Table 4-1 are met.