User Guide
Contents About this document Appearance and ports Setting up the monitor Wall Mounting Connecting the monitor to a device such as a computer Setting the OSD menu Safety information Legal Notice i
About this document Please read this document first before you begin using the device. Some components mentioned in the document may not be included with the device and you need to purchase them separately. Some features described in this document are only available when they are used together with other components. The figures and Graphical User Interfaces (GUIs) in this document may be different from the actual ones and all figures are for reference only.
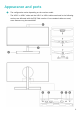
Appearance and ports • The configuration varies depending on the monitor model. • The USB-C to USB-C cable and the USB-C to USB-A cable mentioned in the following sections are delivered with the ZQE-CAA monitor. If non-standard cables are used, some features may be unavailable.
Appearance and ports 1* Microphone Used for video conferences, voice calls, and recordings. • To use the microphone, use a USB-C to USB-C cable or a USB-C to USB-A cable to connect the monitor to a computer. • 2 This component is only available with ZQE-CAA monitors. 5-way directional button • Turns the monitor on or off and serves as an indicator. • Press this button upward. After the brand logo is displayed on the monitor screen, the indicator will blink and the monitor will then turn on.
Appearance and ports 5 HDMI port Connects to a device such as a computer through the HDMI port. 6 Display port (DP) Connects to a device such as a computer through the DP. 7* USB-C port • Charges a device that supports PD 5 V 2 A . • Supports the display by connecting to a device such as a phone or tablet through a USB-C to USB-C cable. This component is only available with ZQE-CAA monitors. 8* Headset jack Connects to a headset. This component is only available with ZQE-CAA monitors.
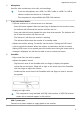
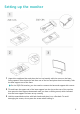
Setting up the monitor 1 Unpack the cardboard box and place the box horizontally with the arrow on the foam facing upward. Take the device and foam out of the box and place them horizontally. Take the base support out of the foam. For the ZQE-CBA monitor, you also need to connect the base and support with screws.
Setting up the monitor Removing the monitor from the base support Place the monitor facing downward on the curved foam in the original package, push the quick release button on the rear of the monitor upward, and lift the base support from the monitor. Before installing the base support, ensure that there are no objects made of iron attached to the support at the rear of the monitor, otherwise a short circuit may occur.
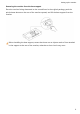
Wall Mounting The SoundBar of the ZQE-CAA monitor cannot be used when the monitor is wallmounted. • An optional wall mount can be used with your device. Consult with your local dealer to purchase the recommended wall mount bracket. Carefully attach the wall mount bracket at the rear of the device. Install the wall mount bracket on a solid wall perpendicular to the floor. If you are attaching the device to other building materials, please contact qualified personnel to install the wall mount.
Wall Mounting A B 8
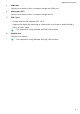
Connecting the monitor to a device such as a computer • The device does not come with certain components and cables and you need to purchase them separately. • Standard cables vary depending on the monitor model. Open the protective cover on the bottom part of the monitor rear to view the ports. You can connect the monitor to a device such as a computer based on the cable type. • You will see a monitor nameplate attached under the ports and information such as S/N on the nameplate.
Connecting the monitor to a device such as a computer USB-C to USB-C cable connection • This connection only applies to ZQE-CAA monitors. • It is recommended that you use the USB-C to USB-C cable delivered with the monitor. If a non-standard cable is used, some features may be unavailable. • The USB-C port of an external device must be a port that supports display, data transmission, and charging. • This connection supports charging connected devices, such as laptops or phones.
Setting the OSD menu After the monitor is connected to a device such as a computer and is turned on, the system will automatically configure and optimize the monitor settings. You can open the OSD menu to change the settings while facing the screen: 1 Press the 5-way directional button upward to open the OSD menu. 2 On the OSD menu screen, operate the 5-way directional button as instructed to change the settings: Press the button forward, backward, leftward, and rightward to switch between options.
Setting the OSD menu Game assist In the Game scenario, you can configure the following auxiliary settings: Dark field control: The gamma curve of the monitor can be adjusted to enhance the dark hue in images so that dark scenes and objects can be easily identified. Refresh rate: The refresh rate will be displayed after this feature is enabled. Crosshairs: Crosshairs will be displayed on the screen after this feature is enabled. Picture mode You can select an appropriate picture mode as required.
Setting the OSD menu OD This feature uses the driver acceleration technology to shorten the response time. The value ranges from 0 to 4. A higher value indicates a faster response. Picture Scaling You can set it to Full screen, Scaled, or Original size. HDMI-1 HDMI-2 Input source Select the corresponding input source based on the cable connecting the monitor and other devices. USB-C DP Volume You can set the speaker volume to a value ranging from 0 to 100.
Setting the OSD menu Shortcuts Press the up, down, left, and right shortcuts when facing the screen, which correspond to pressing the 5-way directional button backward, forward, leftward, and rightward, respectively. When you press the 5-way directional button in any of the four directions, you can quickly access the setting menu of a specified feature to configure settings.
Safety information This section contains important information about the operation of your device. It also contains information about how to use the device safely. Read this information carefully before using your device. Electronic device Do not use your device if using the device is prohibited. Do not use the device if doing so causes danger or interference with other electronic devices. Interference with medical equipment • Follow rules and regulations set forth by hospitals and health care facilities.
Safety information • During thunderstorms, power off your device and remove all cables connected to it to protect against lightning strikes. • Do not use your device during thunderstorms to protect your device against any danger caused by lightning. • Ideal operating temperatures are 0 °C to 35 °C. Ideal storage temperatures are -10 °C to +45 °C. Extreme heat or cold may damage your device or accessories.
Safety information • Unplug the power adapter from electrical outlets and the device when not in use. • If the power cable is damaged (for example, the cord is exposed or broken), or the plug loosens, stop using it at once. Continued use may lead to electric shocks, short circuits, or fire. • Do not touch the power cord with wet hands or pull the power cord to disconnect the power adapter. • Do not touch the device or the power adapter with wet hands.
Safety information Reduction of hazardous substances This device and its electrical accessories comply with local applicable rules on the restriction of the use of certain hazardous substances in electrical and electronic equipment, such as EU REACH regulation, RoHS and Batteries (where included) directive. For declarations of conformity about REACH and RoHS, please visit the website https://consumer.huawei.com/certification.
Legal Notice Copyright © Huawei 2021. All rights reserved. The product described in this manual may include copyrighted software of Huawei and possible licensors. Customers shall not in any manner reproduce, distribute, modify, decompile, disassemble, decrypt, extract, reverse engineer, lease, assign, or sublicense the said software, unless such restrictions are prohibited by applicable laws or such actions are approved by respective copyright holders.
Legal Notice Import and Export Regulations Customers shall comply with all applicable export or import laws and regulations and be responsible to obtain all necessary governmental permits and licenses in order to export, reexport or import the product mentioned in this manual including the software and technical data therein. Privacy Policy To better understand how we protect your personal information, please see the privacy policy at https://consumer.huawei.com/privacy-policy.