
MateView GT User Guide-(01,en-us,zhuque)
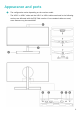
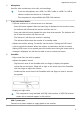
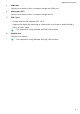
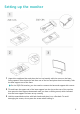
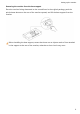
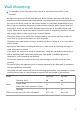
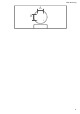
Table Of Contents
- Contents
- About this document
- Appearance and ports
- Setting up the monitor
- Wall Mounting
- •An optional wall mount can be used with your device. Consult with your local dealer to purchase the recommended wall mount bracket. Carefully attach the wall mount bracket at the rear of the device. Install the wall mount bracket on a solid wall perpendicular to the floor. If you are attaching the device to other building materials, please contact qualified personnel to install the wall mount. Detailed instructions will be included with the wall mount. Please use a wall mount bracket where the device is adequately secured to the wall with enough space to allow connecting to external devices.•Prevent the holes on the device from being blocked by any objects and leave a space of more than 10 cm around the device for heat dissipation.•Disconnect the power before moving or installing the device. Failing to do so may result in electric shocks.•Remove the stand before installing the device on a wall mount by following the steps for stand attachment in reverse.•If you install the device on a ceiling or slanted wall, it may fall and result in severe injury. Use an authorized wall mount and contact your local dealer or qualified personnel. Otherwise it is not covered by the warranty.•Do not over tighten the screws as this may cause damage to the device and void your warranty.•To prevent injury, this apparatus must be securely attached to the floor/wall in accordance with the installation instructions.•Use screws and wall mounts that meet the following specifications. Any damages or injuries resulting from misuse or using improper accessories are not covered by the warranty.
- ModelZQE-CAAZQE-CBAScrewDiameter (mm)M4M4Length (mm)When wall mount thickness is 2mm1010Quantity44VESA screw hole specs (A x B) in millimeters100 × 100100 × 100
- Connecting the monitor to a device such as a computer
- Setting the OSD menu
- Safety information
- Legal Notice
- Copyright © Huawei 2021. All rights reserved.
- Trademarks and Permissions
- Notice
- DISCLAIMER
- Import and Export Regulations
- Privacy Policy
- For More Help
- ALL PICTURES AND ILLUSTRATIONS IN THIS GUIDE, INCLUDING BUT NOT LIMITED TO THE DEVICE COLOR, SIZE, AND DISPLAY CONTENT, ARE FOR YOUR REFERENCE ONLY. THE ACTUAL DEVICE MAY VARY. NOTHING IN THIS GUIDE CONSTITUTES A WARRANTY OF ANY KIND, EXPRESS OR IMPLIED.

Wall Mounting
The SoundBar of the ZQE-CAA monitor cannot be used when the monitor is wall-
mounted.
• An optional wall mount can be used with your device. Consult with your local dealer to
purchase the recommended wall mount bracket. Carefully attach the wall mount bracket at
the rear of the device. Install the wall mount bracket on a solid wall perpendicular to the
oor. If you are attaching the device to other building materials, please contact qualied
personnel to install the wall mount. Detailed instructions will be included with the wall
mount. Please use a wall mount bracket where the device is adequately secured to the wall
with enough space to allow connecting to external devices.
• Prevent the holes on the device from being blocked by any objects and leave a space of
more than 10 cm around the device for heat dissipation.
• Disconnect the power before moving or installing the device. Failing to do so may result in
electric shocks.
• Remove the stand before installing the device on a wall mount by following the steps for
stand attachment in reverse.
• If you install the device on a ceiling or slanted wall, it may fall and result in severe injury.
Use an authorized wall mount and contact your local dealer or qualied personnel.
Otherwise it is not covered by the warranty.
• Do not over tighten the screws as this may cause damage to the device and void your
warranty.
• To prevent injury, this apparatus must be securely attached to the oor/wall in accordance
with the installation instructions.
• Use screws and wall mounts that meet the following specications. Any damages or injuries
resulting from misuse or using improper accessories are not covered by the warranty.
Model ZQE-CAA ZQE-CBA
Screw
Diameter (mm) M4 M4
Length (mm)
When wall mount thickness is 2mm
10 10
Quantity 4 4
VESA screw hole specs (A x B) in millimeters 100 × 100 100 × 100
7