
User's Manual


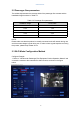
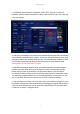
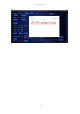

Table Of Contents

7
USER MANUAL
2. Click Modify Device Network Parameters, select Wi-Fi, enter Wi-Fi name and
password, select IP address assignment method, select DHCP mode in this case, and
click save settings.
3. After saving the Settings, the device will be restarted and the client will automatically
disconnect the connection with the device. At this time, the camera will enter the wired
debugging mode under "wireless working mode", and the status light (middle) will flash
once a second (slow flash).At this point, first disconnect the cable network cable,
manual power off and then power it on again.
4. After disconnecting the network cable, the camera enters the automatic wireless
network connection state. During the connection process, the status light (middle)
flashes twice per second (quick flash), the light will constant on once connected
successfully,if failed connecting after 30 seconds, please return to configuration mode.
The status light (middle) flashes once per second (slow flash), at which point you can
plug in and wired device and re-enter the correct Wi-Fi name and password.
5. After successful connection, when the status light (in the middle) is always on, place
the wireless network to be connected between the debugging computer and the device
under the same network, scan the device and find that the device is connected and in
normal use.As shown in the figure below: