
Manual


Assembly & Installation Instructions A152
For New Town Six Light Chandelier 10-3260 Page 1 of 2
Hand-Forged, Vermont-Made Lighting and Accessories
P.O. Box 827, 154 Route 30 South, Castleton, Vermont 05735
21201
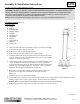
To Install to Ceiling (Figure 1)
Component Parts
A Fixture
B Stud (2)
C Ceiling Bracket
D Canopy Loop (2)
E Crossbar
F Lag Screw (4)
G Hex Nut (2)
H Canopy
I Loop Collar (2)
J Chain (2)
K Fixture Loop
1. Attach one end of the chain to the fixture loop (K). Lace the wire through
every other link of the chain (J) to the end.
2. Remove loop collar (I) from canopy loop (D).
3. Slide canopy (H) and loop collar (I) over canopy loop (D).
4. Fasten the chain to the canopy loop (D) and slip wires through the canopy
loop (D). Make sure to provide enough slack in the wire to ensure weight
of fixture is supported by the chain.
5. Using four lag screws (F) attach crossbar (E) to a structural member in the
ceiling, centering the crossbar over the outlet box. We've supplied lag
screws with your fixture; however, different materials and/or construction
methods may require different fasteners. If in doubt, contact a qualified
electrician. Do not attach crossbar directly to outlet box.
6. Raise fixture to ceiling allowing loop collar (I) and canopy (H) to rest
against chain (J), align studs in crossbar (E) with holes in ceiling
bracket (C).
7. Thread hex nut (G) onto studs (B) and tighten.
8. Using suitable wire connectors (not provided) connect fixture wires to supply (white to white and black to black,
and bare copper to bare copper or green supply). Push wires back into outlet box.
Caution: Make sure wire connectors are twisted on securely, and no bare wire is exposed.
9. Raise canopy (H) to the ceiling and secure with loop collar (I) to canopy loop (D).
(continued)
CAUTION: FAILURE TO INSTALL THIS FIXTURE PROPERLY MAY RESULT IN SERIOUS PERSONAL
INJURY OR DEATH AND PROPERTY DAMAGE. We recommend installation by a licensed electrician.
This product must be installed in accordance with applicable installation code(s), by a person familiar with the
construction and operation of the product and the hazards involved.*
Caution: Do not exceed maximum wattage noted on fixture. Use only recommended bulbs with fixture.
(Figure 1)